注:本文代码基于Flutter SDK 3.13.5
一、Key是什么?
在Flutter中,Key的使用是很常见的,就以Scaffold这个Widget来说,当人们使用它的Drawer功能时,必然会涉及openDrawer与closeDrawer这两个行为,它们的具体方法实现定义在ScaffoldState中,可通过如下API调用:
1
|
Scaffold.of(context).openDrawer(); // or Scaffold.of(context).closeDrawer();
|
不妨点进去看下ScaffoldState中的openDrawer与closeDrawer这两个方法的实现。
 1
 2
 3
 4
 5
 6
 7
 8
 9
10
11
12
13
14
|
final GlobalKey<DrawerControllerState> _drawerKey = GlobalKey<DrawerControllerState>();

void openDrawer() {
  if (_endDrawerKey.currentState != null && _endDrawerOpened.value) {
    _endDrawerKey.currentState!.close();
  }
  _drawerKey.currentState?.open();
}

void closeDrawer() {
 if (hasDrawer && isDrawerOpen) {
   _drawerKey.currentState!.close();
 }
}
|
可以发现,它们均使用了_drawerKey这一个GlobalKey来获取currentState,也就是获取了DrawerControllerState实例,然后再调用该实例的open或close方法。
那么,正如标题所言,Key是什么?还是那句话:遇事不决,先看注释。Key作为参数定义在Widget的构造方法中,默认值为null,也就是使用Widget时可以不传,来看下Widget中关于Key的注释。
 1
 2
 3
 4
 5
 6
 7
 8
 9
10
11
12
13
14
15
16
17
18
19
20
21
22
23
24
25
26
27
28
29
30
31
|
@immutable
abstract class Widget extends DiagnosticableTree {
  /// Initializes [key] for subclasses.
  const Widget({ this.key });

  /// 控制一个widget如何替换树中的另一个widget。
  /// Controls how one widget replaces another widget in the tree.
  ///
  /// 如果两个widgets的 [runtimeType] 和 [key] 属性分别为 [operator==],则新widget通过更新底层element来替换旧widget(即,通过使用新widget调用 [Element.update] )。
  /// 否则,旧element将从树中删除,新的widget将创建出element,并将新element插入到树中。
  /// If the [runtimeType] and [key] properties of the two widgets are
  /// [operator==], respectively, then the new widget replaces the old widget by
  /// updating the underlying element (i.e., by calling [Element.update] with the
  /// new widget). Otherwise, the old element is removed from the tree, the new
  /// widget is inflated into an element, and the new element is inserted into the
  /// tree.
  ///
  /// 此外,使用 [GlobalKey] 作为widget的 [key] 允许element在树中移动(更改父级)而不会丢失状态。
  /// 当找到一个新的widget(其key和type与同一位置的前一个widget不匹配),但在前一帧的树中的其它位置有一个具有相同global key的widget时,该widget的element将移动到新地点。
  /// In addition, using a [GlobalKey] as the widget's [key] allows the element
  /// to be moved around the tree (changing parent) without losing state. When a
  /// new widget is found (its key and type do not match a previous widget in
  /// the same location), but there was a widget with that same global key
  /// elsewhere in the tree in the previous frame, then that widget's element is
  /// moved to the new location.
  ///
  /// 通常,作为另一个widget的唯一child的widget不需要显式key。
  /// Generally, a widget that is the only child of another widget does not need
  /// an explicit key.
  final Key? key;
}
|
再点击进去看下Key本身的一个注释。
 1
 2
 3
 4
 5
 6
 7
 8
 9
10
11
12
13
14
15
16
17
18
|
/// [Key] 是 [Widget]、[Element] 和 [SemanticsNode] 的标识符。
/// A [Key] is an identifier for [Widget]s, [Element]s and [SemanticsNode]s.
///
/// 如果新的widget的key与与该element关联的当前widget的key相同,则该新widget将仅用于更新现有element。
/// A new widget will only be used to update an existing element if its key is
/// the same as the key of the current widget associated with the element.
///
/// {@youtube 560 315 https://www.youtube.com/watch?v=kn0EOS-ZiIc}
///
/// Key在具有相同父级的 [Element] 中必须是唯一的。
/// Keys must be unique amongst the [Element]s with the same parent.
///
/// [Key] 的子类应该是 [LocalKey] 或 [GlobalKey] 的子类。
/// Subclasses of [Key] should either subclass [LocalKey] or [GlobalKey].
@immutable
abstract class Key {

}
|
结合上面Widget中对Key的注释以及Key本身的一个注释,总结下Key的特性:
1、Key用于控制一个Widget如何替换树中的另一个Widget。
2、如果两个Widget的runtimeType和key属性分别为相等,则新Widget通过更新底层Element来替换旧Widget;否则旧Element将从树中删除,新的Widget将创建出Element,并将新Element插入到树中。
3、使用GlobalKey作为Widget的key允许Element在树中移动(更改父级)而不会丢失状态。
4、Key在具有相同父级的Element中必须是唯一的。
5、…
这里给出了Key的部分特性,主要是想让大家对Key有一个初级认知。
二、3个小示例之问题
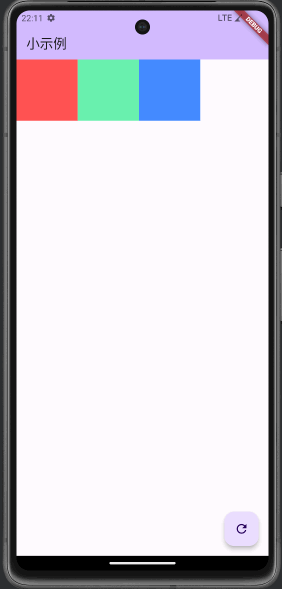
在分析Key的原理之前,先看个“删除中间色块”的小示例。
现有一需求:设计一个通用的色块Widget,然后在屏幕中横向摆放三个不同颜色的色块Widget,当点击FloatingActionButton按钮时会删除中间色块。
2.1、示例1
基于StatelessWidget设计一个通用的色块Widget,并通过构造方法传入ColorValue枚举值参数来控制色块颜色,然后在build方法中进行Color初始化。
 1
 2
 3
 4
 5
 6
 7
 8
 9
10
11
12
13
14
15
16
17
18
19
20
21
22
23
24
25
26
27
28
29
30
31
32
33
34
35
36
37
38
39
40
41
42
43
44
45
46
47
48
49
50
51
52
53
54
55
56
57
58
59
60
61
62
63
64
65
66
67
68
69
70
71
72
73
74
75
76
77
78
79
80
81
82
83
84
85
86
87
88
|
void main() {
  runApp(const MyApp());
}

class MyApp extends StatelessWidget {
  const MyApp({super.key});

  @override
  Widget build(BuildContext context) {
    return MaterialApp(
      title: 'Flutter Demo',
      theme: ThemeData(
        colorScheme: ColorScheme.fromSeed(seedColor: Colors.deepPurple),
        useMaterial3: true,
      ),
      home: const MyPage(title: '小示例'),
    );
  }
}

class MyPage extends StatefulWidget {
  const MyPage({super.key, required this.title});

  final String title;

  @override
  State<MyPage> createState() => _MyPageState();
}

class _MyPageState extends State<MyPage> {
  final List<Widget> _boxes = [
    const StatelessBox(colorValue: ColorValue.redAccent),
    const StatelessBox(colorValue: ColorValue.greenAccent),
    const StatelessBox(colorValue: ColorValue.blueAccent),
  ];

  void _refresh() {
    setState(() {
      _boxes.removeAt(1);
    });
  }

  @override
  Widget build(BuildContext context) {
    return Scaffold(
      appBar: AppBar(
        backgroundColor: Theme.of(context).colorScheme.inversePrimary,
        title: Text(widget.title),
      ),
      body: Row(children: _boxes),
      floatingActionButton: FloatingActionButton(
        onPressed: _refresh,
        tooltip: 'refresh',
        child: const Icon(Icons.refresh),
      ),
    );
  }
}

enum ColorValue { redAccent, greenAccent, blueAccent }

class StatelessBox extends StatelessWidget {
  final ColorValue colorValue;

  const StatelessBox({super.key, required this.colorValue});

  Color _getColor(ColorValue colorValue) {
    switch (colorValue) {
      case ColorValue.redAccent:
        return Colors.redAccent;
      case ColorValue.greenAccent:
        return Colors.greenAccent;
      case ColorValue.blueAccent:
        return Colors.blueAccent;
    }
  }

  @override
  Widget build(BuildContext context) {
    Color color = _getColor(colorValue);
    debugPrint("build: $color");
    return Container(
      width: 100,
      height: 100,
      color: color,
    );
  }
}
|
程序运行起来后,可以看到如下效果。
程序刚运行起来,日志打印如下:
1
2
3
|
I/flutter (15182): build: MaterialAccentColor(primary value: Color(0xffff5252))
I/flutter (15182): build: MaterialAccentColor(primary value: Color(0xff69f0ae))
I/flutter (15182): build: MaterialAccentColor(primary value: Color(0xff448aff))
|
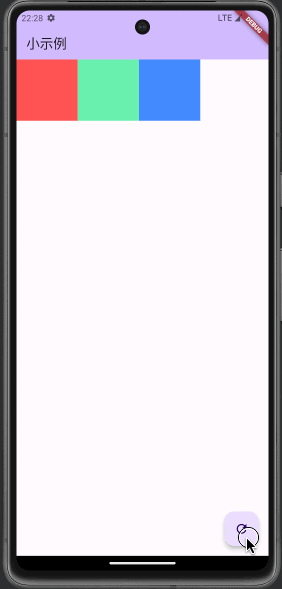
点击FloatingActionButton按钮后,日志打印如下:
1
|
I/flutter (15182): build: MaterialAccentColor(primary value: Color(0xff448aff))
|
总结:初始时色块颜色从左到右的顺序为红、绿、蓝,当点击FloatingActionButton按钮后,色块颜色的顺序变为红、蓝,虽然程序运行效果与预期效果相同,但是还是存在一些疑问(也就是点击FloatingActionButton按钮后):
1、为什么日志打印是蓝色?
2、为什么红色块自身的build方法不会触发?
3、…
2.2、示例2
基于StatefulWidget设计一个通用的色块Widget,并通过构造方法传入ColorValue枚举值参数来控制色块颜色,然后在initState方法中进行Color初始化。
 1
 2
 3
 4
 5
 6
 7
 8
 9
10
11
12
13
14
15
16
17
18
19
20
21
22
23
24
25
26
27
28
29
30
31
32
33
34
35
36
37
38
39
40
41
42
43
44
45
46
47
48
49
50
51
52
53
54
55
56
57
58
59
60
61
62
63
64
65
66
67
68
69
70
71
72
73
74
75
76
77
78
79
80
81
82
|
class MyPage extends StatefulWidget {
  const MyPage({super.key, required this.title});

  final String title;

  @override
  State<MyPage> createState() => _MyPageState();
}

class _MyPageState extends State<MyPage> {

  final List<Widget> _boxes = [
    const StatefulBox(colorValue: ColorValue.redAccent),
    const StatefulBox(colorValue: ColorValue.greenAccent),
    const StatefulBox(colorValue: ColorValue.blueAccent),
  ];

  void _refresh() {
    setState(() {
      _boxes.removeAt(1);
    });
  }

  @override
  Widget build(BuildContext context) {
    return Scaffold(
      appBar: AppBar(
        backgroundColor: Theme.of(context).colorScheme.inversePrimary,
        title: Text(widget.title),
      ),
      body: Row(children: _boxes),
      floatingActionButton: FloatingActionButton(
        onPressed: _refresh,
        tooltip: 'refresh',
        child: const Icon(Icons.refresh),
      ),
    );
  }
}

enum ColorValue { redAccent, greenAccent, blueAccent }

class StatefulBox extends StatefulWidget {
  final ColorValue colorValue;

  const StatefulBox({super.key, required this.colorValue});

  @override
  State<StatefulBox> createState() => _StatefulBoxState();
}

class _StatefulBoxState extends State<StatefulBox> {
  late Color _color;

  @override
  void initState() {
    super.initState();
    debugPrint('initState');
    _color = _getColor(widget.colorValue);
  }

  Color _getColor(ColorValue colorValue) {
    switch (colorValue) {
      case ColorValue.redAccent:
        return Colors.redAccent;
      case ColorValue.greenAccent:
        return Colors.greenAccent;
      case ColorValue.blueAccent:
        return Colors.blueAccent;
    }
  }

  @override
  Widget build(BuildContext context) {
    debugPrint('build: $_color');
    return Container(
      width: 100,
      height: 100,
      color: _color,
    );
  }
}
|
程序运行起来后,可以看到如下效果。
程序刚运行起来,日志打印如下:
1
2
3
4
5
6
|
I/flutter (15657): initState
I/flutter (15657): build: MaterialAccentColor(primary value: Color(0xffff5252))
I/flutter (15657): initState
I/flutter (15657): build: MaterialAccentColor(primary value: Color(0xff69f0ae))
I/flutter (15657): initState
I/flutter (15657): build: MaterialAccentColor(primary value: Color(0xff448aff))
|
点击FloatingActionButton按钮后,日志打印如下:
1
|
I/flutter (15657): build: MaterialAccentColor(primary value: Color(0xff69f0ae))
|
总结:初始时色块颜色从左到右的顺序为红、绿、蓝,当点击FloatingActionButton按钮后,色块颜色的顺序变为红、绿,很明显程序运行效果与预期效果不相同,因此存在一些疑问(也就是点击FloatingActionButton按钮后):
1、为什么删除的是蓝色块?
2、为什么日志打印是绿色?
3、为什么红色块自身的build方法不会触发?
4、…
2.3、示例3
基于StatefulWidget设计一个通用的色块Widget,并通过构造方法传入ColorValue枚举值参数来控制色块颜色,然后在initState方法中进行Color初始化,最后在使用色块Widget时给它传入一个Key。
 1
 2
 3
 4
 5
 6
 7
 8
 9
10
11
12
13
14
15
16
17
18
19
20
21
22
23
24
25
26
27
28
29
30
31
32
33
34
35
36
37
38
39
40
41
42
43
44
45
46
47
48
49
50
51
52
53
54
55
56
57
58
59
60
61
62
63
64
65
66
67
68
69
70
71
72
73
74
75
76
77
78
79
80
81
82
|
class MyPage extends StatefulWidget {
  const MyPage({super.key, required this.title});

  final String title;

  @override
  State<MyPage> createState() => _MyPageState();
}

class _MyPageState extends State<MyPage> {

  final List<Widget> _boxes = [
    const StatefulBox(key: ValueKey(1), colorValue: ColorValue.redAccent),
    const StatefulBox(key: ValueKey(2), colorValue: ColorValue.greenAccent),
    const StatefulBox(key: ValueKey(3), colorValue: ColorValue.blueAccent),
  ];

  void _refresh() {
    setState(() {
      _boxes.removeAt(1);
    });
  }

  @override
  Widget build(BuildContext context) {
    return Scaffold(
      appBar: AppBar(
        backgroundColor: Theme.of(context).colorScheme.inversePrimary,
        title: Text(widget.title),
      ),
      body: Row(children: _boxes),
      floatingActionButton: FloatingActionButton(
        onPressed: _refresh,
        tooltip: 'refresh',
        child: const Icon(Icons.refresh),
      ),
    );
  }
}

enum ColorValue { redAccent, greenAccent, blueAccent }

class StatefulBox extends StatefulWidget {
  final ColorValue colorValue;

  const StatefulBox({super.key, required this.colorValue});

  @override
  State<StatefulBox> createState() => _StatefulBoxState();
}

class _StatefulBoxState extends State<StatefulBox> {
  late Color _color;

  @override
  void initState() {
    super.initState();
    debugPrint('initState');
    _color = _getColor(widget.colorValue);
  }

  Color _getColor(ColorValue colorValue) {
    switch (colorValue) {
      case ColorValue.redAccent:
        return Colors.redAccent;
      case ColorValue.greenAccent:
        return Colors.greenAccent;
      case ColorValue.blueAccent:
        return Colors.blueAccent;
    }
  }

  @override
  Widget build(BuildContext context) {
    debugPrint('build: $_color');
    return Container(
      width: 100,
      height: 100,
      color: _color,
    );
  }
}
|
程序运行起来后,可以看到如下效果。

程序刚运行起来,日志打印如下:
1
2
3
4
5
6
|
I/flutter (15938): initState
I/flutter (15938): build: MaterialAccentColor(primary value: Color(0xffff5252))
I/flutter (15938): initState
I/flutter (15938): build: MaterialAccentColor(primary value: Color(0xff69f0ae))
I/flutter (15938): initState
I/flutter (15938): build: MaterialAccentColor(primary value: Color(0xff448aff))
|
点击FloatingActionButton按钮后,无日志输出。
总结:初始时色块颜色从左到右的顺序为红、绿、蓝,当点击FloatingActionButton按钮后,色块颜色的顺序变为红、蓝,虽然程序运行效果与预期效果相同,但还是存在一些疑问(也就是点击FloatingActionButton按钮后):
1、为什么在使用色块Widget时给它传入一个Key,程序运行效果相比示例2就又变得正常了?
2、为什么点击FloatingActionButton按钮后无日志输出?
3、…
看了上面3个小示例的演示,笔者想问它们的运行结果是在你的预料之中还是预料之外?
OK,不管怎样,接下来分析这3个小示例的执行原理之后谜底就会揭开。
三、3个小示例之执行原理
3.1、分析示例1
当点击FloatingActionButton按钮后,会执行setState方法,关于setState方法的分析可参考解读Flutter源码之setState一文。
此处setState方法会先触发Scaffold的重建,Scaffold的重建也会触发其子Widget的重建,然后子Widget的重建也会触发其子Widget的重建,有点像“核裂变的链式反应”,直到所有子Widget均完成重建。
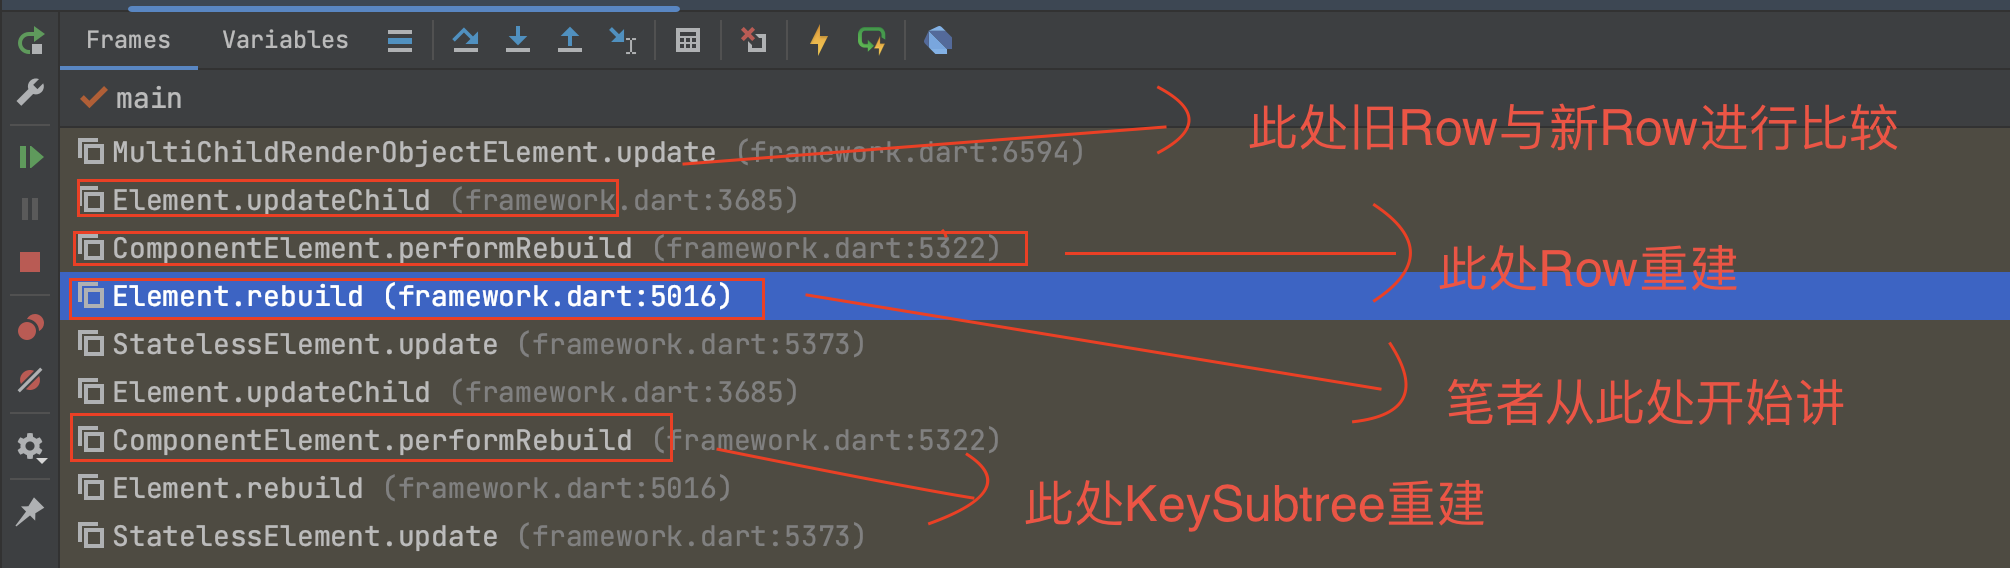
因为从Scaffold的重建一直到Row的重建,中间实在嵌套太多层了,很不方便分析,所以这里只从Row的父组件KeyedSubtree开始讲起。
当KeyedSubtree重建完成之后(即KeyedSubtree的父组件_BodyBuilder的build方法已执行),就会执行Element的rebuild方法,在Element的rebuild方法中,接着执行了Element的performRebuild方法,又因为KeyedSubtree是StatelessWidget的子类,所以执行的是ComponentElement的performRebuild方法。
在ComponentElement的performRebuild方法中,执行了KeyedSubtree的build方法重建了Row,然后执行了Element的updateChild方法。
在Element的updateChild方法中,虽然重建后的Row实例与之前的Row实例不同,但它们的runtimeType是一样的以及key均为null,所以执行了Element的update方法进行Row及其所有子Widget的更新。
又因为Row是MultiChildRenderObjectWidget的子类,所以执行的是MultiChildRenderObjectElement的update方法来进行Row及其所有子Widget的更新,以上描述所涉及的方法调用栈如下。
跟踪下MultiChildRenderObjectElement的update方法的源码,可以发现在update方法中,执行了updateChildren方法。
1
2
3
4
5
6
7
8
9
|
@override
void update(MultiChildRenderObjectWidget newWidget) {
  super.update(newWidget);
  final MultiChildRenderObjectWidget multiChildRenderObjectWidget = widget as MultiChildRenderObjectWidget;
  assert(widget == newWidget);
  assert(!debugChildrenHaveDuplicateKeys(widget, multiChildRenderObjectWidget.children));
  _children = updateChildren(_children, multiChildRenderObjectWidget.children, forgottenChildren: _forgottenChildren);
  _forgottenChildren.clear();
}
|
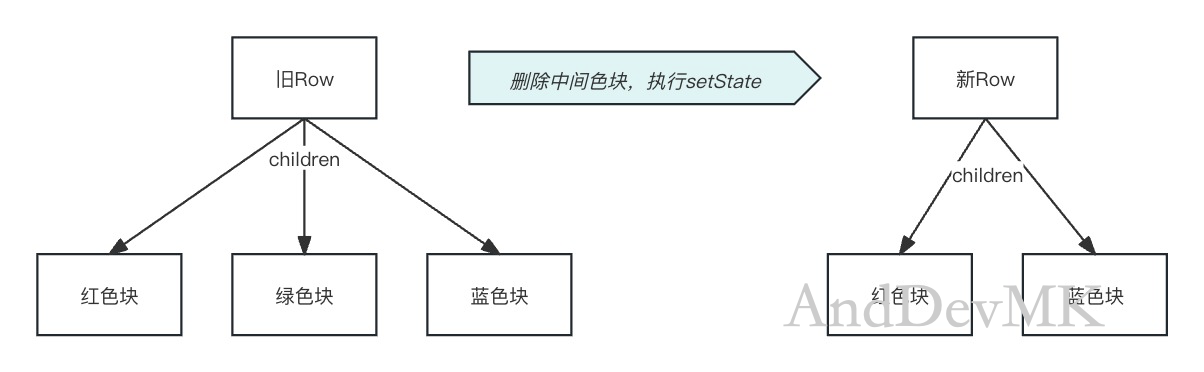
为了方便本文后续的描述,笔者会把重建后的Row叫新Row,而之前的Row就变为旧Row。
OK,现在解释下updateChildren方法的参数:
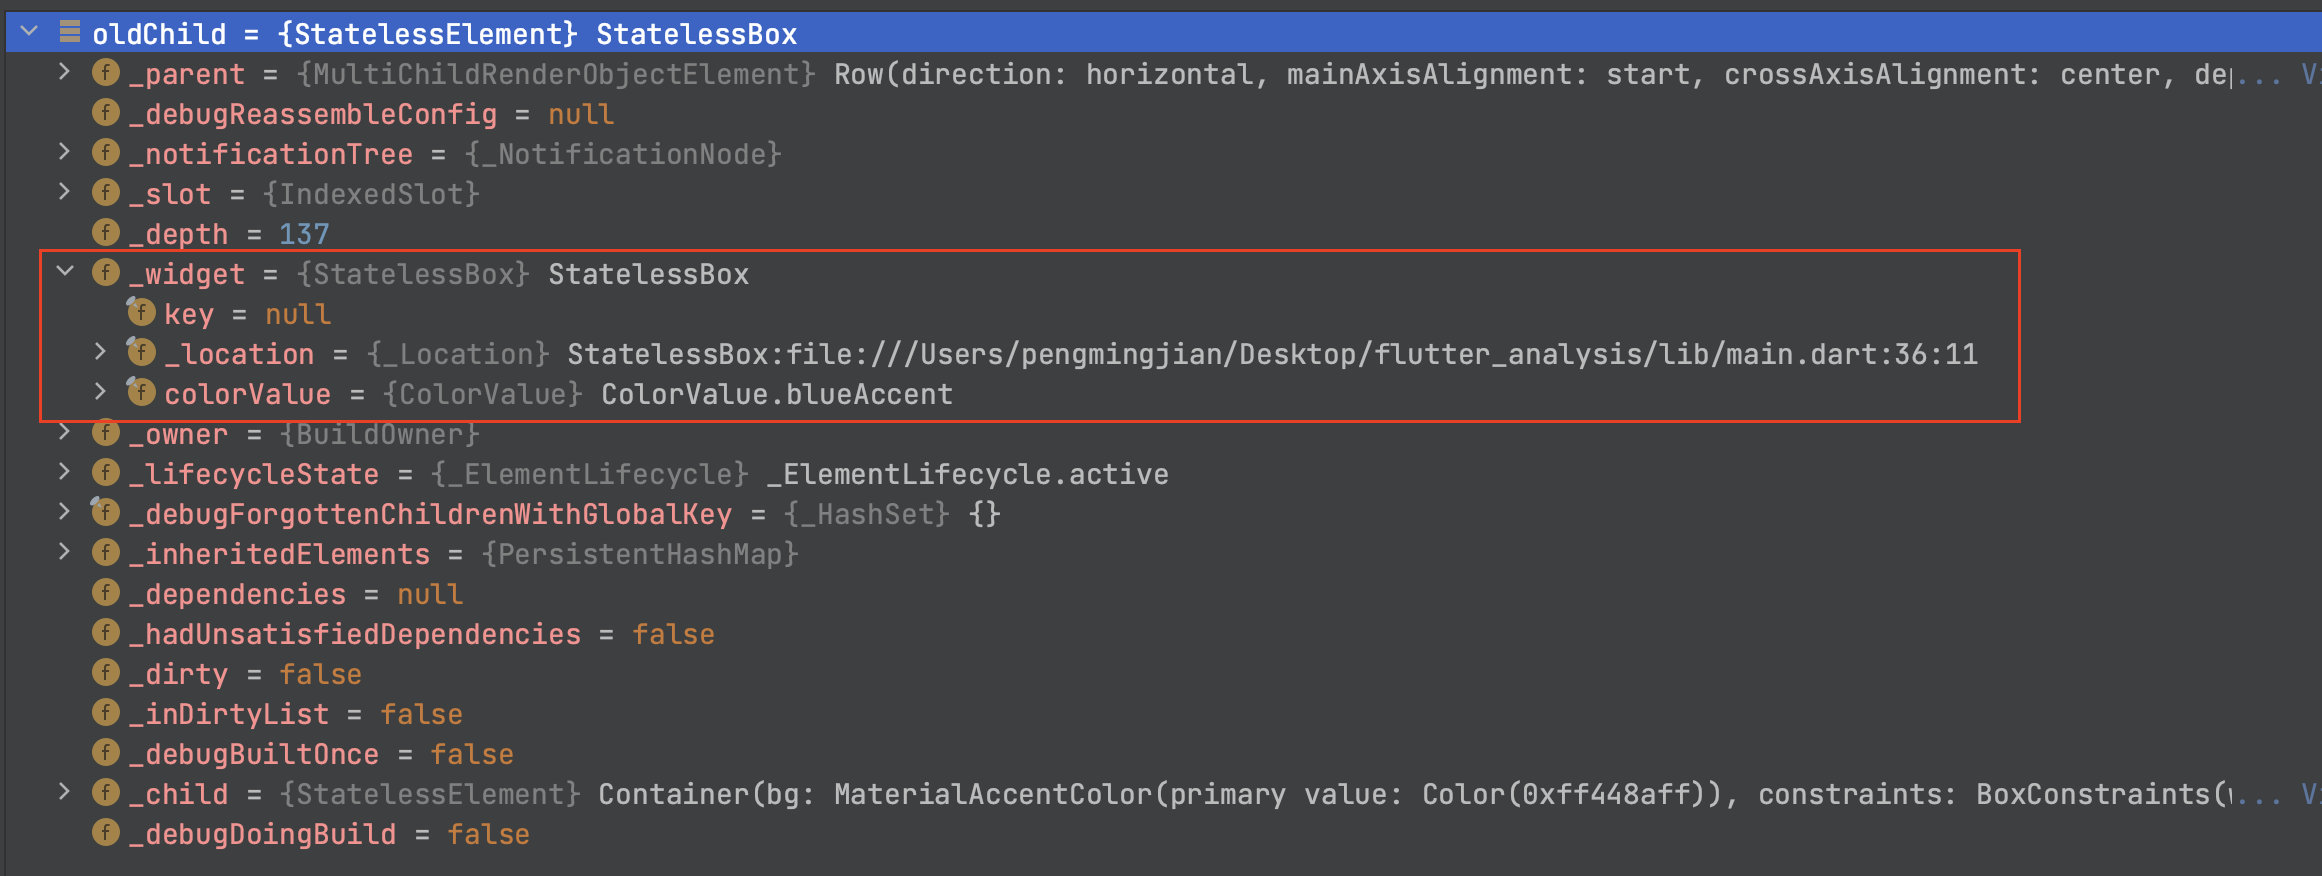
oldChildren:它是一个List<Element>,在本示例中,用来存放旧Row中所有子Widget所关联的Element,此处传入的是_children。
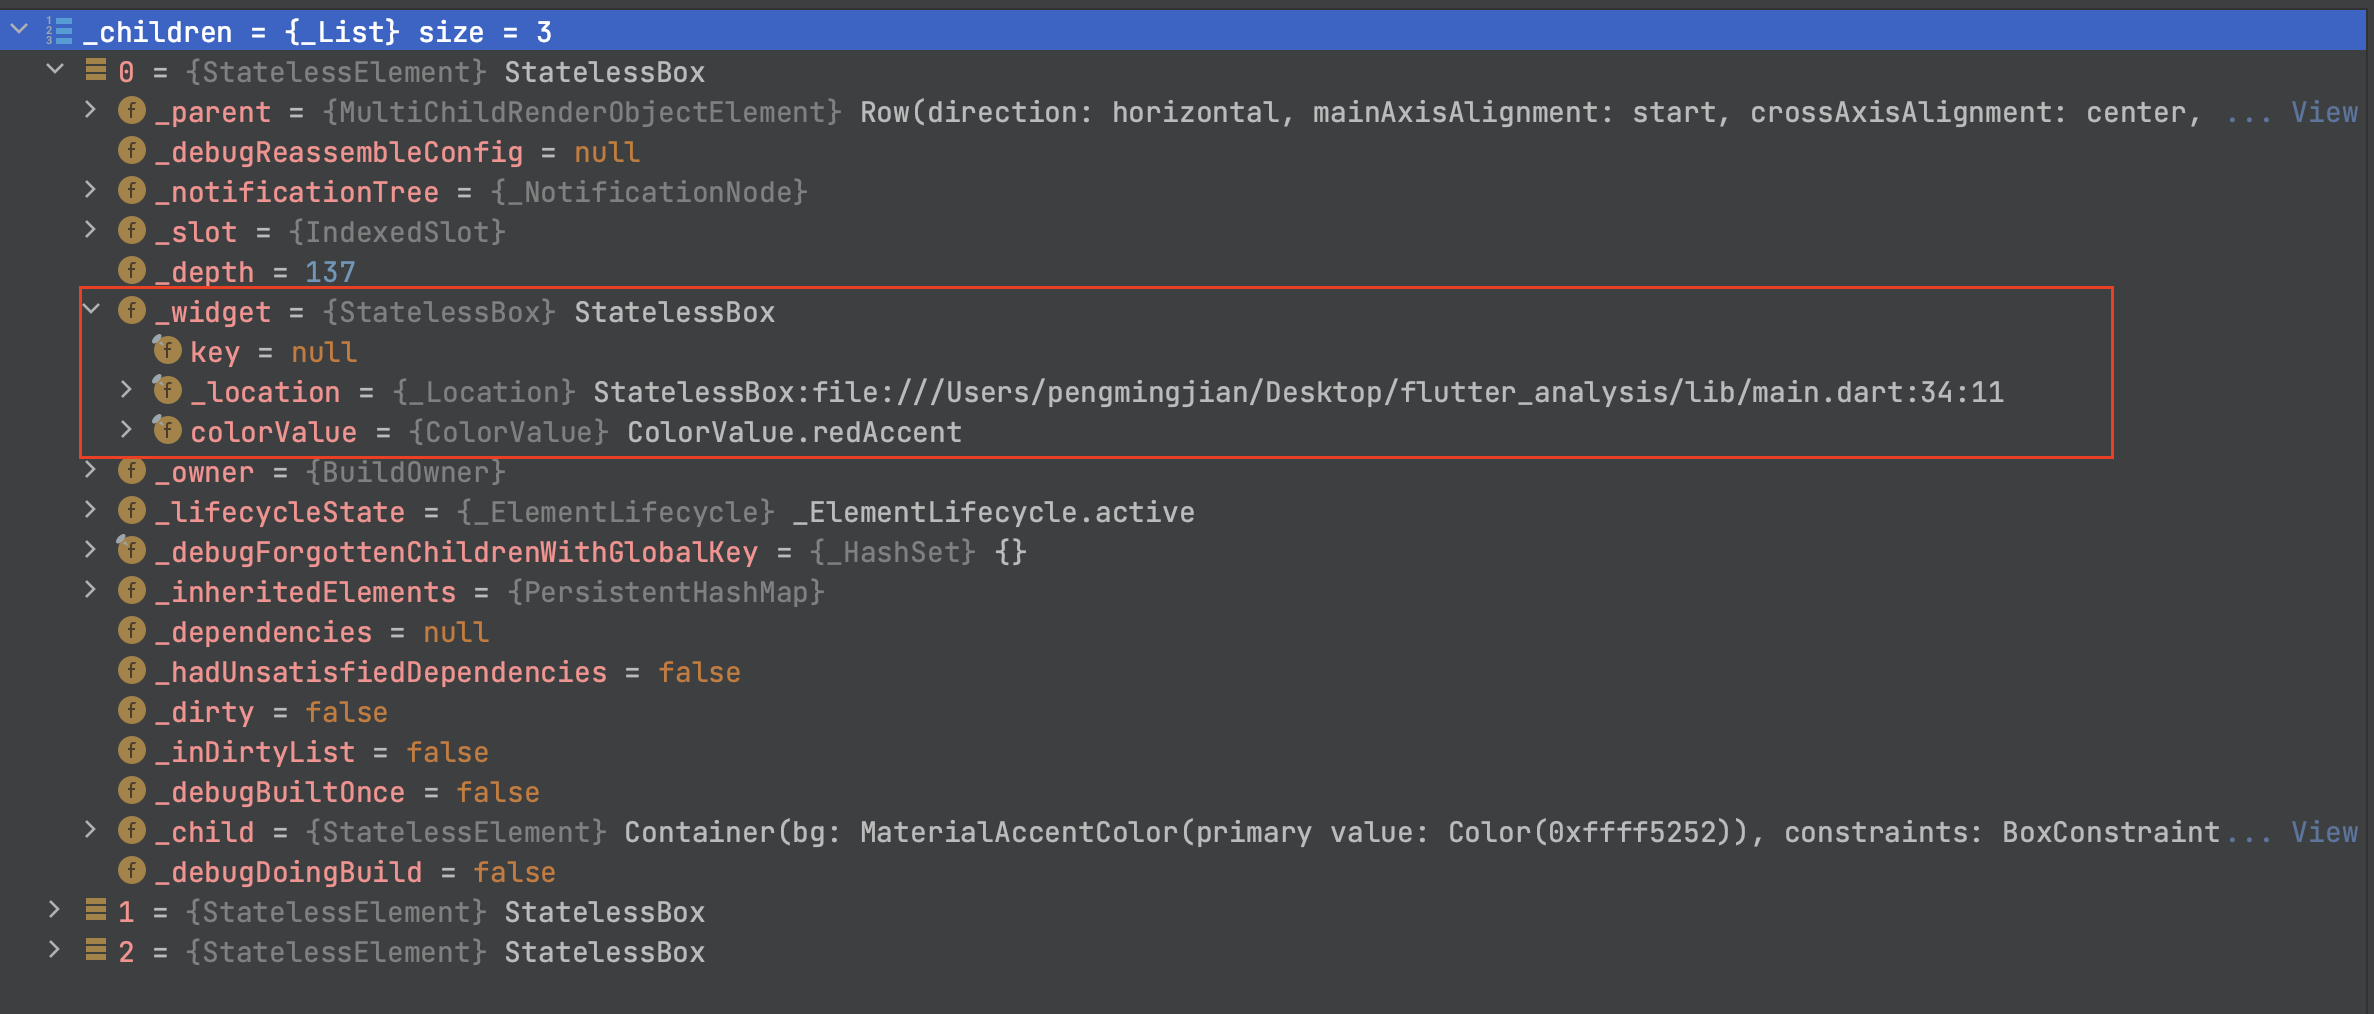
newWidgets:它是一个List<Widget>,用来存放新Row中所有子Widget,此处传入的是multiChildRenderObjectWidget.children。
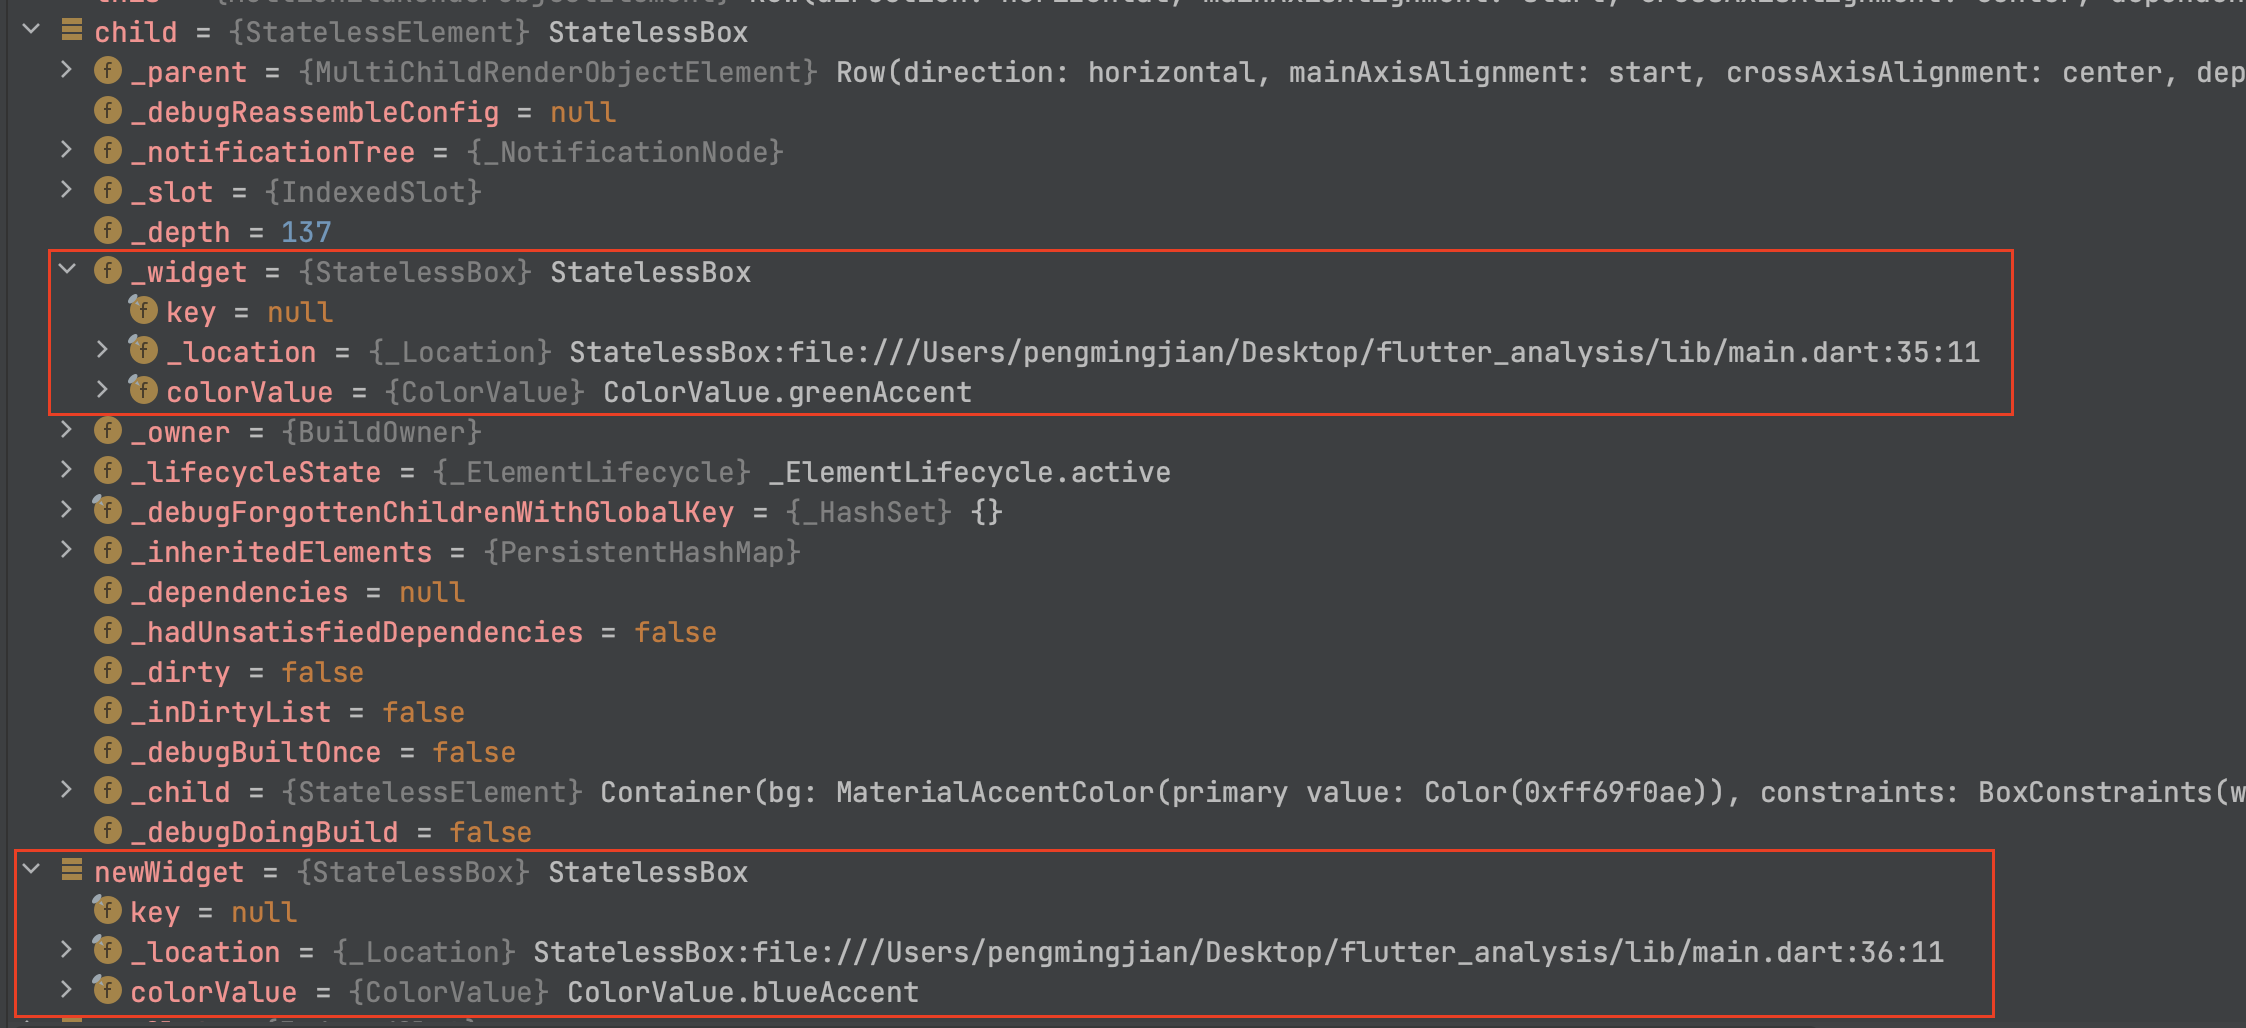
因为删除了中间的绿色块Widget,所以相比初始时的三个色块Widget,现在只剩下红色块Widget与最后一个蓝色块Widget。

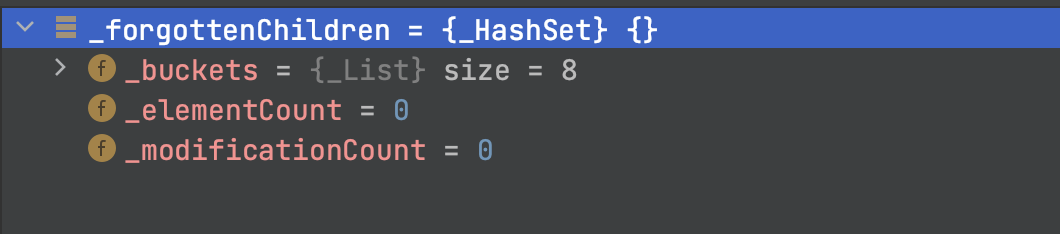
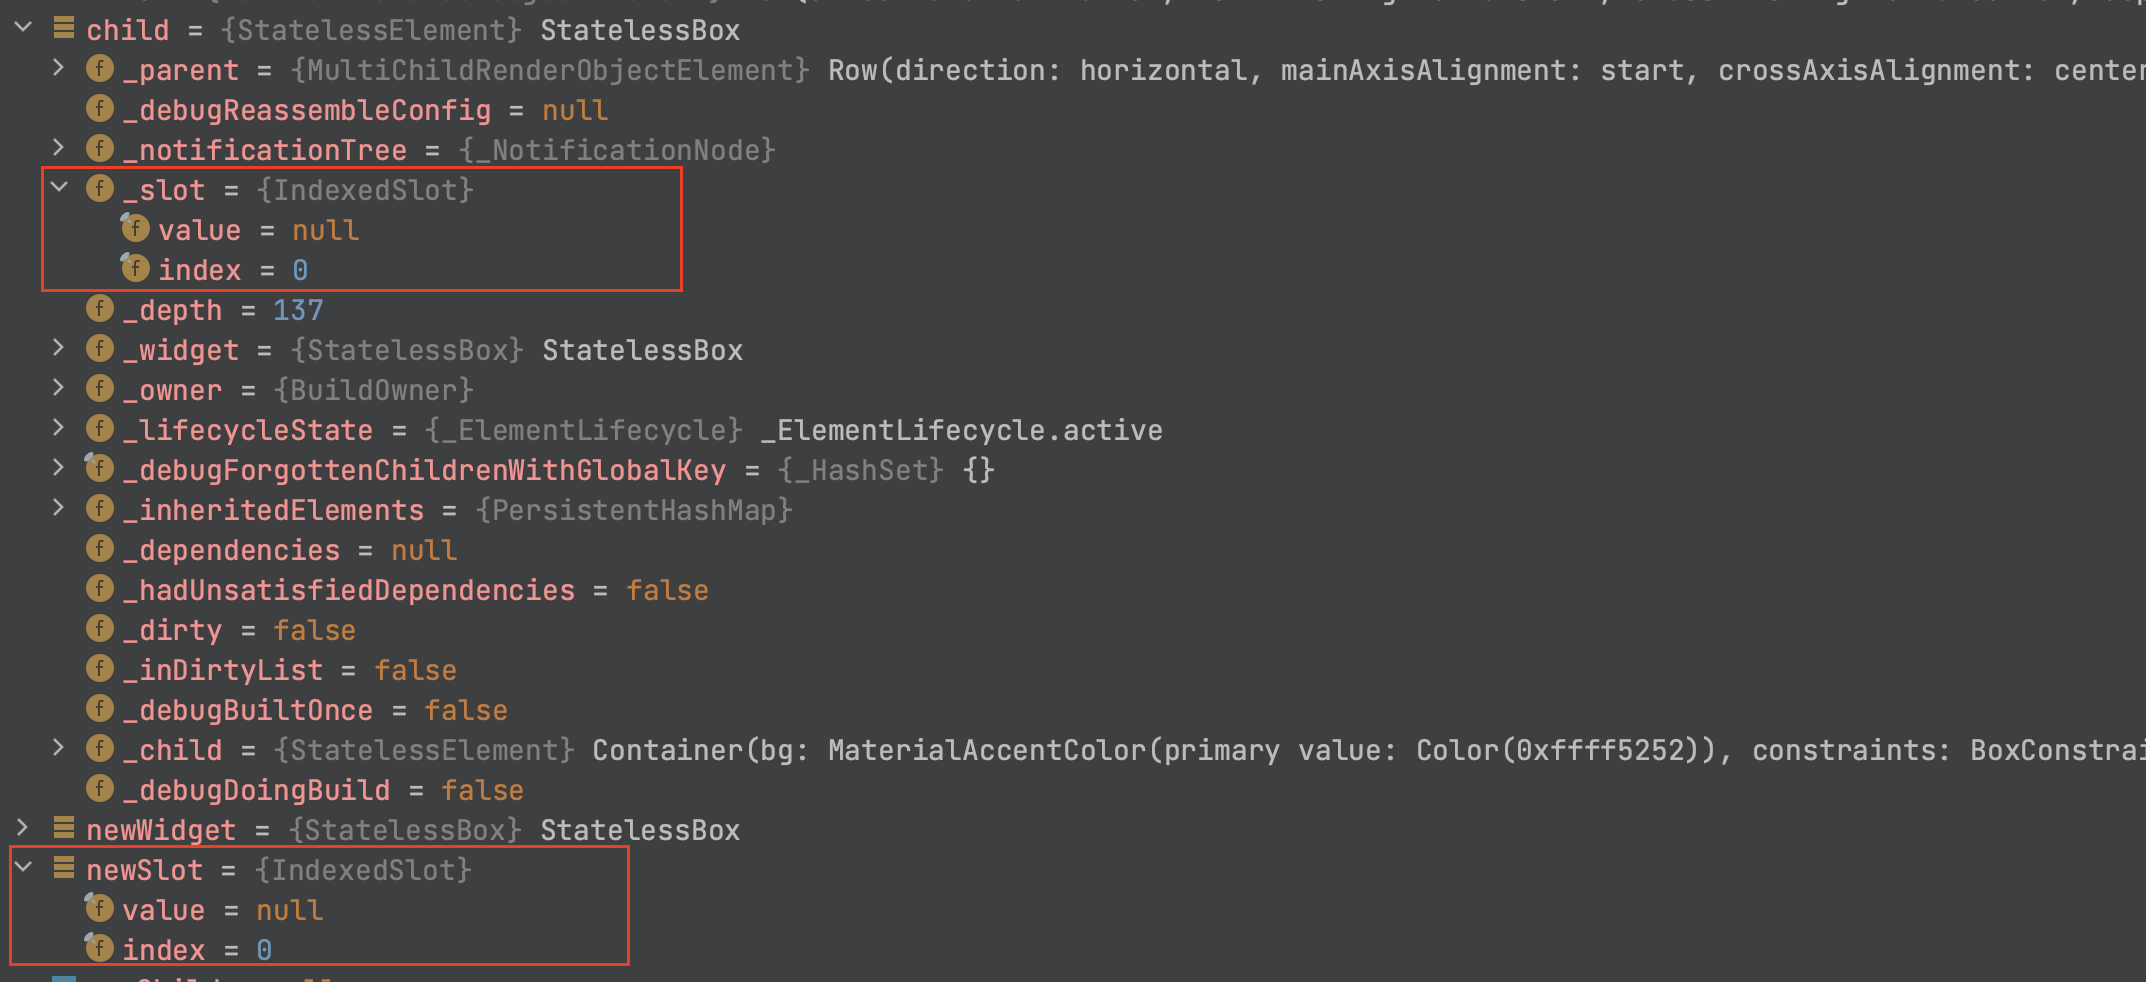
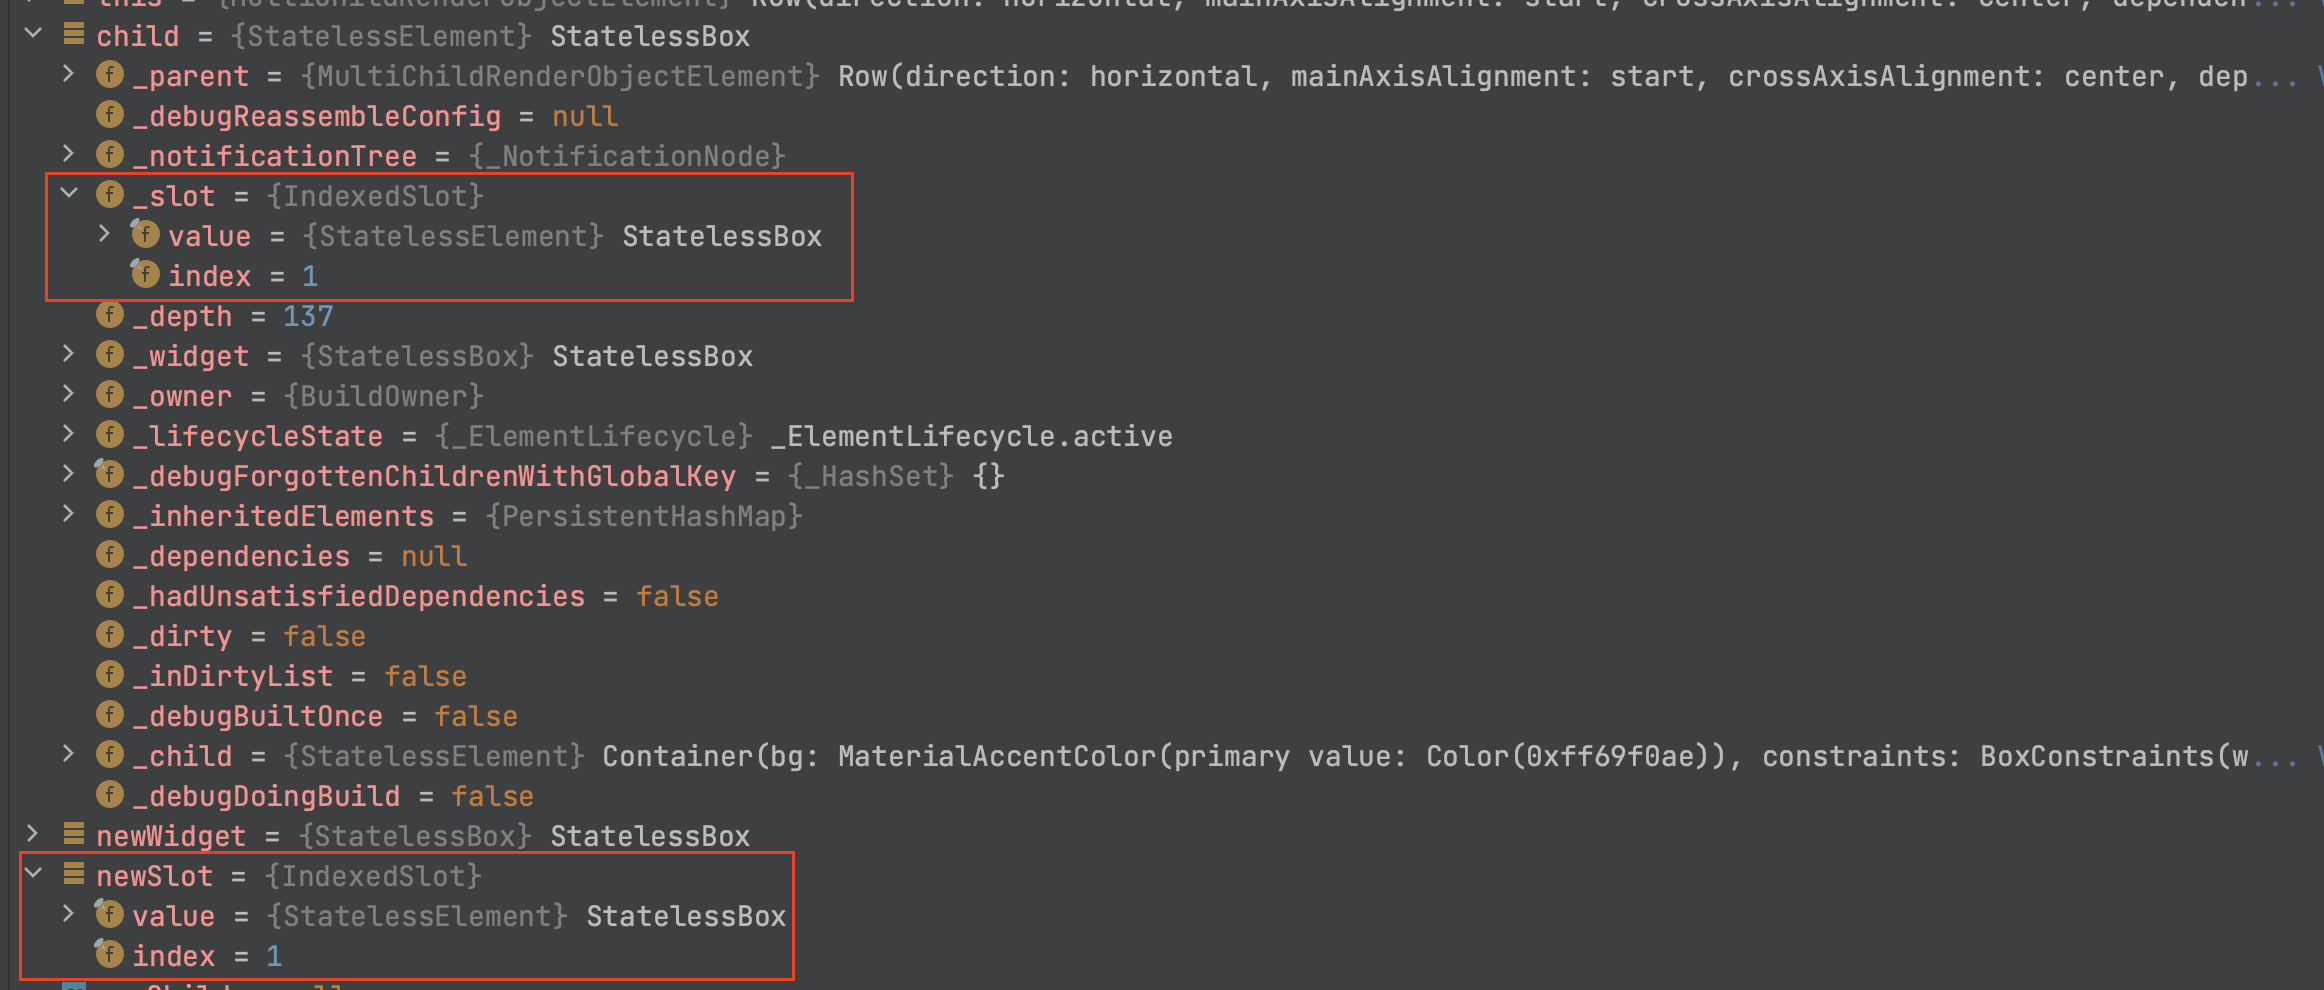
forgottenChildren:一个可选的命名参数,它是一个Set<Element>?,用来存放旧Row中传入了GlobalKey的子Widget所关联的Element,主要作用是避免重复遍历_children来删除子节点的O(n^2) 工作,此处传入的是_forgottenChildren。
在本示例中,因为旧Row中所有子Widget都没有用到GlobalKey,所以_forgottenChildren为空。
slots:一个可选的命名参数,它是一个List<Object?>?,用来存放旧Row中所有子Widget所关联的槽位,用于定义该子级在其父级子级列表中的位置,因为此处没有传入,所以为null。
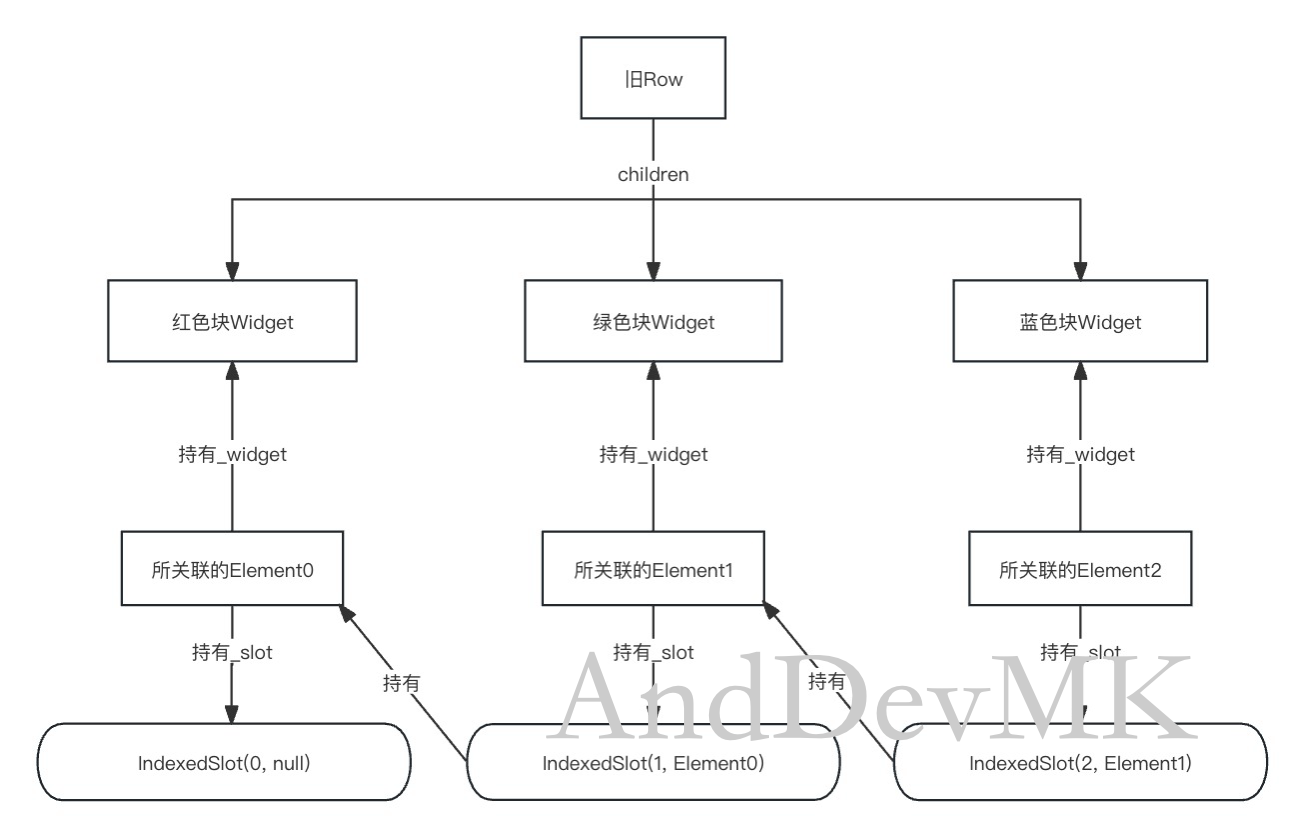
多插一嘴,虽然此处没有传入为null,但是旧Row中所有子Widget所关联的槽位还是存在的,这在MultiChildRenderObjectElement的mount方法中已经为旧Row中所有子Widget分配了槽位。
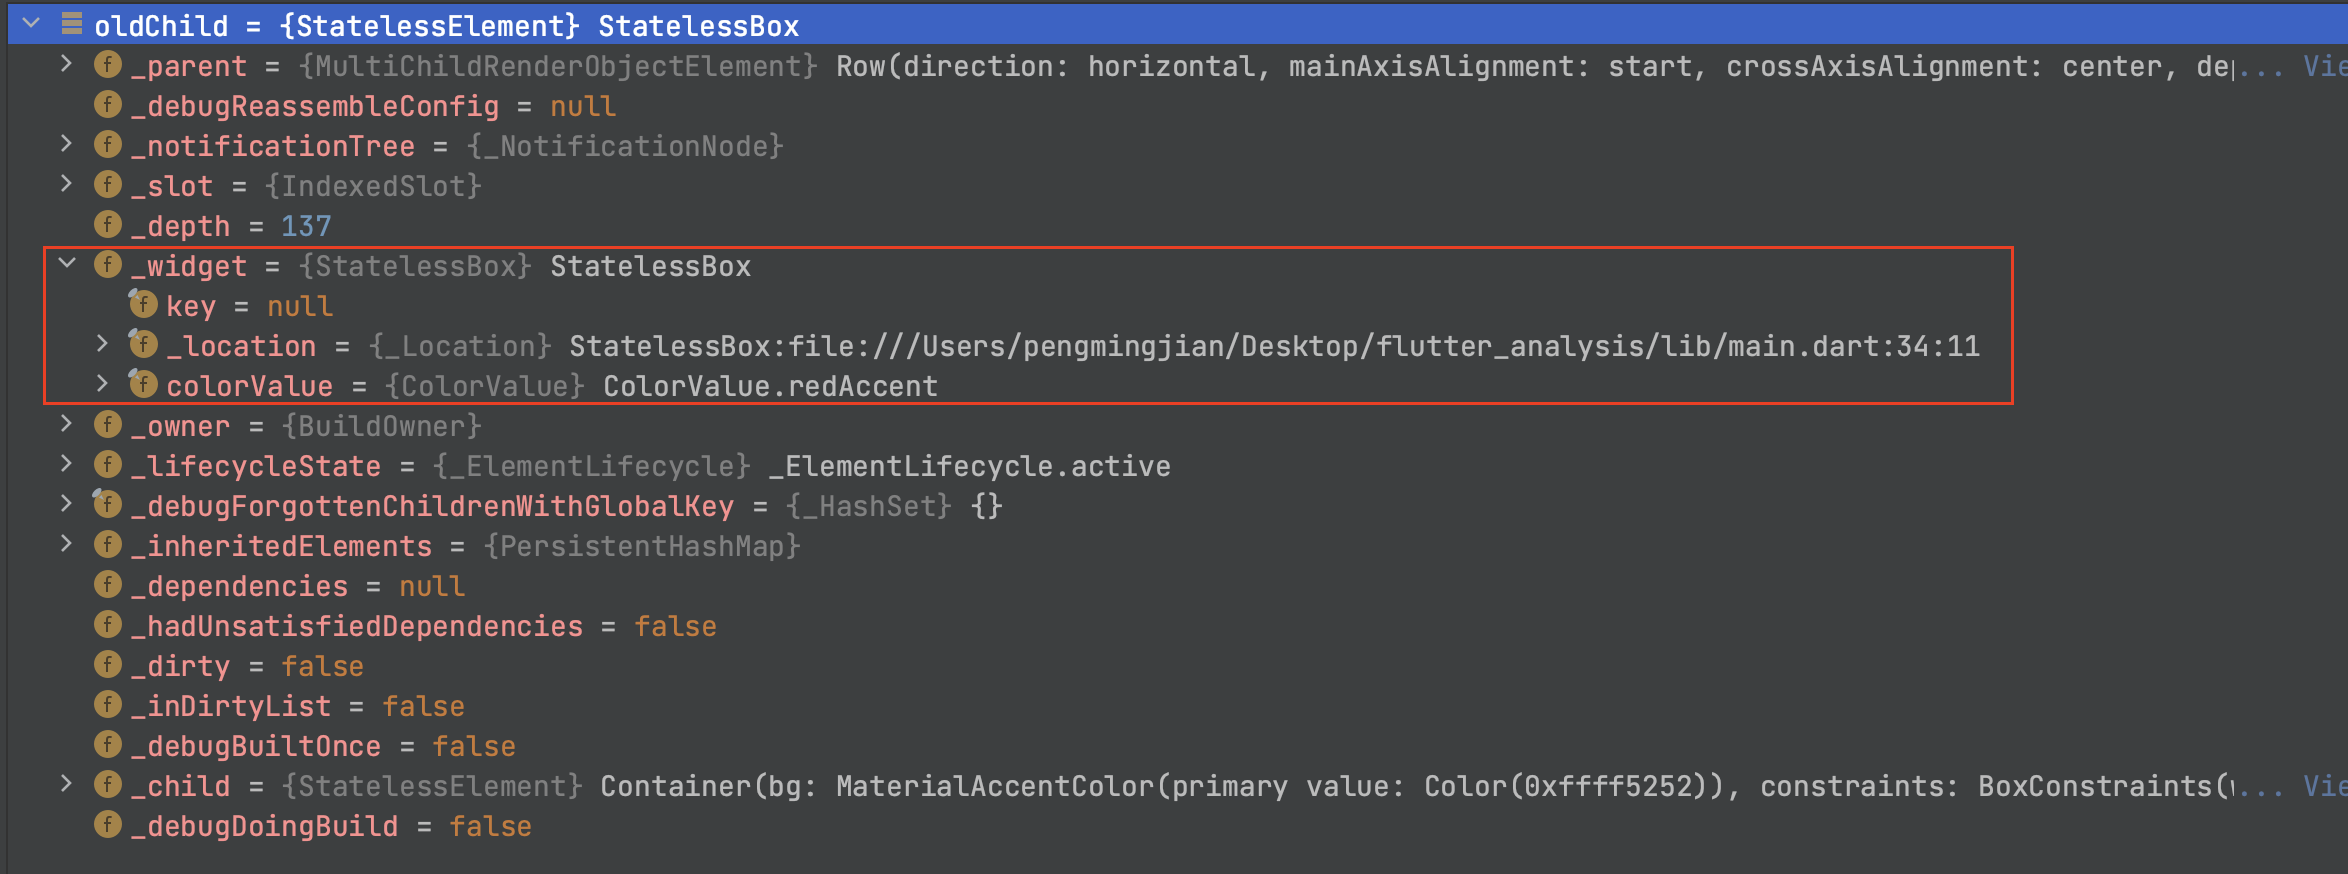
此时,旧Row中所有子Widget所关联的槽位如下。
OK,继续跟踪Element的updateChildren方法的源码,可以发现updateChildren方法的源码是比较长的,所以本文会对updateChildren方法的源码拆分为十部分,并且结合示例只讲解被执行到的那部分源码。
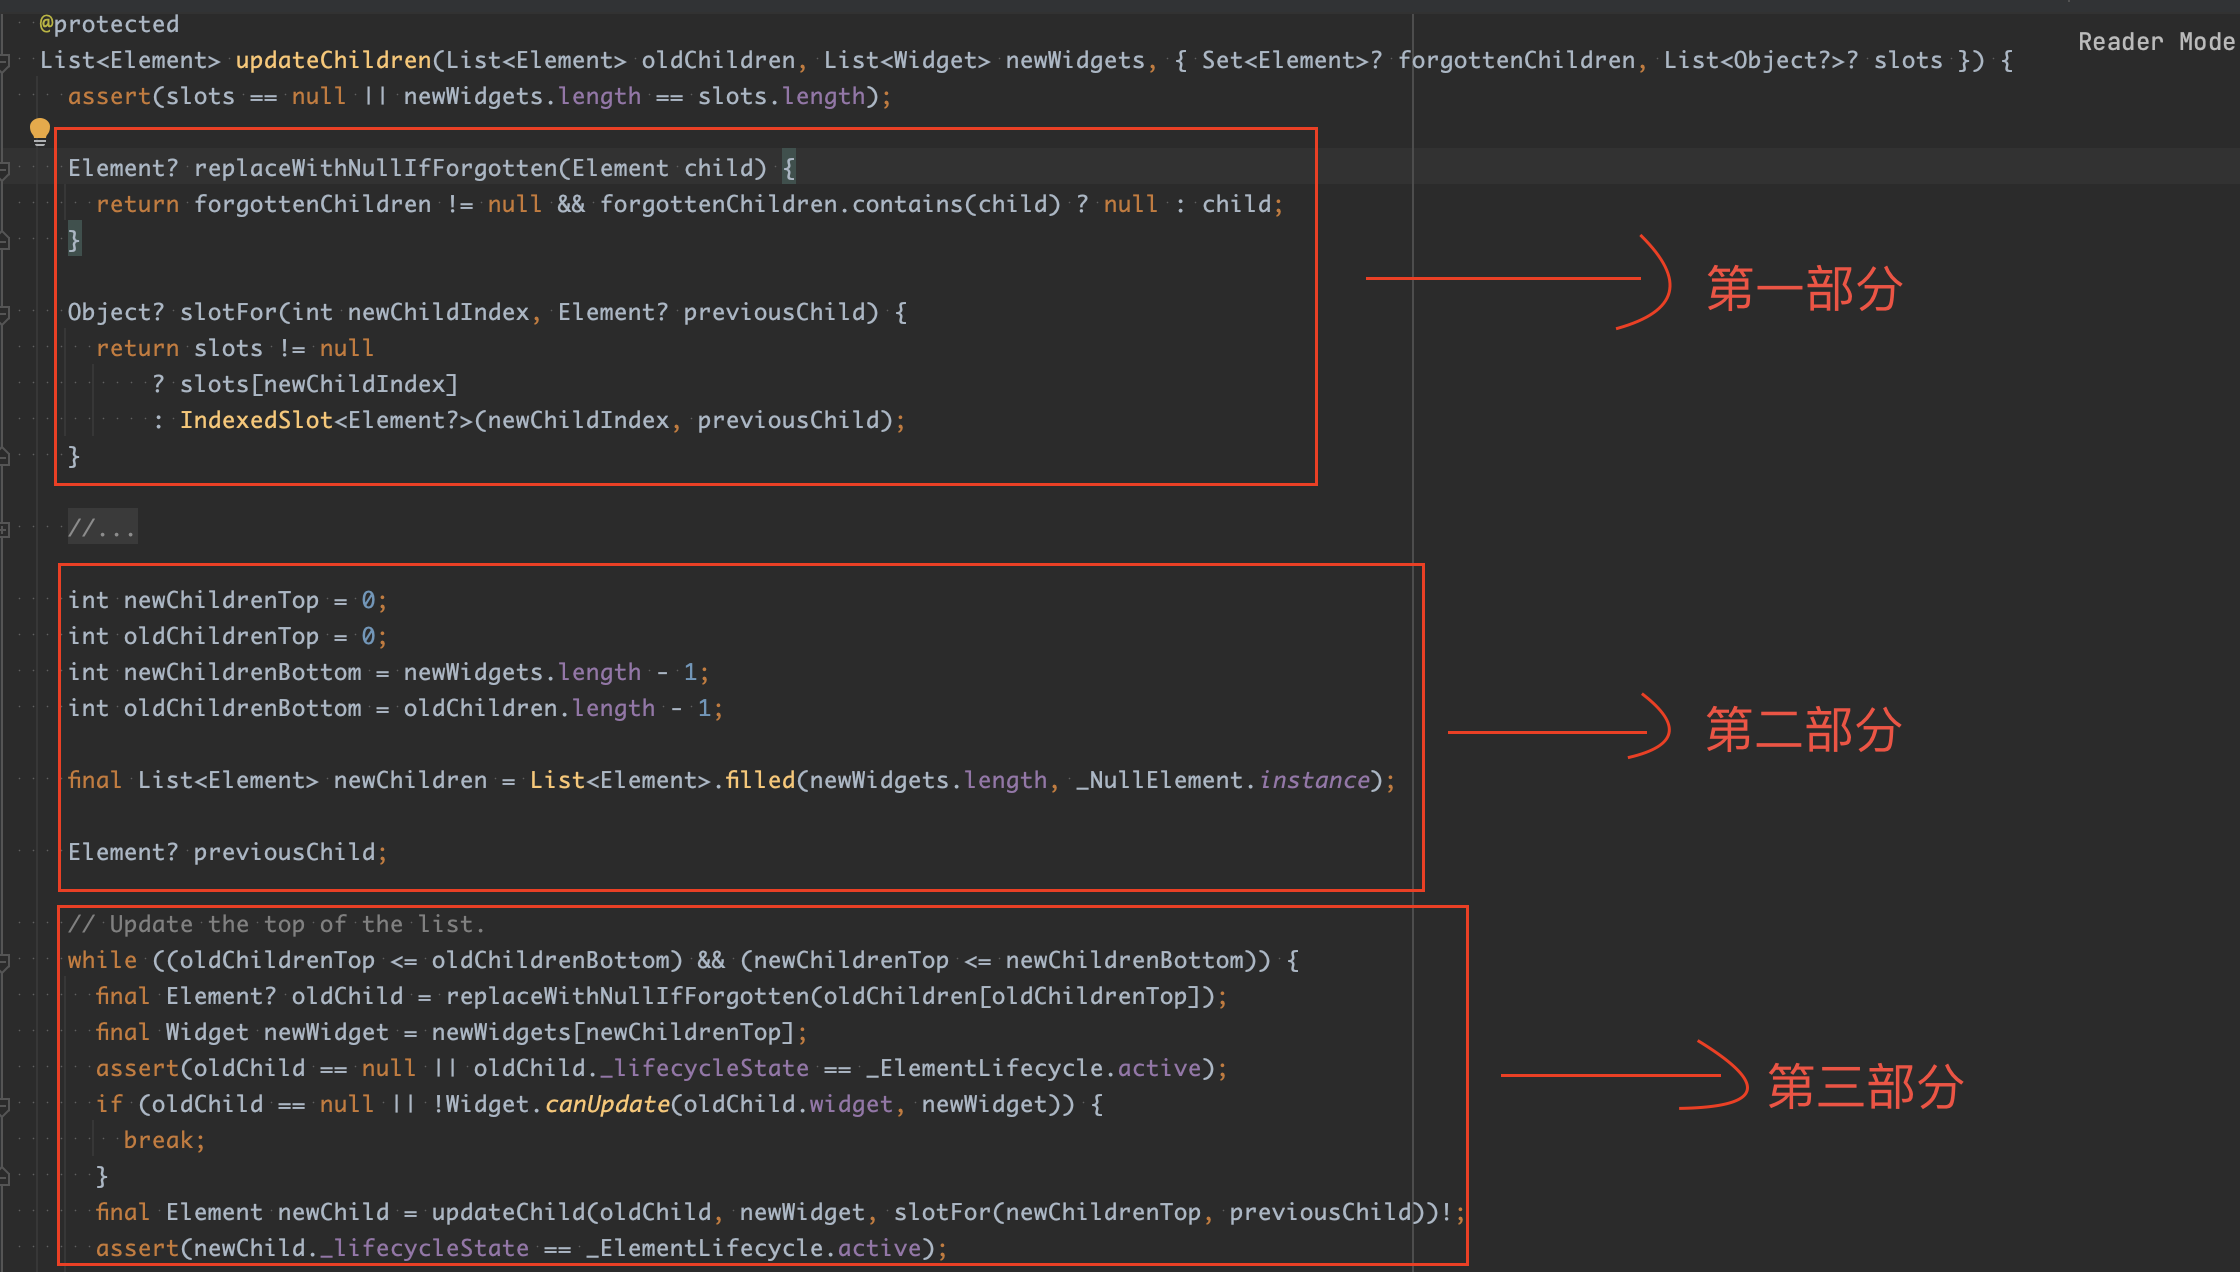
3.1.1、分析第一部分
1
2
3
4
5
6
7
8
9
|
Element? replaceWithNullIfForgotten(Element child) {
return forgottenChildren != null && forgottenChildren.contains(child) ? null : child;
}
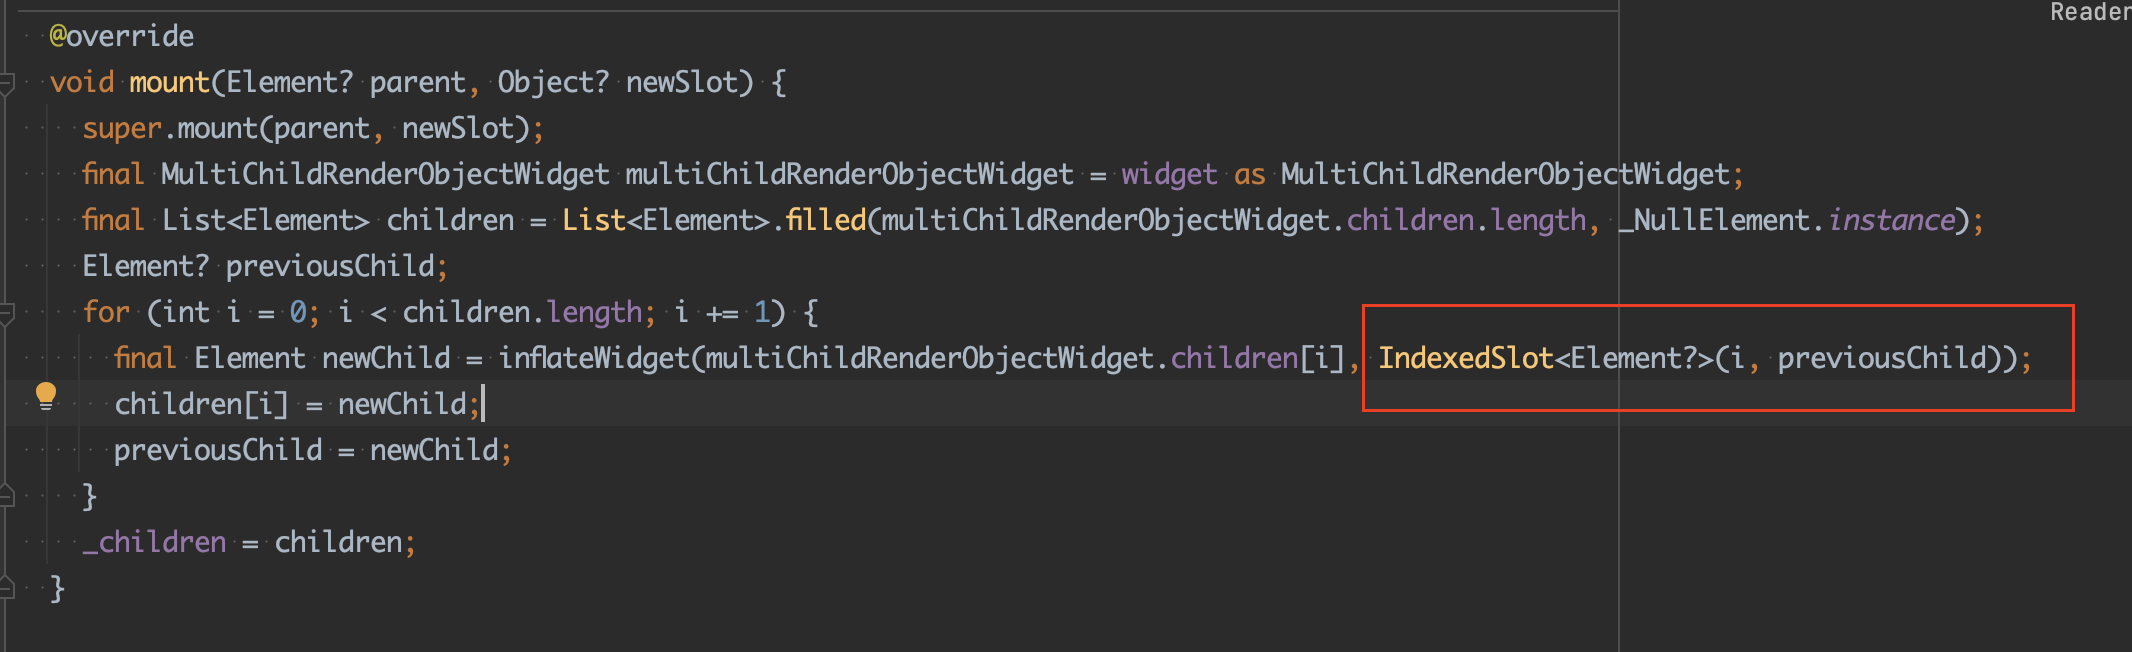
Object? slotFor(int newChildIndex, Element? previousChild) {
return slots != null
? slots[newChildIndex]
: IndexedSlot<Element?>(newChildIndex, previousChild);
}
|
在updateChildren方法一开始,就定义了两个局部方法,来分析下:
-
replaceWithNullIfForgotten():如果旧Row中存在传入了GlobalKey的子Widget,那么该子Widget所关联的Element就需要被过滤掉而不进行处理,避免后续遍历时导致Element被移除,这种情况下会返回null,否则返回传入的child本身。
-
slotFor():获取新Row中newChildIndex索引位置的槽位,之前讲过updateChildren方法并没有传入slots,所以这里会为每个Element创建一个新槽位IndexedSlot。
3.1.2、分析第二部分
1
2
3
4
5
6
7
8
|
int newChildrenTop = 0;
int oldChildrenTop = 0;
int newChildrenBottom = newWidgets.length - 1;
int oldChildrenBottom = oldChildren.length - 1;

final List<Element> newChildren = List<Element>.filled(newWidgets.length, _NullElement.instance);

Element? previousChild;
|
在updateChildren方法中,定义了几个局部变量,来分析下:
| 局部变量 |
说明 |
| newChildrenTop |
遍历newWidgets时的起始位置,从0开始 |
| oldChildrenTop |
遍历oldChildren时的起始位置,从0开始 |
| newChildrenBottom |
遍历newWidgets时的结束位置,结束位置为newWidgets.length - 1 |
| oldChildrenBottom |
遍历oldChildren时的结束位置,结束位置为oldChildren.length - 1 |
| newChildren |
它是一个List<Element>,用来存放新Row中所有子Widget所关联的Element |
| previousChild |
新Row中子Widget所关联的槽位指向的前一个Element |
3.1.3、分析第三部分
 1
 2
 3
 4
 5
 6
 7
 8
 9
10
11
12
13
14
15
16
17
18
19
20
|
// 更新列表顶部
// Update the top of the list.
while ((oldChildrenTop <= oldChildrenBottom) && (newChildrenTop <= newChildrenBottom)) {
  // 分析一
  final Element? oldChild = replaceWithNullIfForgotten(oldChildren[oldChildrenTop]);
  final Widget newWidget = newWidgets[newChildrenTop];
  assert(oldChild == null || oldChild._lifecycleState == _ElementLifecycle.active);
  // 分析二
  if (oldChild == null || !Widget.canUpdate(oldChild.widget, newWidget)) {
    break;
  }
  // 分析三
  final Element newChild = updateChild(oldChild, newWidget, slotFor(newChildrenTop, previousChild))!;
  assert(newChild._lifecycleState == _ElementLifecycle.active);
  // 分析四
  newChildren[newChildrenTop] = newChild;
  previousChild = newChild;
  newChildrenTop += 1;
  oldChildrenTop += 1;
}
|
这个While循环的工作原理是从列表顶部开始更新,也就是从旧Row中第一个子Widget所关联的Element与新Row中第一个子Widget开始往后遍历,判断新旧Widget是否同一个Widget(判断条件是Widget的runtimeType与key),如果是则更新Element所持有的旧Widget为新Widget,否则break退出该While循环。
当Element更新旧Widget成功时,newChildrenTop与oldChildrenTop就会+1,如果遍历过程中出现Element不能更新旧Widget,那么break退出该While循环,此时newChildrenTop与oldChildrenTop恰好记录了Element不能更新旧Widget时的位置索引。
3.1.3.1、第一轮循环
第一轮While循环判断while(oldChildrenTop <= oldChildrenBottom) && (newChildrenTop <= newChildrenBottom),因为此时oldChildrenTop、newChildrenTop均为0,而oldChildrenBottom为2,newChildrenBottom为1,所以满足While循环判断进入循环体。
分析一:
1
2
|
final Element? oldChild = replaceWithNullIfForgotten(oldChildren[oldChildrenTop]);
final Widget newWidget = newWidgets[newChildrenTop];
|
获取oldChild:在本例中,旧Row中所有子Widget都没有传入GlobalKey,所以replaceWithNullIfForgotten()返回的是传入的child本身,也就是oldChildren[0],它是旧Row中第一个子Widget所关联的Element。
获取newWidget:获取新Row中第一个子Widget。

分析二:
1
2
3
|
if (oldChild == null || !Widget.canUpdate(oldChild.widget, newWidget)) {
  break;
}
|
由分析一可以知道,oldChild == null是不成立的,所以执行了Widget.canUpdate(),来看下canUpdate方法。
1
2
3
4
|
static bool canUpdate(Widget oldWidget, Widget newWidget) {
  return oldWidget.runtimeType == newWidget.runtimeType
      && oldWidget.key == newWidget.key;
}
|
可以知道,canUpdate方法中比较了runtimeType与key,也就是比较了旧Row中第一个Widget与新Row中第一个Widget的runtimeType与key,因为两者均没传入key,所以key默认为null,那么比较的就是runtimeType了,而两者的runtimeType均为StatelessBox,所以canUpdate方法返回true,并不会执行break跳出While循环。
分析三:
1
|
final Element newChild = updateChild(oldChild, newWidget, slotFor(newChildrenTop, previousChild))!;
|
执行了Element的updateChild方法,那么updateChild方法是用来干嘛的?
updateChild方法使用给定的新配置更新给定的child,它是widgets系统的核心,每次我们根据更新的配置添加、更新或删除child时都会调用它。
来看下updateChild方法的源码。
 1
 2
 3
 4
 5
 6
 7
 8
 9
10
11
12
13
14
15
16
17
18
19
20
21
22
23
24
25
26
27
28
29
30
31
32
33
34
35
36
37
38
39
|
@protected
@pragma('vm:prefer-inline')
Element? updateChild(Element? child, Widget? newWidget, Object? newSlot) {
  if (newWidget == null) {
    if (child != null) {
      deactivateChild(child);
    }
    return null;
  }

  final Element newChild;
  if (child != null) {
    bool hasSameSuperclass = true;
    assert(() {
      final int oldElementClass = Element._debugConcreteSubtype(child);
      final int newWidgetClass = Widget._debugConcreteSubtype(newWidget);
      hasSameSuperclass = oldElementClass == newWidgetClass;
      return true;
    }());
    if (hasSameSuperclass && child.widget == newWidget) {
      if (child.slot != newSlot) {
        updateSlotForChild(child, newSlot);
      }
      newChild = child;
    } else if (hasSameSuperclass && Widget.canUpdate(child.widget, newWidget)) {
      if (child.slot != newSlot) {
        updateSlotForChild(child, newSlot);
      }
      child.update(newWidget);
      newChild = child;
    } else {
      deactivateChild(child);
      newChild = inflateWidget(newWidget, newSlot);
    }
  } else {
    newChild = inflateWidget(newWidget, newSlot);
  }
  return newChild;
}
|
这里总结下updateChild方法的工作逻辑:
|
newWidget == null |
newWidget != null |
| child == null |
返回null |
返回新的Element |
| child != null |
旧的child被移除, 返回null |
如果可能,更新旧child,返回child或新的Element |
在本示例中,updateChild方法的第一个参数传入了旧Row中第一个Widget所关联的Element,第二个参数传入了新Row中第一个Widget,第三个参数是新Row中第一个Widget所关联的槽位。
来看下第一轮While循环中,会执行到的updateChild方法的相关源码。
 1
 2
 3
 4
 5
 6
 7
 8
 9
10
11
12
13
14
15
16
17
18
19
20
21
22
23
24
25
26
27
28
|
@protected
@pragma('vm:prefer-inline')
Element? updateChild(Element? child, Widget? newWidget, Object? newSlot) {
  if (newWidget == null) {
    if (child != null) {
      deactivateChild(child);
    }
    return null;
  }

  final Element newChild;
  if (child != null) {
    bool hasSameSuperclass = true;
    assert(() {
      final int oldElementClass = Element._debugConcreteSubtype(child);
      final int newWidgetClass = Widget._debugConcreteSubtype(newWidget);
      hasSameSuperclass = oldElementClass == newWidgetClass;
      return true;
    }());
    if (hasSameSuperclass && child.widget == newWidget) {
      if (child.slot != newSlot) {
        updateSlotForChild(child, newSlot);
      }
      newChild = child;
    }
  }
  return newChild;
}
|
在updateChild方法中,因为传入的参数child与newWidget都不为null,所以执行到if判断if (hasSameSuperclass && child.widget == newWidget),可以看到child.widget == newWidget比较的是两个Widget是否相等,而Widget对==操作符进行了重写,比较的是两者的引用。
1
2
3
4
|
// Widget
@override
@nonVirtual
bool operator ==(Object other) => super == other;
|
Row的children列表是定义为_MyPageState的一个成员变量_boxes,当移除中间色块Widget时,第一个色块Widget的引用在列表中还是没发生变化,所以if判断if (hasSameSuperclass && child.widget == newWidget)是成立的,然后进入另一个if判断if (child.slot != newSlot)。
之前讲过newSlot是在slotFor()局部方法中新创建的,而child.slot是在MultiChildRenderObjectElement的mount方法中创建的,所以这两个slot不是同一个实例。
但是,这里!=比较的并不是两者的slot引用,因为IndexedSlot重载了==操作符,它们比较的是IndexedSlot构造方法中传入的参数值,相当于执行了equals(),可以看下IndexedSlot的部分源码。
 1
 2
 3
 4
 5
 6
 7
 8
 9
10
|
// IndexedSlot
@override
bool operator ==(Object other) {
  if (other.runtimeType != runtimeType) {
    return false;
  }
  return other is IndexedSlot
      && index == other.index
      && value == other.value;
}
|
可以知道,此时这两个IndexedSlot中参数值的比较是相等的,因而if判断if (child.slot != newSlot)是不成立的,不会执行updateSlotForChild()。
然后执行newChild = child,直接将旧Row中第一个Widget所关联的Element返回,那么updateChild方法执行完成。
分析四:
1
2
3
4
|
newChildren[newChildrenTop] = newChild;
previousChild = newChild;
newChildrenTop += 1;
oldChildrenTop += 1;
|
把返回的newChild添加到newChildren中,并且newChild成为了下一个槽位slot所指向的Element,然后执行newChildrenTop += 1与oldChildrenTop += 1,进入第二轮While循环判断。
3.1.3.2、第二轮循环
第二轮While循环判断while(oldChildrenTop <= oldChildrenBottom) && (newChildrenTop <= newChildrenBottom),因为此时oldChildrenTop、newChildrenTop均为1,而oldChildrenBottom为2,newChildrenBottom为1,所以满足While循环判断进入循环体。
分析一、分析二与之前一样,先是获取oldChild与newWidget,然后继续执行updateChild方法。
分析三:
在本示例中,updateChild方法的第一个参数传入了旧Row中第二个Widget所关联的Element,第二个参数传入了新Row中第二个Widget,第三个参数是新Row中第二个Widget所关联的槽位。
来看下第二轮While循环中,会执行到的updateChild方法的相关源码。
 1
 2
 3
 4
 5
 6
 7
 8
 9
10
11
12
13
14
15
16
17
18
19
20
21
22
23
24
25
26
27
28
29
30
31
|
@protected
@pragma('vm:prefer-inline')
Element? updateChild(Element? child, Widget? newWidget, Object? newSlot) {
  if (newWidget == null) {
    if (child != null) {
      deactivateChild(child);
    }
    return null;
  }

  final Element newChild;
  if (child != null) {
    bool hasSameSuperclass = true;
    assert(() {
      final int oldElementClass = Element._debugConcreteSubtype(child);
      final int newWidgetClass = Widget._debugConcreteSubtype(newWidget);
      hasSameSuperclass = oldElementClass == newWidgetClass;
      return true;
    }());
    if (hasSameSuperclass && child.widget == newWidget) {

    } else if (hasSameSuperclass && Widget.canUpdate(child.widget, newWidget)) {
      if (child.slot != newSlot) {
        updateSlotForChild(child, newSlot);
      }
      child.update(newWidget);
      newChild = child;
    }
  }
  return newChild;
}
|
在updateChild方法中,因为传入的参数child与newWidget都不为null,所以执行到if判断if (hasSameSuperclass && child.widget == newWidget)。
但是,此时child.widget == newWidget是不成立的,为什么呢?
因为child.widget是旧Row中第二个Widget,而newWidget是新Row中第二个子Widget(它其实对应了旧Row中第三个Widget),所以相当于旧Row中第二个Widget与第三个Widget进行比较,很显然这两个引用是不相等的。
接着执行else if (hasSameSuperclass && Widget.canUpdate(child.widget, newWidget)),对于Widget.canUpdate(),之前讲过如果Row的子Widget没有传入key,那么比较的就是runtimeType,很显然两者的runtimeType都是StatelessBox,所以if判断else if (hasSameSuperclass && Widget.canUpdate(child.widget, newWidget))成立,然后进入另一个if判断if (child.slot != newSlot)。
之前讲过IndexedSlot重写了操作符==,内部比较的是构造方法传入的参数值,相当于执行equals(),所以此时这两个slot依然相等,if判断if (child.slot != newSlot)不成立。
接着继续执行child.update(newWidget)方法,又因为child的类型为StatelessElement,所以执行了StatelessElement的update方法。

可以发现,在update方法中先是执行了super.update(newWidget),也就是执行了Element的update方法,将newWidget赋值给旧Row中第二个Widget所关联的Element,换句话说,旧Row中第二个Widget所关联的Element持有了旧Row中第三个Widget。

然后在update方法中还执行了rebuild方法,这会重建旧Row中第三个Widget,执行旧Row中第三个Widget的build方法。
OK,我们回到这个if判断else if (hasSameSuperclass && Widget.canUpdate(child.widget, newWidget)),最后执行了newChild = child,将旧Row中第二个Widget所关联的Element返回了。
分析四:
1
2
3
4
|
newChildren[newChildrenTop] = newChild;
previousChild = newChild;
newChildrenTop += 1;
oldChildrenTop += 1;
|
把返回的newChild添加到newChildren中,并且newChild成为了下一个槽位slot所指向的Element,然后执行newChildrenTop += 1与oldChildrenTop += 1,进入第三轮While循环判断。
3.1.3.3、第三轮循环
第三轮While循环判断while(oldChildrenTop <= oldChildrenBottom) && (newChildrenTop <= newChildrenBottom),因为此时oldChildrenTop、newChildrenTop均为2,而oldChildrenBottom为2,newChildrenBottom为1,所以不满足While循环判断。
3.1.4、分析第五部分
 1
 2
 3
 4
 5
 6
 7
 8
 9
10
11
12
13
14
15
16
17
18
19
|
// 扫描列表中间的老孩子
// Scan the old children in the middle of the list.
final bool haveOldChildren = oldChildrenTop <= oldChildrenBottom;
Map<Key, Element>? oldKeyedChildren;
if (haveOldChildren) {
  oldKeyedChildren = <Key, Element>{};
  while (oldChildrenTop <= oldChildrenBottom) {
    final Element? oldChild = replaceWithNullIfForgotten(oldChildren[oldChildrenTop]);
    assert(oldChild == null || oldChild._lifecycleState == _ElementLifecycle.active);
    if (oldChild != null) {
      if (oldChild.widget.key != null) {
        oldKeyedChildren[oldChild.widget.key!] = oldChild;
      } else {
        deactivateChild(oldChild);
      }
    }
    oldChildrenTop += 1;
  }
}
|
第五部分的工作原理是扫描列表中间的老孩子,也就是扫描oldChildrenTop与oldChildrenBottom之间的旧Widget所关联的Element。
换句话说就是处理之前列表中间那些无法更新旧Widget为新Widget的Element,如果该Element之前关联的旧Widget传入了key,那么就会把该Element存入一个Map中,否则就会执行deactivateChild方法移除该Element。
可以发现,有一个bool类型的局部变量haveOldChildren,它的判断条件是oldChildrenTop <= oldChildrenBottom,因为此时oldChildrenTop为2,oldChildrenBottom为2,那么haveOldChildren为true,满足if判断if (haveOldChildren)。
然后执行While循环判断 while (oldChildrenTop <= oldChildrenBottom),这里的While循环判断条件与haveOldChildren的判断条件一样的,所以满足While循环判断而进入循环体。
在While循环体中,获取oldChild,此时的oldChild是旧Row中第三个子Widget所关联的Element。
因为旧Row中所有子Widget都没有传入Key,并且旧Row中第三个子Widget所关联的Element在新Row中是找不到子Widget去关联的,所以执行deactivateChild方法把旧Row中第三个子Widget所关联的Element移除。
OK,继续跟踪Element的updateChildren方法源码时,发现后面第六、七、八、九部分都不满足相应的判断条件,所以这几部分都没有执行到,这里就不分析了。
3.1.5、分析第十部分
直接将newChildren返回,那么updateChildren方法就执行完毕了,意味着Row所关联的MultiChildRenderObjectElement也就更新了_children。
该示例中Row及其所有子Widget更新的核心原理如图所示。

现在可以回过头来解释示例1中的疑问了:
因为旧Row中第二个子Widget所关联的Element,它对绿色块Widget的持有关系发生了变化,由最初持有了绿色块Widget变为持有了蓝色块Widget,并且触发了蓝色块Widget的build方法,所以日志打印是蓝色。
因为旧Row中第一个子Widget所关联的Element,它对红色块Widget的持有关系没有发生变化。
3.2、分析示例2
与示例1中的颜色块StatelessBox不同,示例2中的颜色块StatefulBox是一个StatefulWidget,它的颜色值_color是在initState方法中初始化的。
我们知道,Element的生命周期比Widget长,而State是在StatefulElement的构造方法中创建的,在此之后,StatefulElement与State便互相持有对方引用,所以State的生命周期也会比Widget长。
这说明旧Row中子Widget所关联的Element,尽管它对Widget的持有关系发生了变化,也不会影响State中已初始化过的数据(这里指_color),除非State重新创建一个新实例。
前面有了示例1的详细分析过程为基础,下面分析示例2时不会再从头开始分析,而是分析与示例1不同的部分。
3.2.1、分析第三部分
 1
 2
 3
 4
 5
 6
 7
 8
 9
10
11
12
13
14
15
16
17
18
19
|
// Update the top of the list.
while ((oldChildrenTop <= oldChildrenBottom) && (newChildrenTop <= newChildrenBottom)) {
  // 分析一
  final Element? oldChild = replaceWithNullIfForgotten(oldChildren[oldChildrenTop]);
  final Widget newWidget = newWidgets[newChildrenTop];
  assert(oldChild == null || oldChild._lifecycleState == _ElementLifecycle.active);
  // 分析二
  if (oldChild == null || !Widget.canUpdate(oldChild.widget, newWidget)) {
    break;
  }
  // 分析三
  final Element newChild = updateChild(oldChild, newWidget, slotFor(newChildrenTop, previousChild))!;
  assert(newChild._lifecycleState == _ElementLifecycle.active);
  // 分析四
  newChildren[newChildrenTop] = newChild;
  previousChild = newChild;
  newChildrenTop += 1;
  oldChildrenTop += 1;
}
|
3.2.1.1、第二轮循环
在第二轮While循环中,执行了updateChild方法,此时第一个参数child为旧Row中第二个子Widget所关联的Element,第二个参数newWidget为新Row中的第二个Widget,也是旧Row中第三个子Widget。
来看下第二轮While循环中,会执行到的updateChild方法的相关源码。
 1
 2
 3
 4
 5
 6
 7
 8
 9
10
11
12
13
14
15
16
17
18
19
20
21
22
23
24
25
26
27
28
29
30
31
|
@protected
@pragma('vm:prefer-inline')
Element? updateChild(Element? child, Widget? newWidget, Object? newSlot) {
  if (newWidget == null) {
    if (child != null) {
      deactivateChild(child);
    }
    return null;
  }

  final Element newChild;
  if (child != null) {
    bool hasSameSuperclass = true;
    assert(() {
      final int oldElementClass = Element._debugConcreteSubtype(child);
      final int newWidgetClass = Widget._debugConcreteSubtype(newWidget);
      hasSameSuperclass = oldElementClass == newWidgetClass;
      return true;
    }());
    if (hasSameSuperclass && child.widget == newWidget) {

    } else if (hasSameSuperclass && Widget.canUpdate(child.widget, newWidget)) {
      if (child.slot != newSlot) {
        updateSlotForChild(child, newSlot);
      }
      child.update(newWidget);
      newChild = child;
    }
  }
  return newChild;
}
|
执行else if (hasSameSuperclass && Widget.canUpdate(child.widget, newWidget)),因为Row的所有子Widget均没有传入Key,所以else if判断成立。
然后执行child.update(newWidget)方法,又因为child的类型为StatefulElement,所以执行了StatefulElement的update方法。

在StatefulElement的update方法中,一共做了4件事情:
1、执行super.update(newWidget),也就是执行了Element的update方法,将newWidget赋值给旧Row中第二个Widget所关联的Element,换句话说,旧Row中第二个Widget所关联的Element持有了旧Row中第三个Widget。
2、执行state._widget = widget as StatefulWidget,旧Row中第二个Widget所关联的Element,它所持有的State也更新了_widget,也就是State持有了旧Row中第三个Widget。
3、执行state.didUpdateWidget(oldWidget),触发了State的didUpdateWidget方法,传入的实参也就是旧Row中第二个Widget。
4、执行rebuild方法,触发了旧Row中第三个Widget的重建。
示例2与示例1的不同之处已经讲完,该示例中Row及其所有子Widget更新的核心原理如图所示。

现在可以回过头来解释示例2中的疑问了:
因为旧Row中第二个子Widget所关联的Element,它对绿色块Widget的持有关系发生了变化,由最初持有了绿色块Widget变为持有了蓝色块Widget,并且触发了所关联State的build方法。但是因为该Element所关联的State中_color值一直为绿色没发生变化,所以当执行build方法时读取到的颜色值还是绿色,打印的日志也就为绿色了,这就导致了看起来像是删除了蓝色块。
解释与问题1相同。
因为旧Row中第一个子Widget所关联的Element,它对红色块Widget的持有关系没有发生变化。
那么,有什么修复办法吗?
可以重写State的didUpdateWidget方法,然后对_color进行重新赋值,因为此时的State已经引用了蓝色块_widget。
1
2
3
4
5
|
@override
void didUpdateWidget(covariant StatefulBox oldWidget) {
  super.didUpdateWidget(oldWidget);
  _color = _getColor(widget.colorValue);
}
|
也就是示例3中的给StatefulBox传入一个Key就行。
3.3、分析示例3
前面有了示例1与示例2的详细分析过程为基础,下面分析示例3时不会再从头开始分析,而是分析与示例2不同的部分。
3.3.1、分析第三部分
 1
 2
 3
 4
 5
 6
 7
 8
 9
10
11
12
13
14
15
16
17
18
19
|
// Update the top of the list.
while ((oldChildrenTop <= oldChildrenBottom) && (newChildrenTop <= newChildrenBottom)) {
  // 分析一
  final Element? oldChild = replaceWithNullIfForgotten(oldChildren[oldChildrenTop]);
  final Widget newWidget = newWidgets[newChildrenTop];
  assert(oldChild == null || oldChild._lifecycleState == _ElementLifecycle.active);
  // 分析二
  if (oldChild == null || !Widget.canUpdate(oldChild.widget, newWidget)) {
    break;
  }
  // 分析三
  final Element newChild = updateChild(oldChild, newWidget, slotFor(newChildrenTop, previousChild))!;
  assert(newChild._lifecycleState == _ElementLifecycle.active);
  // 分析四
  newChildren[newChildrenTop] = newChild;
  previousChild = newChild;
  newChildrenTop += 1;
  oldChildrenTop += 1;
}
|
3.3.1.1、第二轮循环
在第二轮While循环中,看下分析二这里的源码,此时oldChild为旧Row中第二个子Widget所关联的Element,newWidget为新Row中的第二个Widget,也是旧Row中第三个子Widget。
执行if (oldChild == null || !Widget.canUpdate(oldChild.widget, newWidget)),因为oldChild不为null,所以看下if后半段Widget.canUpdate()。
因为旧Row中所有子Widget均传入了Key,所以比较的就不止Widget的runtimeType了了,还需要比较key,很明显两者的runtimeType均为StatefulBox,那么剩下的就是比较两者的Key了,
此时oldChild.widget的Key为ValueKey(2),newWidget的Key为ValueKey(3)。
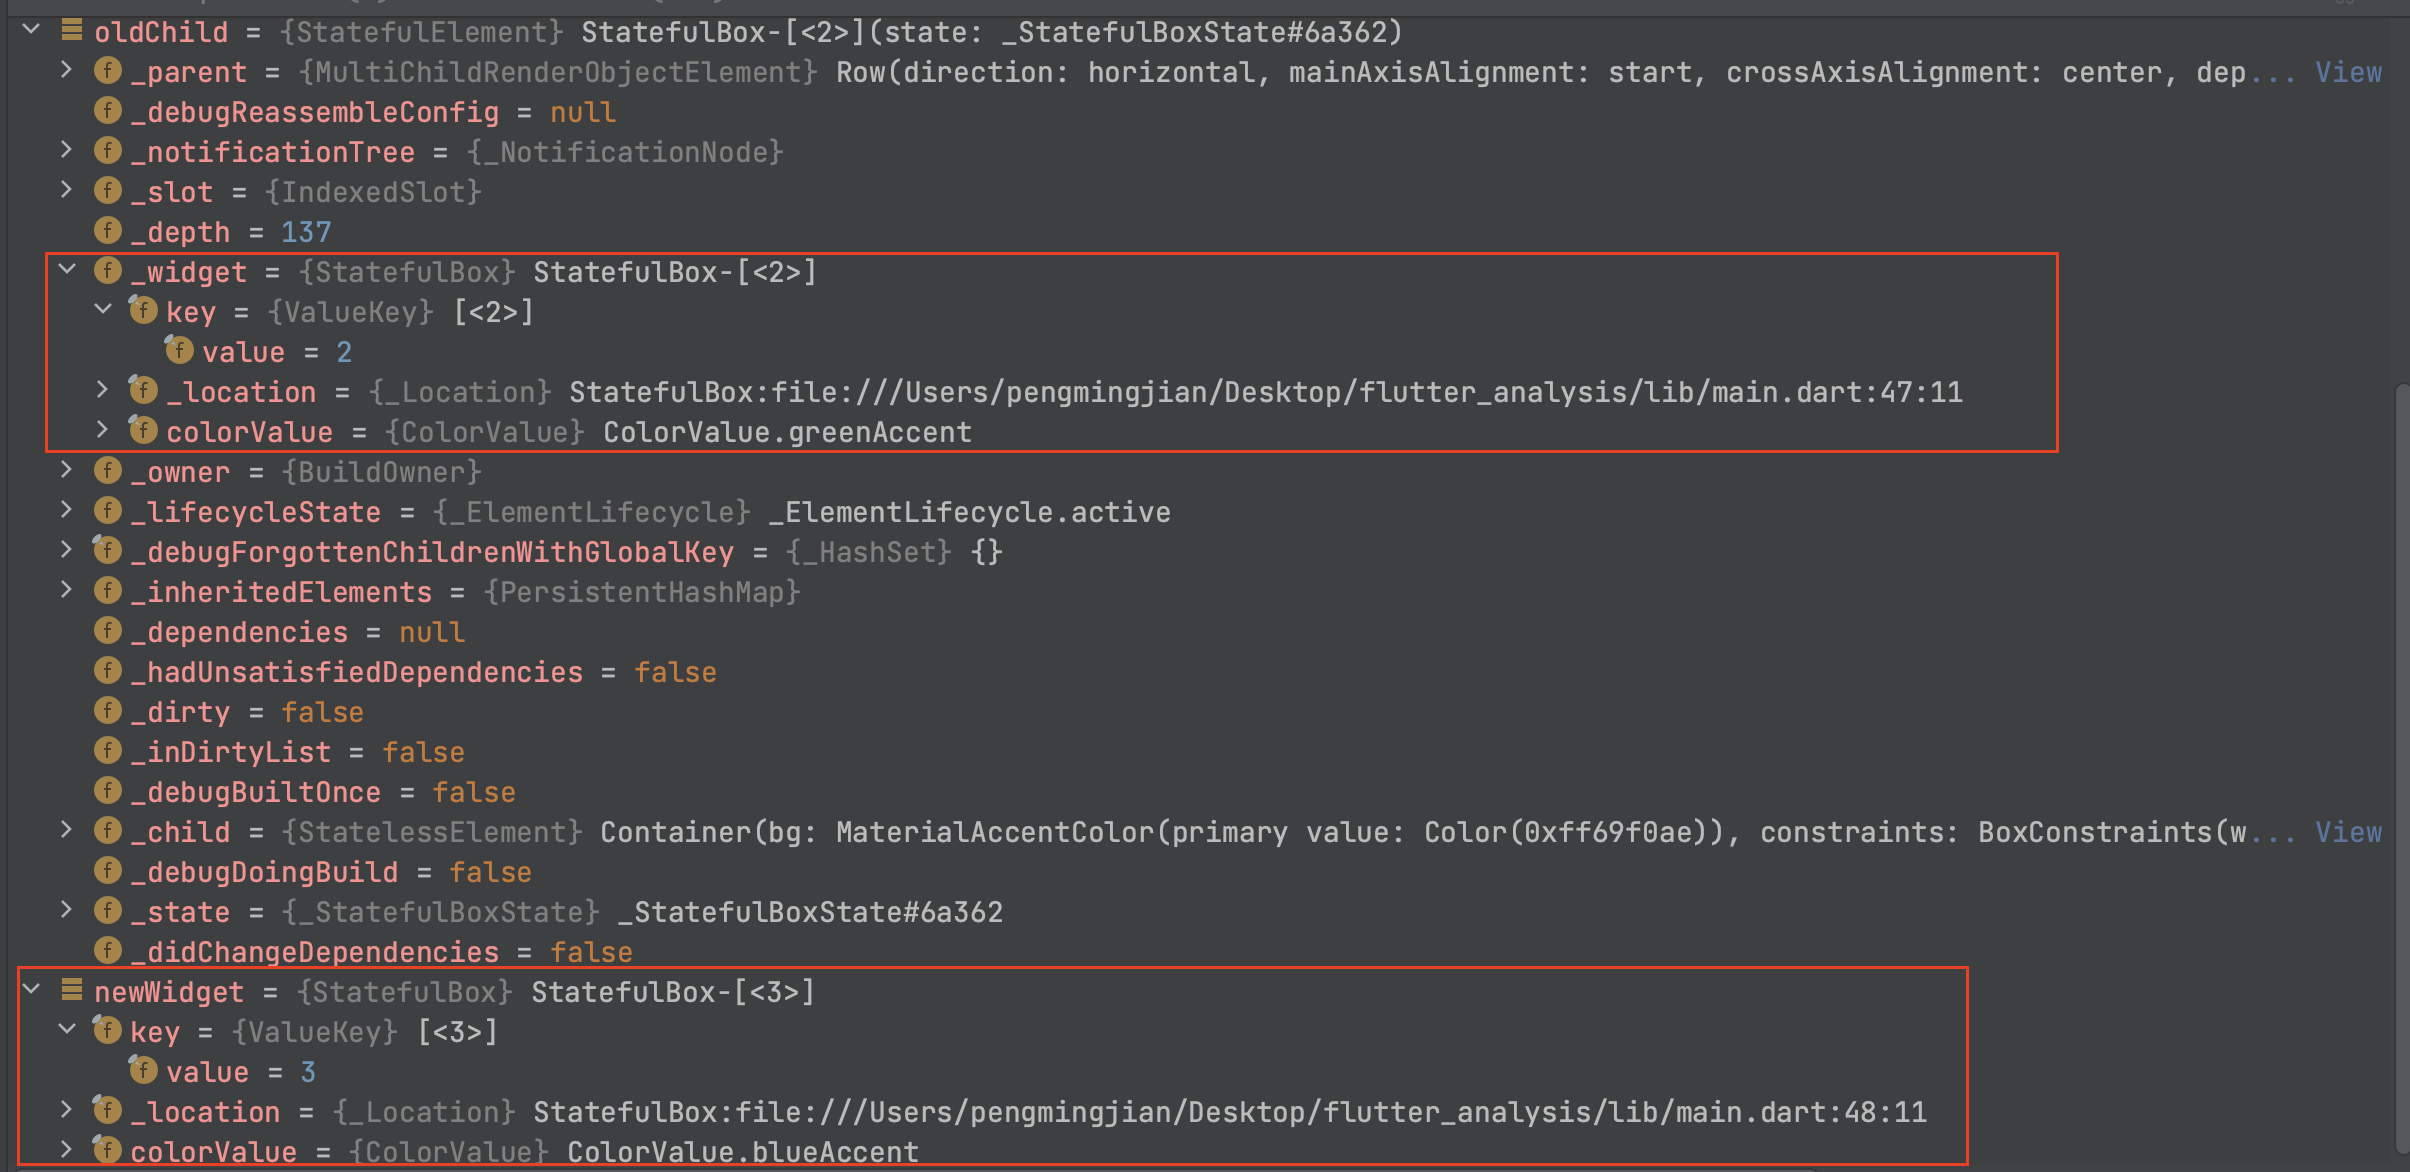
一般情况下,Key之间的==操作符是比较两者的引用,但是呢,ValueKey重写了==操作符,比较的是ValueKey构造方法传入的参数,相当于执行了equals()方法,看下ValueKey的这部分源码。
1
2
3
4
5
6
7
8
9
|
// ValueKey
@override
bool operator ==(Object other) {
  if (other.runtimeType != runtimeType) {
    return false;
  }
  return other is ValueKey<T>
      && other.value == value;
}
|
当ValueKey(2)与ValueKey(3)比较时,很明显2 != 3,因此Widget.canUpdate()返回false,if (oldChild == null || !Widget.canUpdate(oldChild.widget, newWidget))条件成立,执行了break退出While循环。
3.3.2、分析第四部分
 1
 2
 3
 4
 5
 6
 7
 8
 9
10
11
12
13
14
15
|
// 扫描列表底部
// Scan the bottom of the list.
while ((oldChildrenTop <= oldChildrenBottom) && (newChildrenTop <= newChildrenBottom)) {
  // 分析1
  final Element? oldChild = replaceWithNullIfForgotten(oldChildren[oldChildrenBottom]);
  final Widget newWidget = newWidgets[newChildrenBottom];
  assert(oldChild == null || oldChild._lifecycleState == _ElementLifecycle.active);
  // 分析2
  if (oldChild == null || !Widget.canUpdate(oldChild.widget, newWidget)) {
    break;
  }
  // 分析3
  oldChildrenBottom -= 1;
  newChildrenBottom -= 1;
}
|
这个While循环的工作原理是扫描列表底部,也就是从旧Row中第3个子Widget所关联的Element与新Row中第二个子Widget开始往前遍历,判断新旧Widget是否同一个Widget(判断条件是Widget的runtimeType与key),如果不是则break退出该While循环,此时,newChildrenTop与oldChildrenTop恰好就记录了旧Row中子Widget所关联的Element不能够找到所关联的新Row中子Widget时的位置索引。
否则,当旧Row中子Widget所关联的Element能够找到所关联的新Row中子Widget时,newChildrenTop与oldChildrenTop就会-1。
3.3.2.1、第一轮循环
在分析第四部分中,此时oldChildrenTop与newChildrenTop均为1,oldChildrenBottom为2,newChildrenBottom为1,满足while ((oldChildrenTop <= oldChildrenBottom) && (newChildrenTop <= newChildrenBottom))进入循环体中。
分析1:获取oldChild,它是旧Row中第三个Widget所关联的Element。获取newWidget,它是新Row中第二个Widget,也就是旧Row中第三个Widget。
分析2:执行Widget.canUpdate(),此时oldChild.widget与newWidget所指的都是旧Row中第三个Widget,所以Widget.canUpdate()成立返回true,不会执行break跳出While循环。
分析3:执行oldChildrenBottom -= 1与newChildrenBottom -= 1,此时oldChildrenTop与newChildrenTop均为1,oldChildrenBottom为1,newChildrenBottom为0。
3.3.2.2、第二轮循环
在进入下一轮While循环时,不满足while ((oldChildrenTop <= oldChildrenBottom) && (newChildrenTop <= newChildrenBottom))。
3.3.3、分析第五部分
 1
 2
 3
 4
 5
 6
 7
 8
 9
10
11
12
13
14
15
16
17
18
19
|
// 扫描列表中间的老孩子
// Scan the old children in the middle of the list.
final bool haveOldChildren = oldChildrenTop <= oldChildrenBottom;
Map<Key, Element>? oldKeyedChildren;
if (haveOldChildren) {
  oldKeyedChildren = <Key, Element>{};
  while (oldChildrenTop <= oldChildrenBottom) {
    final Element? oldChild = replaceWithNullIfForgotten(oldChildren[oldChildrenTop]);
    assert(oldChild == null || oldChild._lifecycleState == _ElementLifecycle.active);
    if (oldChild != null) {
      if (oldChild.widget.key != null) {
        oldKeyedChildren[oldChild.widget.key!] = oldChild;
      } else {
        deactivateChild(oldChild);
      }
    }
    oldChildrenTop += 1;
  }
}
|
3.3.3.1、第一轮循环
在分析第五部分中,此时oldChildrenTop与oldChildrenBottom均为1,所以haveOldChildren为true。
执行while (oldChildrenTop <= oldChildrenBottom),此处条件与haveOldChildren的条件相同,所以满足While判断的。
然后获取oldChild,它是旧Row中第二个Widget所关联的Element。因为Row中所有子Widget都有传入Key,所以满足if (oldChild.widget.key != null)。
这里是将旧Row中第二个Widget所关联的Element存入到了一个Map里。接着执行oldChildrenTop += 1,此时oldChildrenTop为2。
3.3.3.2、第二轮循环
在进入下一轮While循环时,不满足while (oldChildrenTop <= oldChildrenBottom)。
3.3.4、分析第七部分
1
2
3
4
|
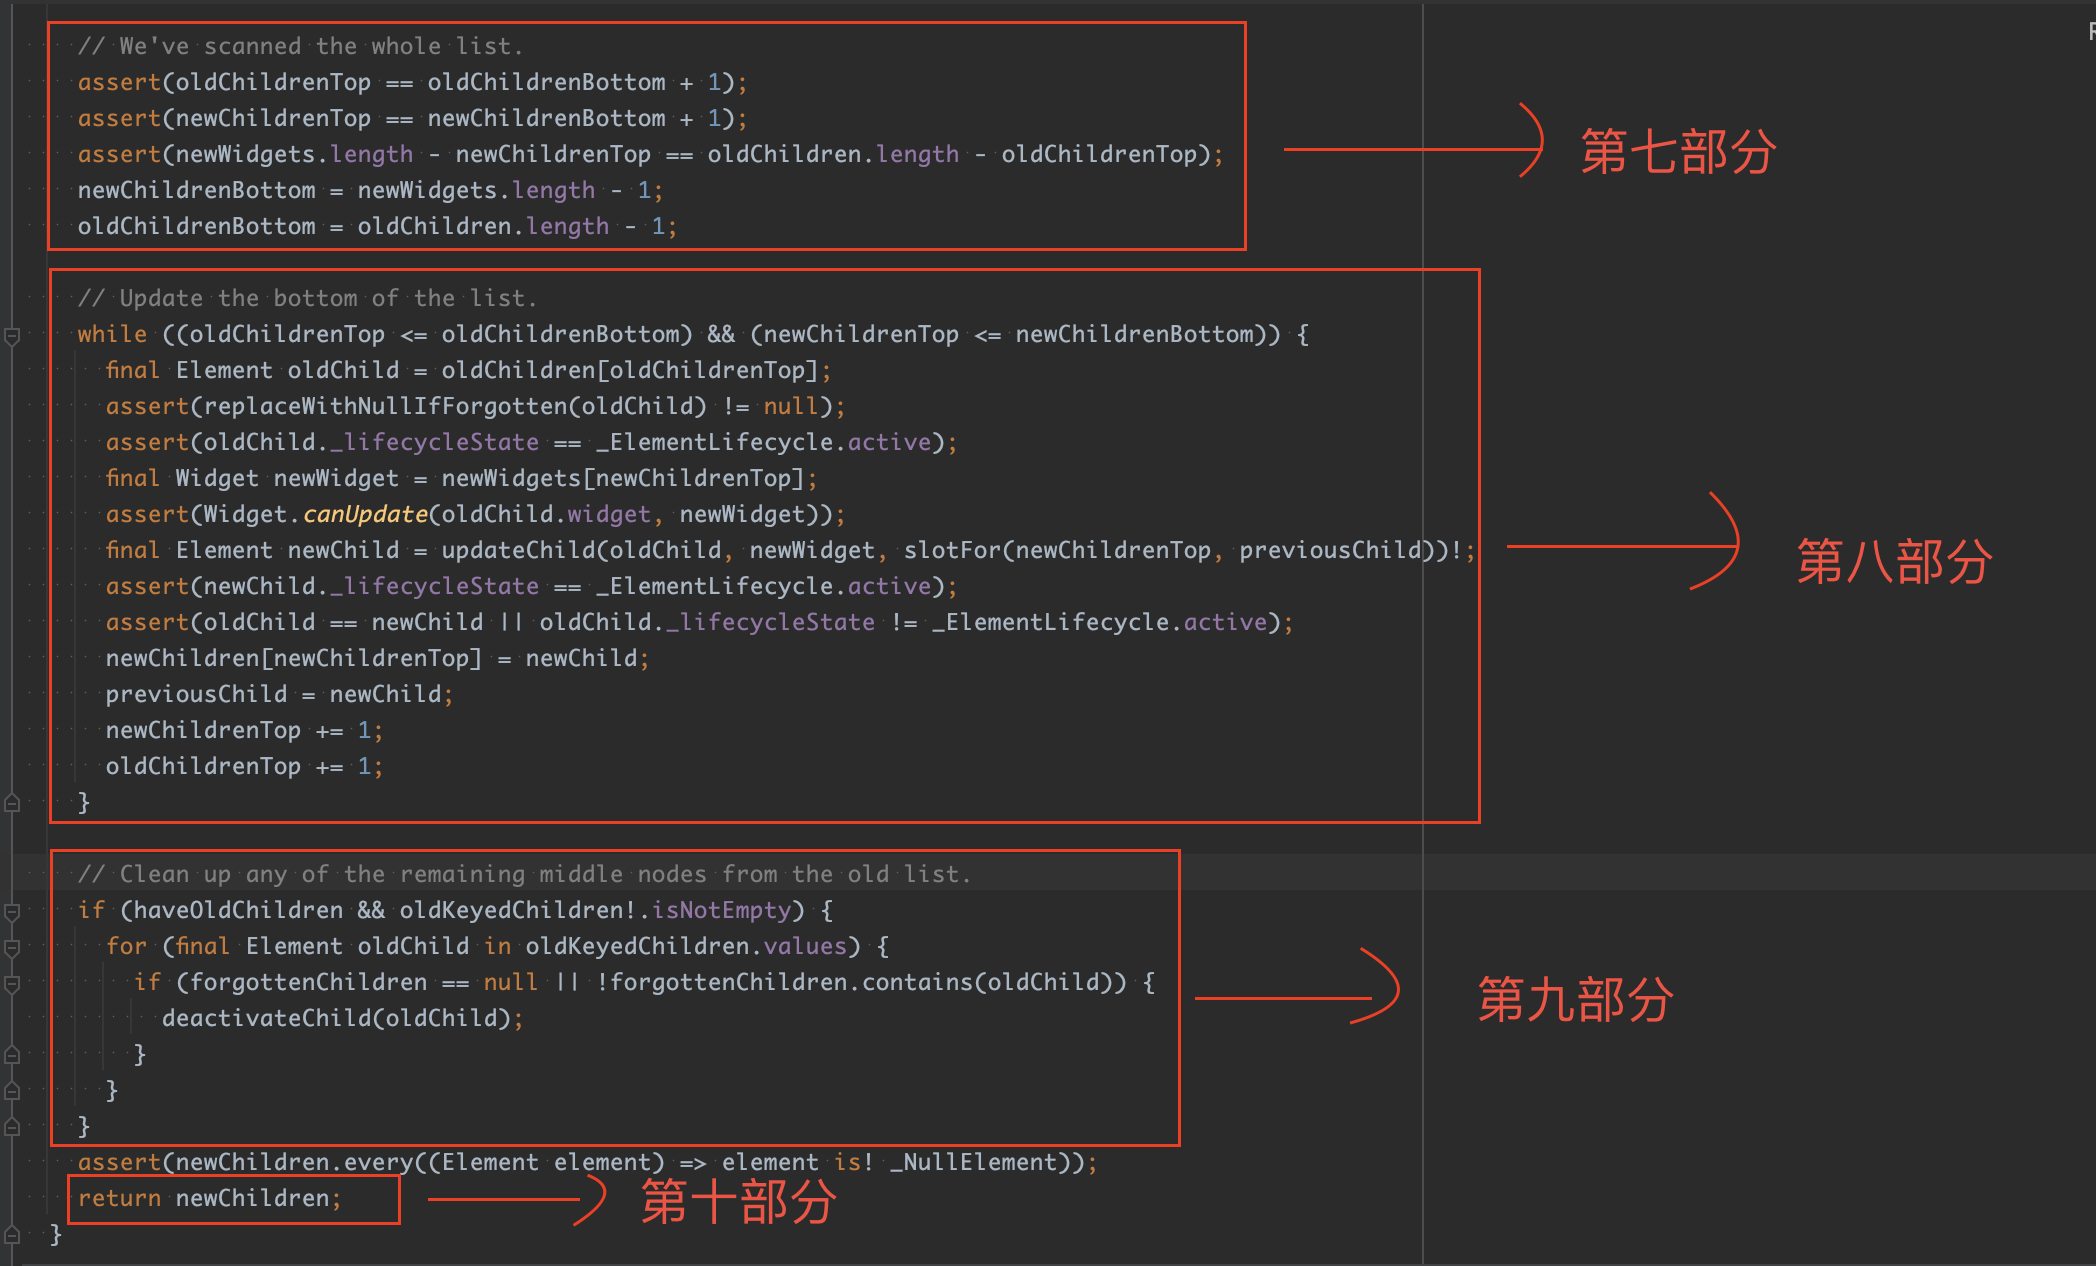
// 我们已经扫描了整个列表
// We've scanned the whole list.
newChildrenBottom = newWidgets.length - 1;
oldChildrenBottom = oldChildren.length - 1;
|
整个列表的扫描工作完成后,重置newChildrenBottom与oldChildrenBottom,此时oldChildrenBottom为2,newChildrenBottom为1。
3.3.5、分析第八部分
 1
 2
 3
 4
 5
 6
 7
 8
 9
10
11
12
13
14
15
16
17
18
19
|
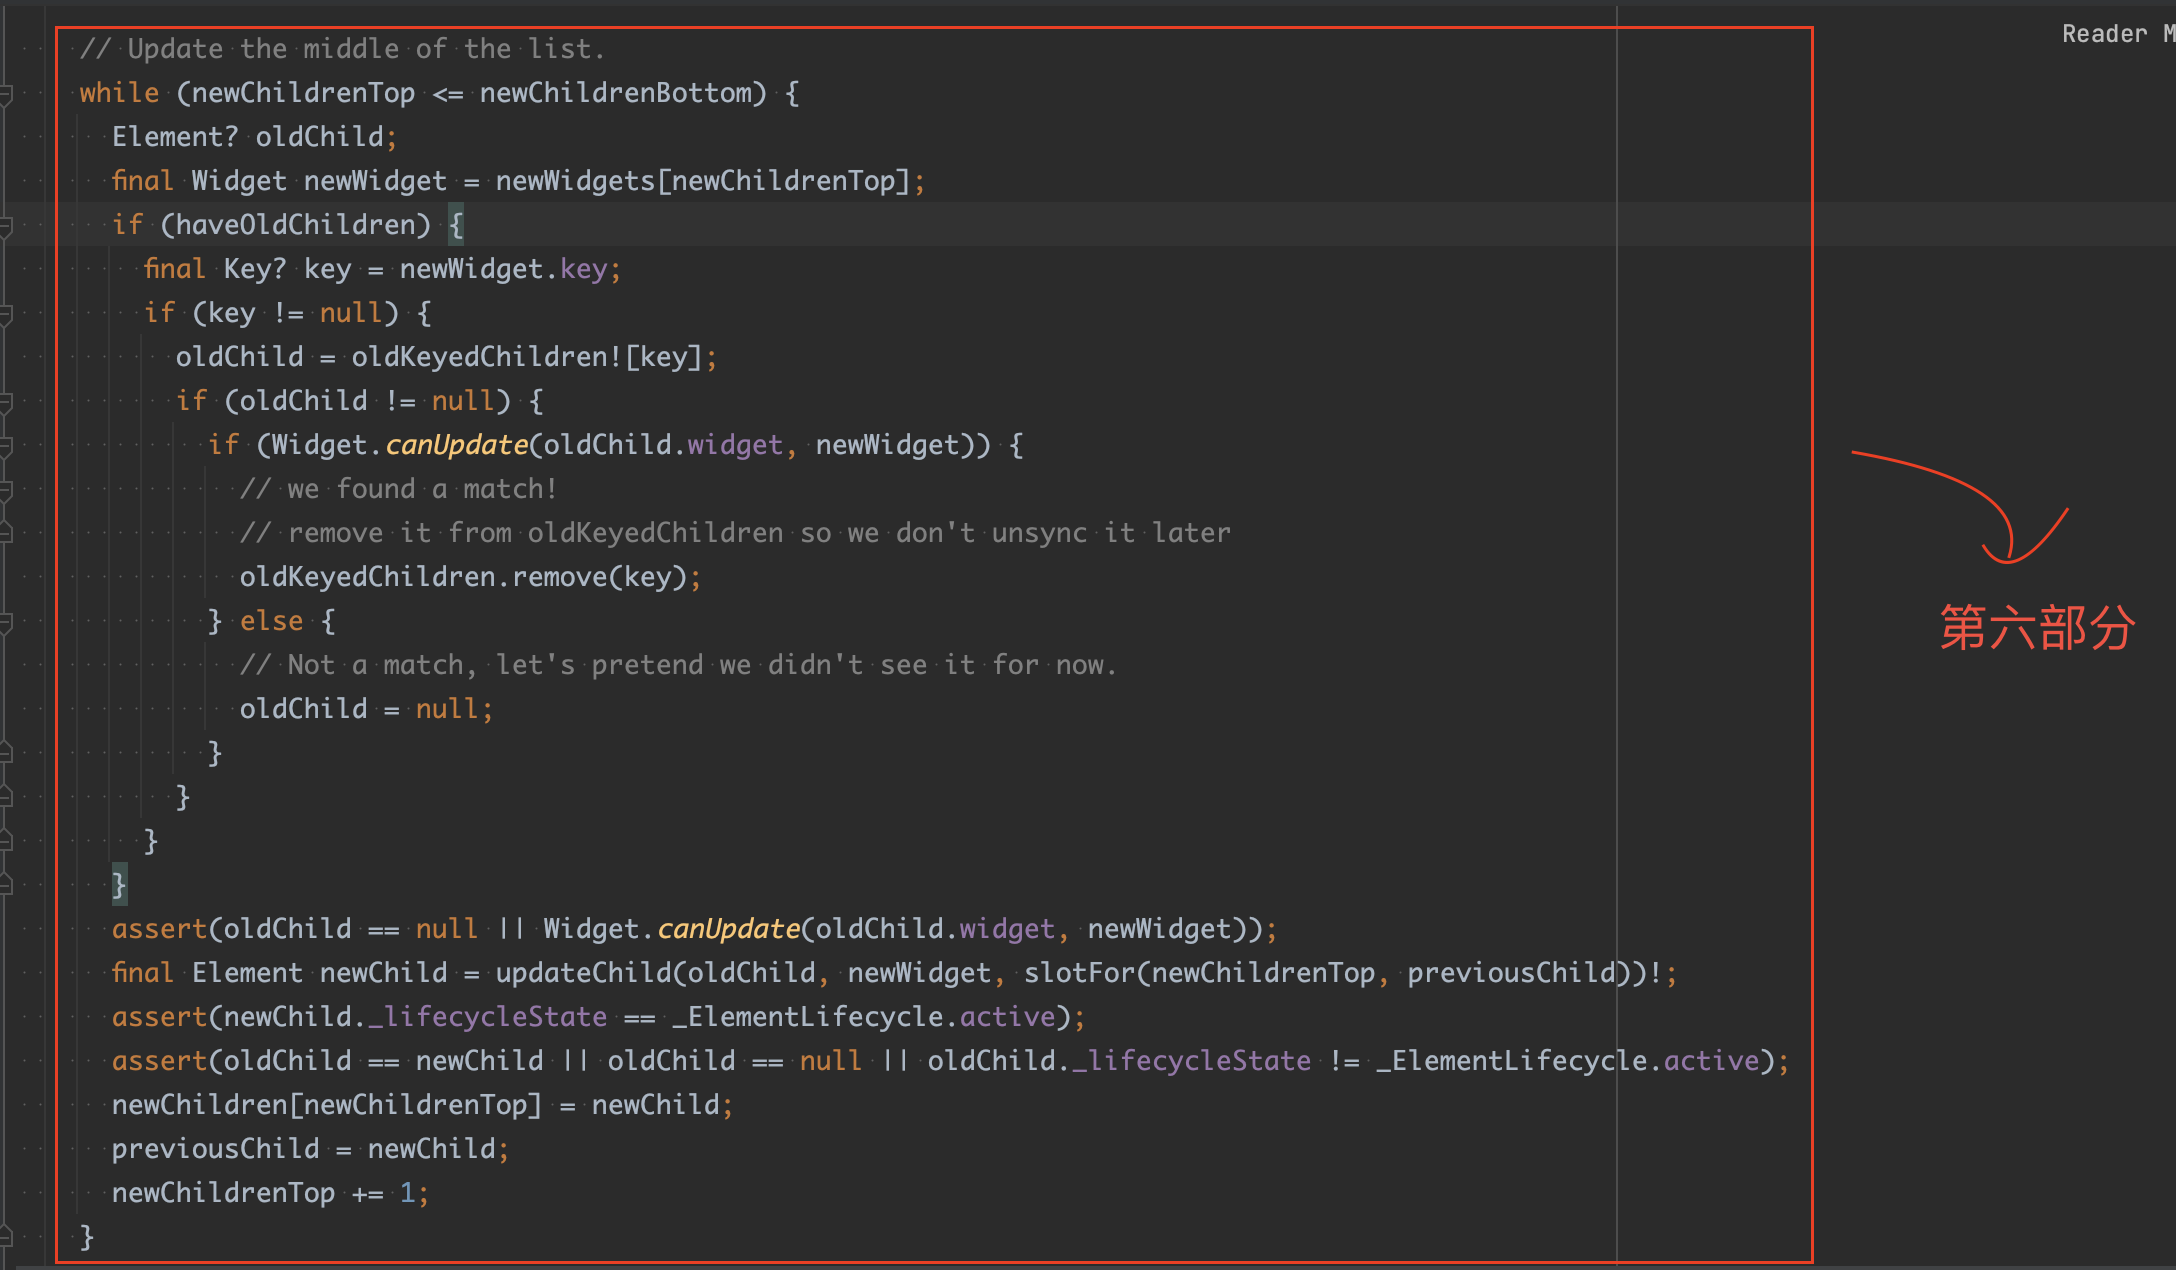
// 更新列表底部
// Update the bottom of the list.
while ((oldChildrenTop <= oldChildrenBottom) && (newChildrenTop <= newChildrenBottom)) {
  // 分析1
  final Element oldChild = oldChildren[oldChildrenTop];
  assert(replaceWithNullIfForgotten(oldChild) != null);
  assert(oldChild._lifecycleState == _ElementLifecycle.active);
  final Widget newWidget = newWidgets[newChildrenTop];
  assert(Widget.canUpdate(oldChild.widget, newWidget));
  // 分析2
  final Element newChild = updateChild(oldChild, newWidget, slotFor(newChildrenTop, previousChild))!;
  assert(newChild._lifecycleState == _ElementLifecycle.active);
  assert(oldChild == newChild || oldChild._lifecycleState != _ElementLifecycle.active);
  // 分析3
  newChildren[newChildrenTop] = newChild;
  previousChild = newChild;
  newChildrenTop += 1;
  oldChildrenTop += 1;
}
|
这个While循环的工作原理是从列表底部开始更新,也就是从旧Row中第三个子Widget所关联的Element与新Row中第二个子Widget开始往后遍历,更新Element所持有的旧Widget为新Widget,为什么能这么干呢?这时因为之前扫描列表底部时已经记录了旧Row中子Widget所关联的Element能够找到所关联的新Row中子Widget时的位置索引,该位置索引之后的Element均能更新旧Widget为新Widget。
当Element更新旧Widget成功时,newChildrenTop与oldChildrenTop就会+1。
3.3.5.1、第一轮循环
此时oldChildrenTop为2,newChildrenTop为1,oldChildrenBottom为2,newChildrenBottom为1。满足while ((oldChildrenTop <= oldChildrenBottom) && (newChildrenTop <= newChildrenBottom))进入循环体。
分析1:获取oldChild,它是旧Row中第三个Widget所关联的Element。获取newWidget,它是新Row中第二个Widget,也就是旧Row中第三个Widget。
分析2:执行Element的updateChild方法,下面是会执行到的updateChild方法的相关源码。
 1
 2
 3
 4
 5
 6
 7
 8
 9
10
11
12
13
14
15
16
17
18
19
20
21
22
23
24
25
26
27
28
|
@protected
@pragma('vm:prefer-inline')
Element? updateChild(Element? child, Widget? newWidget, Object? newSlot) {
  if (newWidget == null) {
    if (child != null) {
      deactivateChild(child);
    }
    return null;
  }

  final Element newChild;
  if (child != null) {
    bool hasSameSuperclass = true;
    assert(() {
      final int oldElementClass = Element._debugConcreteSubtype(child);
      final int newWidgetClass = Widget._debugConcreteSubtype(newWidget);
      hasSameSuperclass = oldElementClass == newWidgetClass;
      return true;
    }());
    if (hasSameSuperclass && child.widget == newWidget) {
      if (child.slot != newSlot) {
        updateSlotForChild(child, newSlot);
      }
      newChild = child;
    }
  }
  return newChild;
}
|
因为比较的两者都是旧Row中第三个子Widget,所以满足if (hasSameSuperclass && child.widget == newWidget),最后执行newChild = child把旧Row中第三个子Widget所关联的Element返回。
分析四:把返回的newChild添加到newChildren中,并且newChild成为了下一个槽位slot所指向的Element,然后执行newChildrenTop += 1与oldChildrenTop += 1,此时oldChildrenTop为3,newChildrenTop为2,oldChildrenBottom为2,newChildrenBottom为1。
3.3.5.2、第二轮循环
在进入下一轮While循环时不满足while ((oldChildrenTop <= oldChildrenBottom) && (newChildrenTop <= newChildrenBottom))。
3.3.6、分析第九部分
1
2
3
4
5
6
7
8
9
|
// 从旧列表中清除任何剩余的中间节点
// Clean up any of the remaining middle nodes from the old list.
if (haveOldChildren && oldKeyedChildren!.isNotEmpty) {
  for (final Element oldChild in oldKeyedChildren.values) {
    if (forgottenChildren == null || !forgottenChildren.contains(oldChild)) {
      deactivateChild(oldChild);
    }
  }
}
|
这里的原理是遍历oldKeyedChildren这个Map,它是第五部分中扫描列表中间的老孩子得出的Map,除了传入GlobalKey的子Widget所关联的Element,其它一律移除,因为新Row中没有子Widget与之关联了。
这里是把之前存入Map的旧Row中第二个Widget所关联的Element执行deactivateChild方法移除。
3.3.7、分析第十部分
直接将newChildren返回,那么updateChildren方法就执行完毕了,意味着Row所关联的MultiChildRenderObjectElement也就更新了_children。
示例3与示例2的不同之处已经讲完,该示例中Row及其所有子Widget更新的核心原理如图所示。

现在可以回过头来解释示例3中的疑问了:
- 1、为什么在使用色块Widget时给它传入一个Key,程序运行效果相比示例2就又变得正常了?
因为旧Row中子Widget所关联的Element,该Element是持有Widget引用的,可以根据Widget的Key去与新Row中子Widget的Key进行配对,如果Key配对成功,那么就会更新该Element所持有的Widget为新Row中子Widget。如果Key配对失败,并且该Widget没有设置GlobalKey,那么该Widget所关联的Element则会被移除。
- 2、为什么点击FloatingActionButton按钮后无日志输出?
因为Element根据Widget的Key来匹配更新Widget,Widget的引用是一直存在的,走的是if (hasSameSuperclass && child.widget == newWidget),所以不会执行child.update(newWidget),也就不会执行State的build方法,所以无日志输出。
四、Key的分类
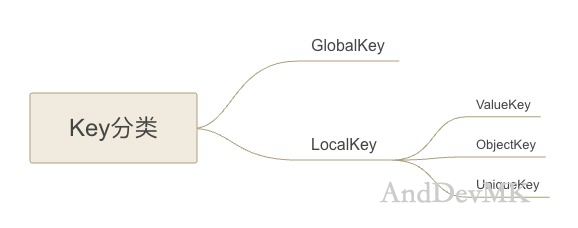
根据作用域的不同,可以将Key分为GlobalKey与LocalKey。LocalKey还可以进一步分为ValueKey、ObjectKey与UniqueKey。
4.1、GlobalKey
 1
 2
 3
 4
 5
 6
 7
 8
 9
10
11
12
13
14
15
16
17
18
19
20
21
22
23
24
25
26
27
28
29
30
31
32
33
34
35
36
37
38
39
40
41
42
43
44
45
46
47
48
49
50
51
52
53
54
55
56
57
58
59
60
61
62
63
64
65
66
67
68
69
70
71
72
73
74
75
76
77
78
79
80
81
82
83
84
85
86
87
88
89
90
91
92
93
94
95
|
/// 在整个应用程序中唯一的key。
/// A key that is unique across the entire app.
///
/// Global keys唯一标识elements。Global keys提供对与这些elements关联的其它对象的访问,例如 [BuildContext]。
/// 对于 [StatefulWidget],global keys还提供对 [State] 的访问。
/// Global keys uniquely identify elements. Global keys provide access to other
/// objects that are associated with those elements, such as [BuildContext].
/// For [StatefulWidget]s, global keys also provide access to [State].
///
/// 当具有global keys的Widgets从树中的一个位置移动到树中的另一位置时,它们会重新设置其子树的父级。
/// 为了重新设置其子树的父级,widget必须在其从树中旧位置删除的同一动画帧中到达其在树中的新位置。
/// Widgets that have global keys reparent their subtrees when they are moved
/// from one location in the tree to another location in the tree. In order to
/// reparent its subtree, a widget must arrive at its new location in the tree
/// in the same animation frame in which it was removed from its old location in
/// the tree.
///
/// 使用global key重新设置 [Element] 的父级相对昂贵,因为此操作将触发对关联的 [State] 及其所有后代的 [State.deactivate] 调用;然后强制重建所有依赖于 [InheritedWidget] 的widgets。
/// Reparenting an [Element] using a global key is relatively expensive, as
/// this operation will trigger a call to [State.deactivate] on the associated
/// [State] and all of its descendants; then force all widgets that depends
/// on an [InheritedWidget] to rebuild.
///
/// 如果您不需要上面列出的任何功能,请考虑使用 [Key]、[ValueKey]、[ObjectKey] 或 [UniqueKey]。
/// If you don't need any of the features listed above, consider using a [Key],
/// [ValueKey], [ObjectKey], or [UniqueKey] instead.
///
/// 您不能同时在树中包含具有相同global key的两个widgets。尝试这样做将在运行时断言。
/// You cannot simultaneously include two widgets in the tree with the same
/// global key. Attempting to do so will assert at runtime.
///
/// ## 陷阱
/// ## Pitfalls
///
/// 不应在每次构建时重新创建 GlobalKeys。例如,它们通常应该是 [State] 对象拥有的长期对象。
/// GlobalKeys should not be re-created on every build. They should usually be
/// long-lived objects owned by a [State] object, for example.
///
/// 在每次构建时创建新的GlobalKey将丢弃与旧key关联的子树的状态,并为新key创建一个新的子树。
/// 除了损害性能之外,这还可能导致子树中的widgets出现意外行为。
/// 例如,子树中的 [GestureDetector] 将无法跟踪正在进行的手势,因为它将在每次构建时重新创建。
/// Creating a new GlobalKey on every build will throw away the state of the
/// subtree associated with the old key and create a new fresh subtree for the
/// new key. Besides harming performance, this can also cause unexpected
/// behavior in widgets in the subtree. For example, a [GestureDetector] in the
/// subtree will be unable to track ongoing gestures since it will be recreated
/// on each build.
///
/// 相反,一个好的做法是让 State 对象拥有 GlobalKey,并在 build 方法之外实例化它,例如在 [State.initState] 中。
/// Instead, a good practice is to let a State object own the GlobalKey, and
/// instantiate it outside the build method, such as in [State.initState].
@optionalTypeArgs
abstract class GlobalKey<T extends State<StatefulWidget>> extends Key {

  factory GlobalKey({ String? debugLabel }) => LabeledGlobalKey<T>(debugLabel);

  const GlobalKey.constructor() : super.empty();

  Element? get _currentElement => WidgetsBinding.instance.buildOwner!._globalKeyRegistry[this];

  /// 具有此key的widget在其中构建的build context。
  /// The build context in which the widget with this key builds.
  ///
  /// 如果树中没有与此global key匹配的widget,则当前上下文为null。
  /// The current context is null if there is no widget in the tree that matches
  /// this global key.
  BuildContext? get currentContext => _currentElement;

  /// 树中当前具有此global key的widget。
  /// The widget in the tree that currently has this global key.
  ///
  /// 如果树中没有与此global key匹配的widget,则当前widget为空。
  /// The current widget is null if there is no widget in the tree that matches
  /// this global key.
  Widget? get currentWidget => _currentElement?.widget;

  /// 树中当前具有此global key的widget的State
  /// The [State] for the widget in the tree that currently has this global key.
  ///
  /// 如果 (1) 树中没有与此global key匹配的widget,(2) 该widget不是 [StatefulWidget],或者关联的 [State] 对象不是 `T` 的子类型,则当前state为null。
  /// The current state is null if (1) there is no widget in the tree that
  /// matches this global key, (2) that widget is not a [StatefulWidget], or the
  /// associated [State] object is not a subtype of `T`.
  T? get currentState {
    final Element? element = _currentElement;
    if (element is StatefulElement) {
      final StatefulElement statefulElement = element;
      final State state = statefulElement.state;
      if (state is T) {
        return state;
      }
    }
    return null;
  }
}
|
结合上面GlobalKey的注释以及源码,总结下GlobalKey的特性:
1、GlobalKey是在整个应用程序中唯一的Key,也就是不能给多个Widget传入同一个GlobalKey实例。
2、GlobalKey唯一标识Element。GlobalKey提供对与这些Element关联的其它对象的访问,例如currentContext、currentWidget与currentState。
3、不应在每次构建时重新创建GlobalKey,而是在build方法之外实例化它。
4、使用GlobalKey重新设置Element的父级相对昂贵,因为此操作将触发对关联的State及其所有后代的State.deactivate调用;然后强制重建所有依赖于InheritedWidget的Widget。
5、…
看下GlobalKey在Flutter源码中的体现过程。
在BuildOwner中有一个Map,用来存放GlobalKey与Element这样的键值对,并且提供了_registerGlobalKey与_unregisterGlobalKey方法对GlobalKey注册与取消注册。
 1
 2
 3
 4
 5
 6
 7
 8
 9
10
11
12
|
// BuildOwner
final Map<GlobalKey, Element> _globalKeyRegistry = <GlobalKey, Element>{};

void _registerGlobalKey(GlobalKey key, Element element) {
  _globalKeyRegistry[key] = element;
}

void _unregisterGlobalKey(GlobalKey key, Element element) {
  if (_globalKeyRegistry[key] == element) {
    _globalKeyRegistry.remove(key);
  }
}
|
那么,它是在哪执行GlobalKey注册与取消注册?
可以看到,GlobalKey注册是在Element的mount方法中触发的,GlobalKey取消注册是在Element的unmount方法中触发的。
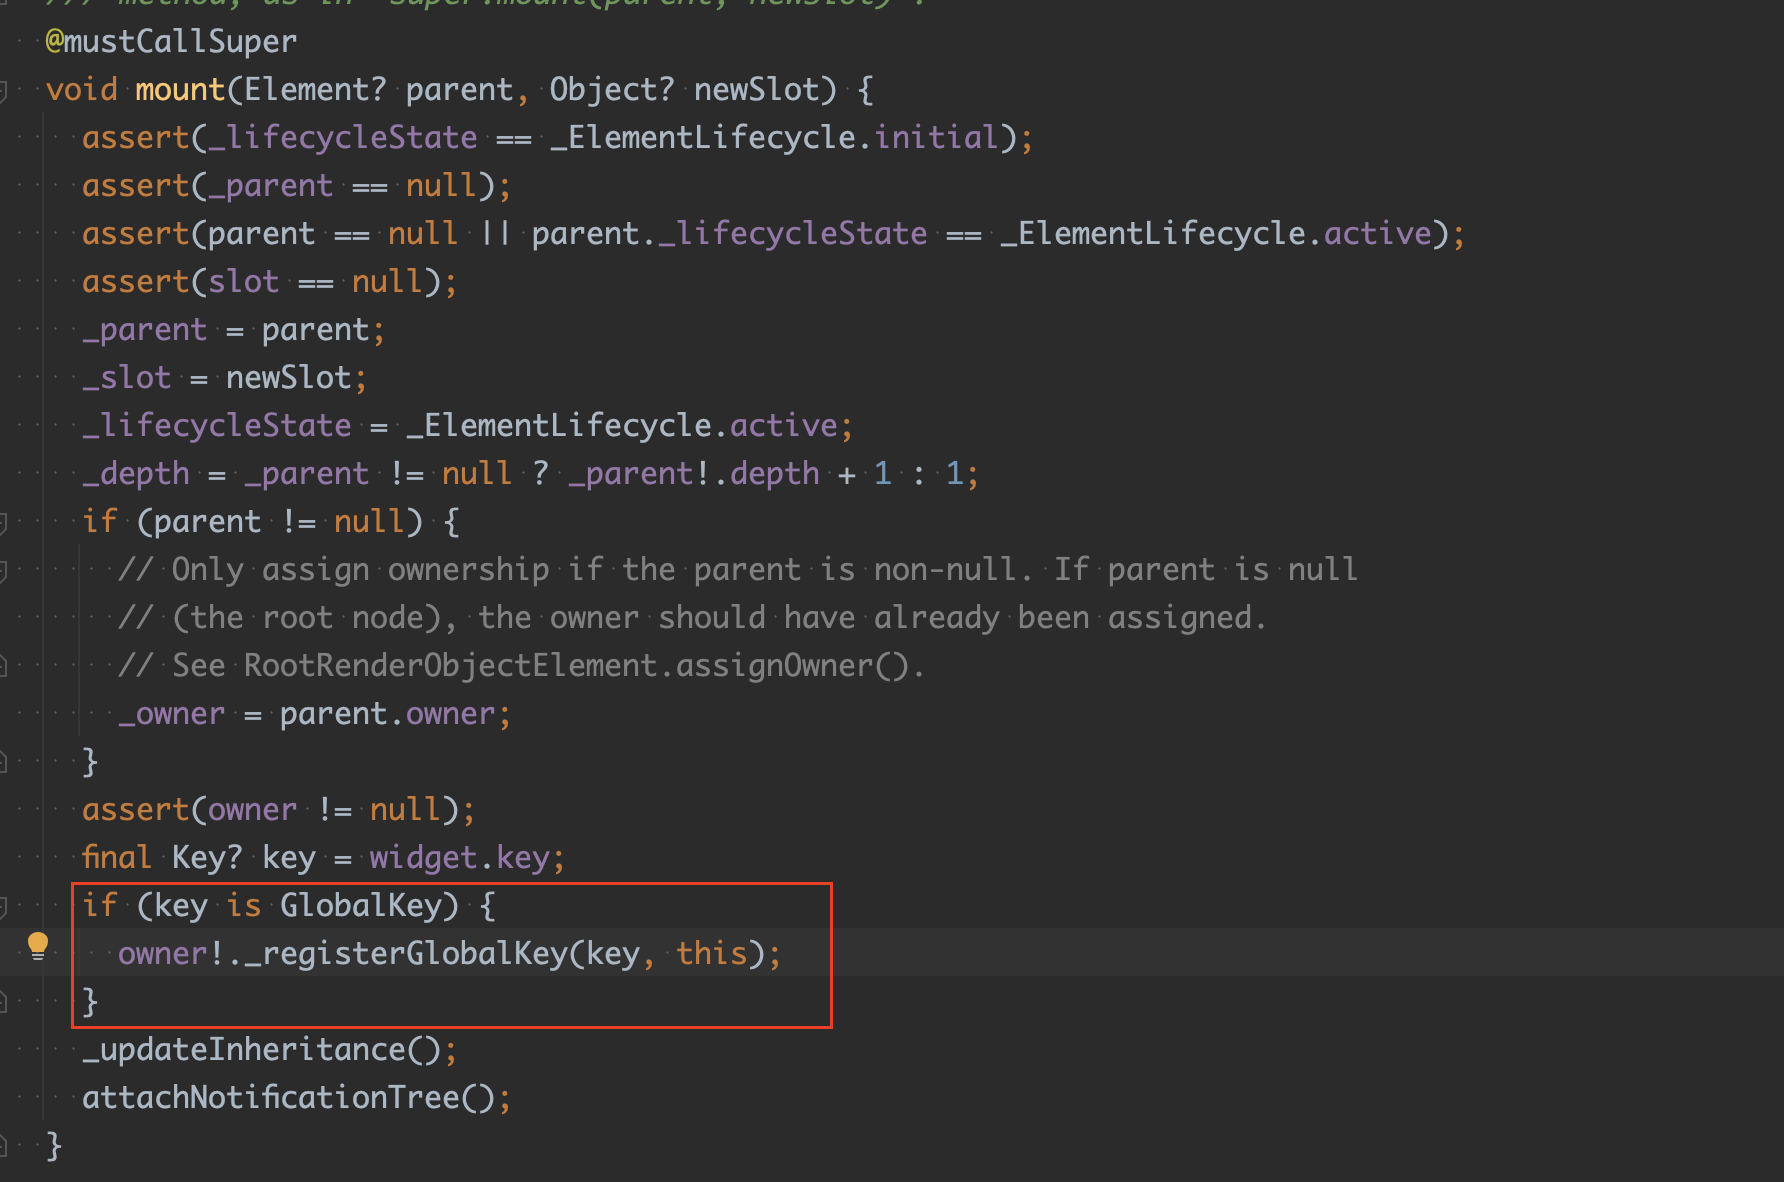
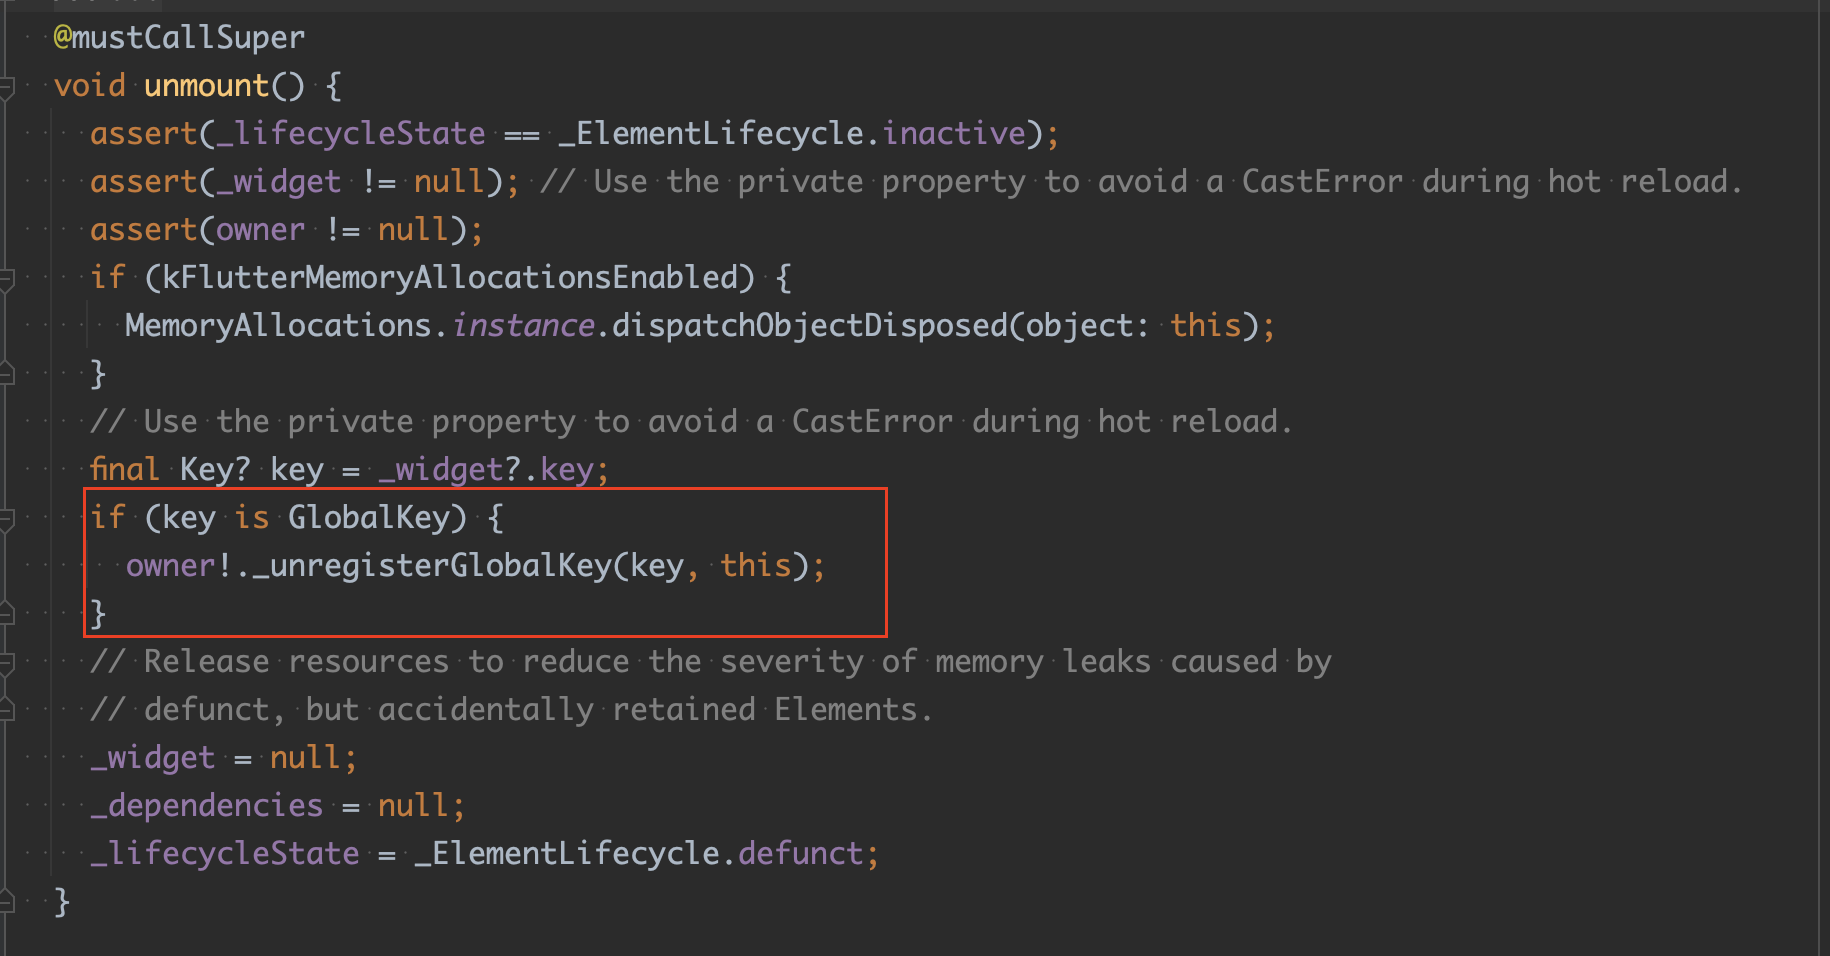
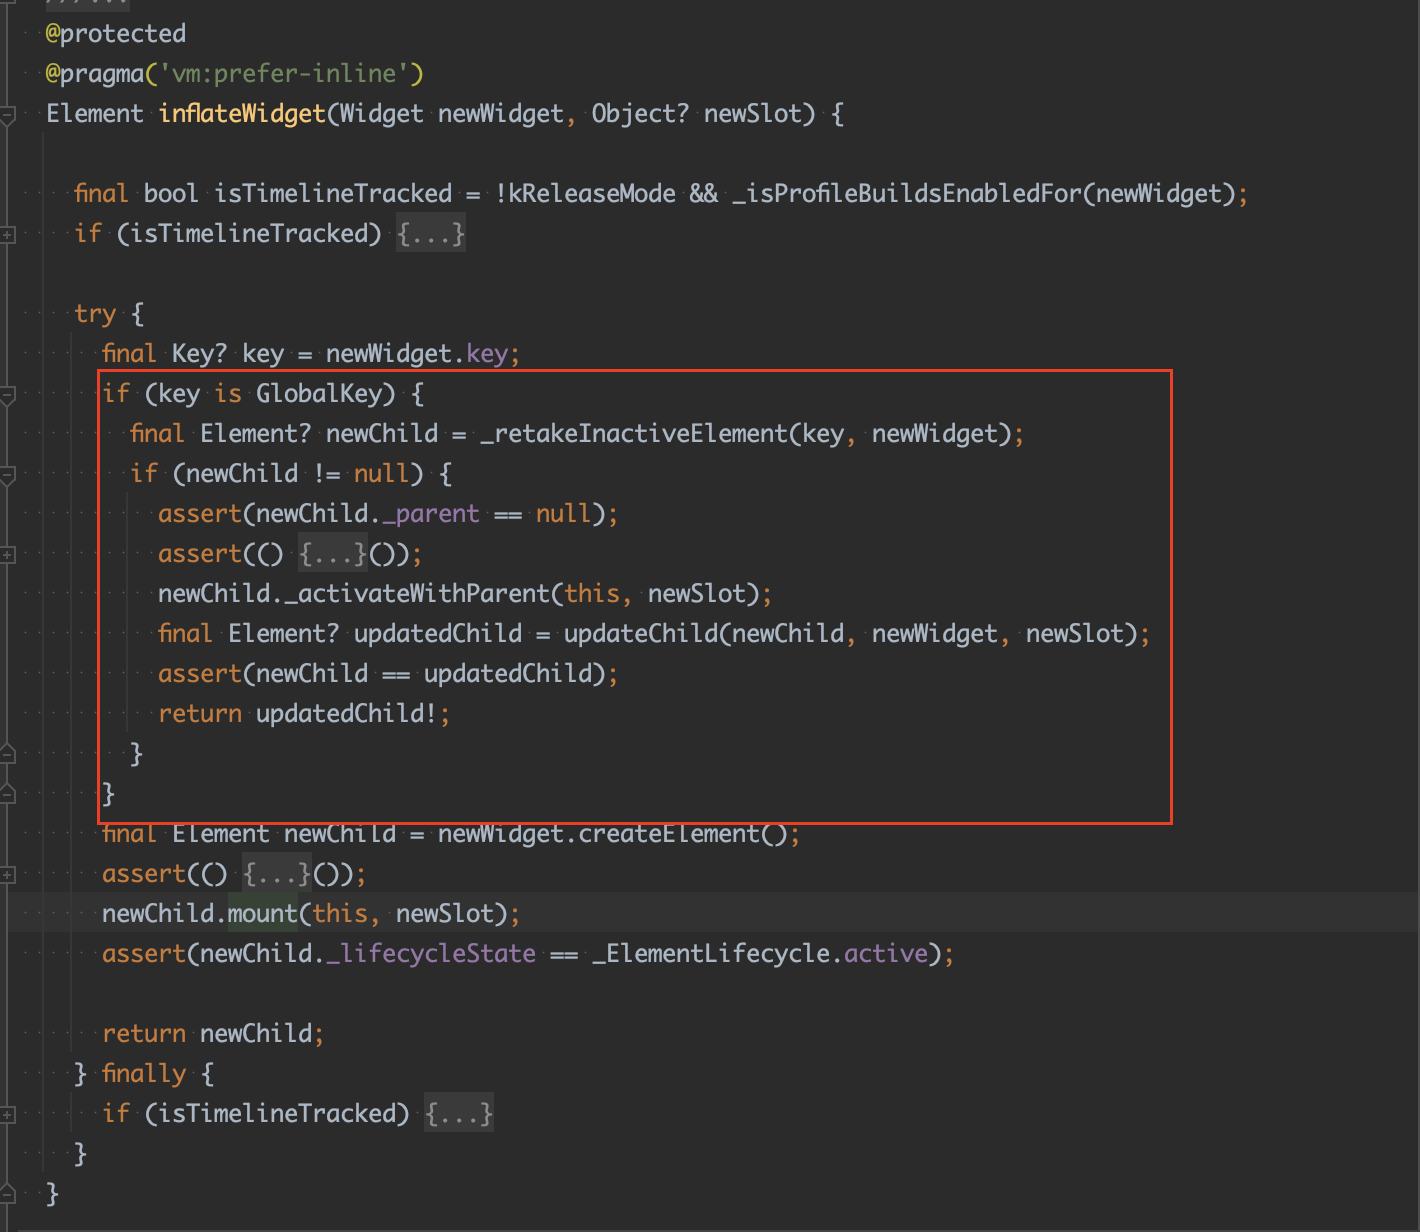
在Element的inflateWidget方法中,一共做了3件事情:
1、执行_retakeInactiveElement方法,通过GlobalKey重新获取不活跃的Element。
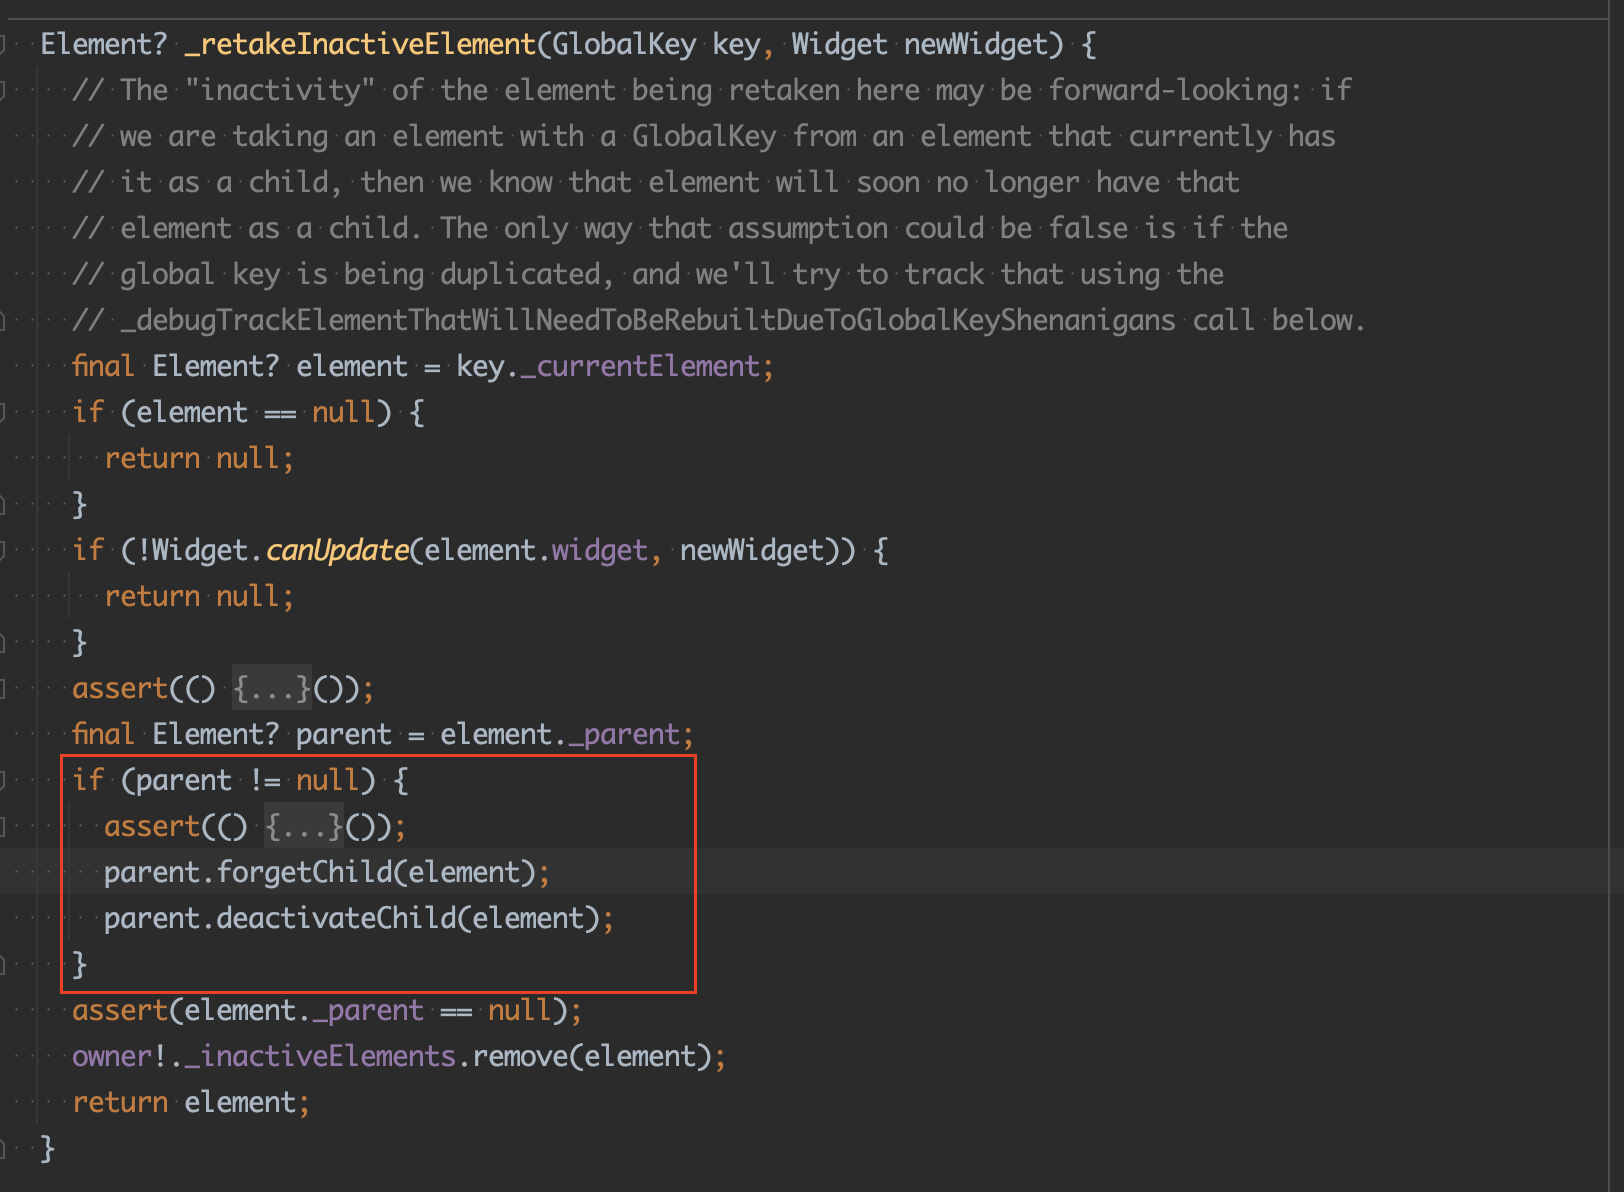
在_retakeInactiveElement方法中,执行了parent.forgetChild,表示从Element的子级列表中删除给定的子级,为该子级在Element树中的其它位置重用做好准备。
在前面讲Row时,它所关联的Element是MultiChildRenderObjectElement,在MultiChildRenderObjectElement的forgetChild方法中,会把当前不活跃的Element添加进_forgottenChildren中。
1
2
3
4
5
6
7
|
@override
void forgetChild(Element child) {
  assert(_children.contains(child));
  assert(!_forgottenChildren.contains(child));
  _forgottenChildren.add(child);
  super.forgetChild(child);
}
|
在_retakeInactiveElement方法中,继续执行了parent.deactivateChild,将给定元素移动到非活动元素列表,并将其渲染对象从渲染树中分离。
2、执行newChild._activateWithParent,让Element从“非活动”生命周期状态转换为“活动”生命周期状态,这里会执行Element的activate方法。
 1
 2
 3
 4
 5
 6
 7
 8
 9
10
11
12
13
14
15
|
void _activateWithParent(Element parent, Object? newSlot) {
  assert(_lifecycleState == _ElementLifecycle.inactive);
  _parent = parent;
  _updateDepth(_parent!.depth);
  _activateRecursively(this);
  attachRenderObject(newSlot);
  assert(_lifecycleState == _ElementLifecycle.active);
}

static void _activateRecursively(Element element) {
  assert(element._lifecycleState == _ElementLifecycle.inactive);
  element.activate();
  assert(element._lifecycleState == _ElementLifecycle.active);
  element.visitChildren(_activateRecursively);
}
|
3、执行updateChild,更新Element对Widget的引用关系。
到此,这个Element就复用完成。
4.2、LocalKey
 1
 2
 3
 4
 5
 6
 7
 8
 9
10
|
/// 不是 [GlobalKey] 的key。
/// A key that is not a [GlobalKey].
///
/// Keys在具有相同父级的 [Element] 中必须是唯一的。相比之下,[GlobalKey] 在整个应用程序中必须是唯一的。
/// Keys must be unique amongst the [Element]s with the same parent. By
/// contrast, [GlobalKey]s must be unique across the entire app.
abstract class LocalKey extends Key {

  const LocalKey() : super.empty();
}
|
结合上面LocalKey的注释以及源码,总结下LocalKey的特性:在同一级别的Widget中,LocalKey具有唯一性。
4.2.1、ValueKey
 1
 2
 3
 4
 5
 6
 7
 8
 9
10
11
12
13
14
15
16
17
18
19
20
21
22
23
24
25
26
27
28
29
30
31
32
33
34
35
36
37
38
39
40
41
42
43
44
|
/// 使用特定类型的值来标识自身的key。
/// A key that uses a value of a particular type to identify itself.
///
/// 当且仅当它们的值为 [operator==] 时,[ValueKey<T>] 才等于另一个 [ValueKey<T>]。
/// A [ValueKey<T>] is equal to another [ValueKey<T>] if, and only if, their
/// values are [operator==].
///
/// 可以对此类进行子类化,以创建与碰巧使用相同值的其它value keys不同的value keys。
/// 如果子类是私有的,这会导致value key类型不能与其它源的keys发生冲突,这可能很有用,例如,如果这些keys被用作与另一个widget提供的keys相同范围内的后备。
/// This class can be subclassed to create value keys that will not be equal to
/// other value keys that happen to use the same value. If the subclass is
/// private, this results in a value key type that cannot collide with keys from
/// other sources, which could be useful, for example, if the keys are being
/// used as fallbacks in the same scope as keys supplied from another widget.
class ValueKey<T> extends LocalKey {
  /// Creates a key that delegates its [operator==] to the given value.
  const ValueKey(this.value);

  /// The value to which this key delegates its [operator==]
  final T value;

  @override
  bool operator ==(Object other) {
    if (other.runtimeType != runtimeType) {
      return false;
    }
    return other is ValueKey<T>
        && other.value == value;
  }

  @override
  int get hashCode => Object.hash(runtimeType, value);

  @override
  String toString() {
    final String valueString = T == String ? "<'$value'>" : '<$value>';
    // The crazy on the next line is a workaround for
    // https://github.com/dart-lang/sdk/issues/33297
    if (runtimeType == _TypeLiteral<ValueKey<T>>().type) {
      return '[$valueString]';
    }
    return '[$T $valueString]';
  }
}
|
之前讲过,ValueKey的==比较相当于equals()方法。
4.2.2、ObjectKey
 1
 2
 3
 4
 5
 6
 7
 8
 9
10
11
12
13
14
15
16
17
18
19
20
21
22
23
24
25
26
27
28
29
30
31
32
33
|
/// 一个key,它从用作其值的对象中获取其标识。
/// A key that takes its identity from the object used as its value.
///
/// 用于将widget的标识与用于生成该widget的对象的标识联系起来。
/// Used to tie the identity of a widget to the identity of an object used to
/// generate that widget.
class ObjectKey extends LocalKey {
  /// Creates a key that uses [identical] on [value] for its [operator==].
  const ObjectKey(this.value);

  /// The object whose identity is used by this key's [operator==].
  final Object? value;

  @override
  bool operator ==(Object other) {
    if (other.runtimeType != runtimeType) {
      return false;
    }
    return other is ObjectKey
        && identical(other.value, value);
  }

  @override
  int get hashCode => Object.hash(runtimeType, identityHashCode(value));

  @override
  String toString() {
    if (runtimeType == ObjectKey) {
      return '[${describeIdentity(value)}]';
    }
    return '[${objectRuntimeType(this, 'ObjectKey')} ${describeIdentity(value)}]';
  }
}
|
与ValueKey不同,ObjectKey重写了==操作符,内部调用的是identical方法来比较,而identical方法是用来检查两个对象引用是否指向同一个对象,所以ObjectKey的==比较的是引用。
4.2.3、UniqueKey
 1
 2
 3
 4
 5
 6
 7
 8
 9
10
11
12
13
|
/// 一个只等于它本身的key。
/// A key that is only equal to itself.
///
/// 这不能使用const构造函数创建,因为这意味着所有实例化的keys都是同一个实例,因此不是唯一的。
/// This cannot be created with a const constructor because that implies that
/// all instantiated keys would be the same instance and therefore not be unique.
class UniqueKey extends LocalKey {

  UniqueKey();

  @override
  String toString() => '[#${shortHash(this)}]';
}
|