注:本文代码基于Flutter SDK 3.13.5
一、前言
如果你开发的App失去了交互动画,那么这将是一件很难想象的事情,此时它的体验必然一言难尽,用户会为它贴上“傻快”、“生硬”、“粗糙”等标签,从而你将不得不丢失一部分用户。
因此,精心设计的动画会使UI更生动,它有助于提升App更精巧的外观和感觉,从而改善用户体验。
在Flutter的Material Widgets中,这些Widgets均自带其设计规范中定义的标准动画效果,能让各种动画效果的实现变得容易,当然了,你也可以定制这些效果。
二、动画概览
在Flutter中,创建动画可以有多种不同实现方式。那么,究竟哪种才是最适合你的呢?可以参考下面的决策树,它将帮助你挑选实现Flutter动画的正确方式。
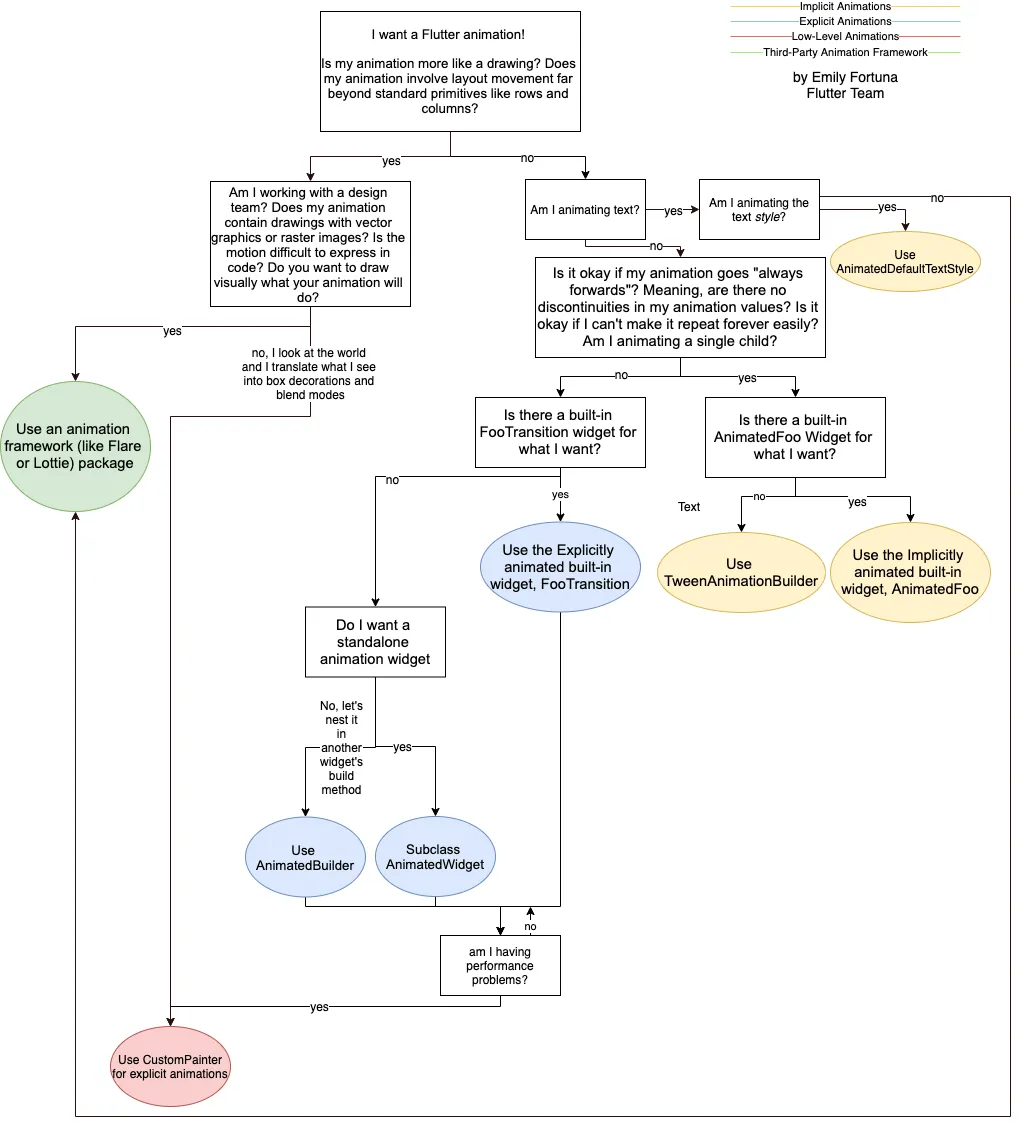
2.1、动画的实现方式
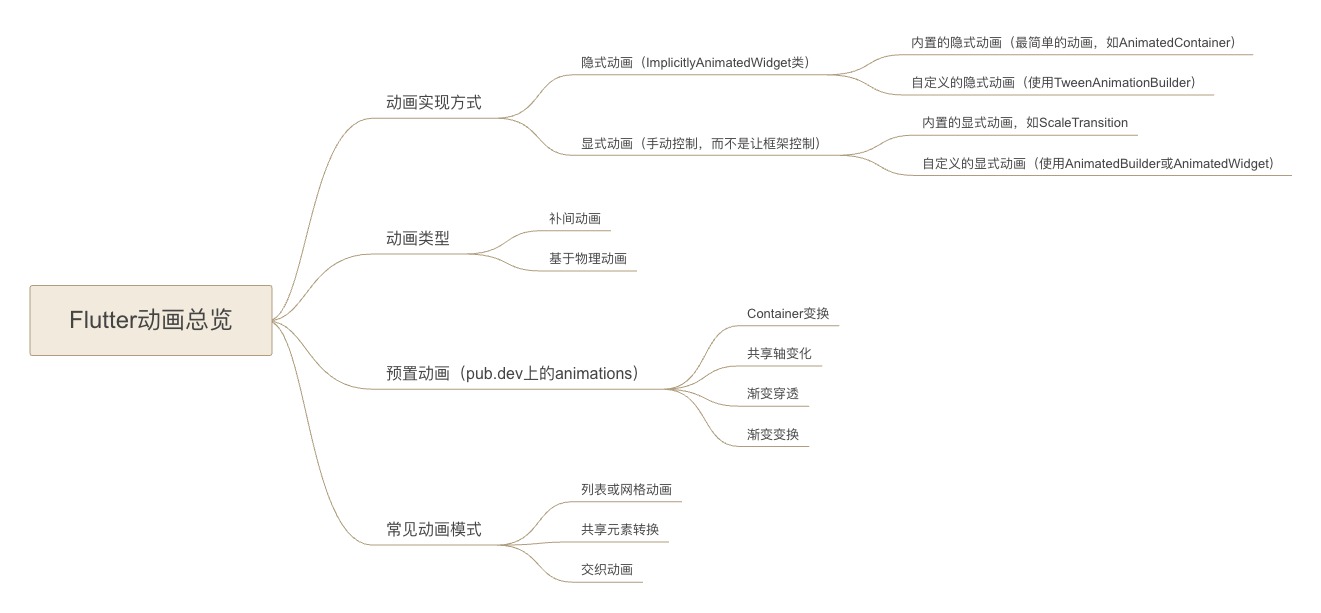
按照动画的实现方式来分类,可以分为隐式动画与显式动画。
所有隐式动画均扩展了ImplicitlyAnimatedWidget类。你可以使用内置的隐式动画,例如AnimatedContainer、AnimatedAlign等,这些是最简单的动画。如果内置的隐式动画不能够满足你的需求,你也可以使用TweenAnimationBuilder创建一个自定义的隐式动画。
所谓显式动画,就是需要手动控制,而不是让框架控制。你可以使用内置的其中一个显式动画类来实现,例如ScaleTransition、RotationTransition等。如果内置的显式动画不能够满足你的需求,你也可以使用AnimatedBuilder或AnimatedWidget创建一个自定义的显式动画。
当然了,不管隐式动画还是显式动画,它们也只是对底层Animation的一个封装,只是封装后的使用自由度不太相同罢了。
2.2、动画的类型
按照动画的类型来分类,可以分为补间动画与基于物理动画。
补间动画是“介于两者之间”的缩写。在补间动画中,定义了起点和终点以及时间轴,再定义过渡时间和速度的曲线,然后框架会计算如何从起点过渡到终点。
在基于物理基础的动画中,动作是模拟真实世界的行为来进行建模的。举个例子,当您抛球时,球落地的时间和位置取决于抛出的速度和距离地面的高度。类似地,附在弹簧上的球和附在绳子上的球掉落(和反弹)方式是不一样的。
2.3、预置动画
预置动画指的是pub.dev上的animations库中所包含的动画,它是由Flutter官方提供的。这个库包含了以下内置常用模式: Container变换、共享轴变化、渐变穿透和渐变变换。
2.4、常见的动画模式
常见的动画模式包括列表或网格动画、共享元素转换、交织动画等。
这种模式用于在列表或网格中添加或删除元素。
在这个模式中,用户从页面中选择一个元素,通常是图像,然后UI会在新页面中为指定元素添加动画,并生成更多细节。在Flutter中,您可以通过Hero组件轻松实现路径(页面)间的共享元素转换动画。
例如,下面这两种风格的Hero动画:
1、当改变位置和大小时,Hero从一页飞至另一页。
2、Hero的边界改变形状由圆变方,同时从一页飞至另一页。
为什么要将这种可飞行的共享组件称为Hero(英雄),有一种说法是说美国文化中的超人是可以飞的,那是美国人心中的大英雄,还有漫威中的超级英雄基本上都是会飞的,所以Flutter开发人员就对这种“会飞的Widget”就起了一个富有浪漫主义的名字Hero。当然这种说法并非官方解释,但却很有意思。
将复杂的动画分解成较小的动作,其中一些动作被延迟,分解后的这些小动画可以是连续的,也可以部分或完全重叠。例如:有一个柱状图,需要在高度增长的同时改变颜色,等到增长到最大高度后,我们需要在X轴上平移一段距离。
使用交织动画需要注意以下几点:
1、要创建交织动画,需要使用多个动画对象(Animation)
2、一个AnimationController控制所有的动画对象
3、给每一个动画对象指定时间间隔(Interval)
OK,动画总览讲解完毕,最后再给出一张动画总览的思维导图。
三、动画基础
在任何系统的UI框架中,动画的实现原理都是相同的,即在一段时间内,快速地多次改变UI外观;由于人眼会产生视觉暂留,所以最终看到的就是一个“连续”的动画,这和电影的原理是一样的。
Flutter中对动画进行了抽象,主要涉及Animation、Curve、Controller、Tween这四个角色,它们一起配合来完成一个完整动画,下面来一一介绍它们。
3.1、Animation
1、在Flutter中,动画对象Animation无法获取屏幕上显示的内容,它与渲染或 build() 方法无关。
2、Animation是一个已知当前值value和状态status(已完成或已解除)的抽象类,其中一个比较常见的Animation类型是 Animation<double>。
3、动画还可以插入除double以外的类型,比如Animation<Color>或者Animation<Size>。
4、一个Animation对象在一段时间内,持续生成介于两个值之间的插入值。这个Animation对象输出的可能是直线,曲线,阶梯函数,或者任何自定义的映射,这由Curve来决定。
5、根据Animation对象的不同控制方式,它可以反向运行,或者中途切换方向。
6、在动画的每一帧中,我们可以通过Animation对象的value属性获取动画的当前值。
3.1.1、动画通知
一个Animation对象可以有不止一个Listener和StatusListener,用addListener() 和addStatusListener() 来定义。
3.2、Curve
CurvedAnimation定义动画进程为非线性曲线。
1
2
|
final CurvedAnimation curve =
    CurvedAnimation(parent: controller, curve: Curves.easeIn);
|
CurvedAnimation和AnimationController(下面介绍)都是Animation<double>类型。CurvedAnimation可以通过包装AnimationController和Curve生成一个新的动画对象,我们正是通过这种方式来将动画和动画执行的曲线关联起来的。
Curves类中定义了很多常用曲线。
| Curves曲线 |
动画过程 |
| linear |
线性动画曲线 |
| decelerate |
变化率开始快速然后减速的曲线 |
| ease |
快速加速、缓慢结束的立方动画曲线 |
| easeIn |
缓慢开始并快速结束的立方动画曲线 |
| easeOut |
快速开始并缓慢结束的立方动画曲线 |
| easeInOut |
一条立方动画曲线,缓慢开始,加速,然后缓慢结束 |
| bounceIn |
幅度不断增长的振荡曲线 |
| bounceOut |
一条先增大后减小幅度的振荡曲线 |
| bounceInOut |
一条先增大后减小幅度的振荡曲线 |
| … |
… |
如果内置的Curves曲线不能满足你的要求,你也可以自定义Curves曲线。例如:
1
2
3
4
5
6
|
import 'dart:math';

class ShakeCurve extends Curve {
  @override
  double transform(double t) => sin(t * pi * 2);
}
|
3.3、AnimationController
AnimationController是个特殊的Animation对象,每当硬件准备新帧时,它都会生成一个新值。默认情况下,AnimationController在给定期间内会线性生成从 0.0 到 1.0 的数字。例如,这段代码创建了一个动画对象,但是没有启动运行。
1
2
3
4
|
final AnimationController controller = AnimationController(
  duration: const Duration(milliseconds: 2000),
  vsync: this,
);
|
AnimationController生成数字的区间可以通过lowerBound和upperBound来指定,如:
1
2
3
4
5
6
|
final AnimationController controller = AnimationController(
 duration: const Duration(milliseconds: 2000),
 lowerBound: 10.0,
 upperBound: 20.0,
 vsync: this
);
|
AnimationController源自于Animation<double>,所以可以用在任何需要Animation对象的地方。但是AnimationController还有其它方法控制动画,例如:forward() 方法可以启动正向动画,reverse() 可以启动反向动画。
在动画开始执行后开始生成动画帧,屏幕每刷新一次就是一个动画帧,在动画的每一帧,会随着根据动画的曲线来生成当前的动画值(Animation.value),然后根据当前的动画值去构建UI,当所有动画帧依次触发时,动画值会依次改变,所以构建的UI也会依次变化,所以最终我们可以看到一个完成的动画。
创建AnimationController的同时,也赋予了一个vsync参数。vsync的存在防止后台动画消耗不必要的资源。您可以通过添加SingleTickerProviderStateMixin到类定义,将有状态的对象用作vsync。
注意:在一些情况下,一个位置可能会超过AnimationController的 0.0-1.0 的范围。例如,fling() 函数可以根据我们手指滑动(甩出)的速度(velocity)、力量(force)等来模拟一个手指甩出动画,因此它的动画值可以在[0.0,1.0]范围之外。即使AnimationController在范围内,CurvedAnimation也可能会出现超出 0.0-1.0 范围的情况。根据所选曲线的不同,CurvedAnimation的输出范围可能会超过输入。举个例子,弹性曲线(比如Curves.elasticIn)会明显超出或低于默认范围。
3.4、Tween
在默认情况下,AnimationController对象的范围是 0.0-0.1。如果需要不同的范围或者不同的数据类型,可以使用Tween配置动画来插入不同的范围或数据类型。例如下面的示例中,Tween的范围是 -200 到 0.0。
1
|
final Tween doubleTween = Tween<double>(begin: -200.0, end: 0.0);
|
Tween是无状态的对象,只有begin和end。Tween的这种单一用途用来定义从输入范围到输出范围的映射。输入范围一般为 0.0-1.0,但这并不是必须的。
Tween源自Animatable<T>,而不是Animation<T>。像动画这样的可动画元素不必重复输出。例如,ColorTween指定了两种颜色之间的过程。
1
2
|
final Tween colorTween =
    ColorTween(begin: Colors.transparent, end: Colors.black54);
|
Tween对象不存储任何状态。而是提供evaluate(Animation<double> animation)方法,将映射函数应用于动画当前值。Animation对象的当前值可以在.value方法中找到。evaluate方法还执行一些内部处理内容,比如确保当动画值在 0.0 和1.0 时分别返回起始点和终点。
3.4.1、Tween.animate
要使用Tween对象,请在Tween调用animate(),传入控制器对象。例如,下面的代码在 500 ms 的进程中生成 0-255 范围内的整数值。
1
2
3
|
AnimationController controller = AnimationController(
    duration: const Duration(milliseconds: 500), vsync: this);
Animation<int> alpha = IntTween(begin: 0, end: 255).animate(controller);
|
注意:animate() 方法会返回一个Animation,而不是Animatable。
下面的示例展示了一个控制器,一个曲线,和一个Tween。
1
2
3
4
5
|
AnimationController controller = AnimationController(
    duration: const Duration(milliseconds: 500), vsync: this);
final Animation<double> curve =
    CurvedAnimation(parent: controller, curve: Curves.easeOut);
Animation<int> alpha = IntTween(begin: 0, end: 255).animate(curve);
|
四、动画示例
现有一需求,点击scale按钮,可以将一个Icon变大或缩小,并且中途还可以调转动画的方向。
  1
  2
  3
  4
  5
  6
  7
  8
  9
 10
 11
 12
 13
 14
 15
 16
 17
 18
 19
 20
 21
 22
 23
 24
 25
 26
 27
 28
 29
 30
 31
 32
 33
 34
 35
 36
 37
 38
 39
 40
 41
 42
 43
 44
 45
 46
 47
 48
 49
 50
 51
 52
 53
 54
 55
 56
 57
 58
 59
 60
 61
 62
 63
 64
 65
 66
 67
 68
 69
 70
 71
 72
 73
 74
 75
 76
 77
 78
 79
 80
 81
 82
 83
 84
 85
 86
 87
 88
 89
 90
 91
 92
 93
 94
 95
 96
 97
 98
 99
100
101
102
103
104
105
106
107
108
109
110
|
void main() {
  runApp(const MyApp());
}

class MyApp extends StatelessWidget {
  const MyApp({super.key});

  @override
  Widget build(BuildContext context) {
    return MaterialApp(
      title: 'Flutter Demo',
      theme: ThemeData(
        colorScheme: ColorScheme.fromSeed(seedColor: Colors.deepPurple),
        useMaterial3: true,
      ),
      home: const MyPage(title: '动画演示'),
    );
  }
}

class MyPage extends StatefulWidget {
  const MyPage({super.key, required this.title});

  final String title;

  @override
  State<MyPage> createState() => _MyPageState();
}

class _MyPageState extends State<MyPage> {
  @override
  Widget build(BuildContext context) {
    return Scaffold(
      appBar: AppBar(
        backgroundColor: Theme.of(context).colorScheme.inversePrimary,
        title: Text(widget.title),
      ),
      body: const MyWidget(),
    );
  }
}

class MyWidget extends StatefulWidget {
  const MyWidget({super.key});

  @override
  State<MyWidget> createState() => _MyWidgetState();
}

class _MyWidgetState extends State<MyWidget> with SingleTickerProviderStateMixin {
  late AnimationController _animationController;
  late Animation<double> _animation;

  @override
  void initState() {
    super.initState();
    _animationController = AnimationController(
      vsync: this,
      duration: const Duration(seconds: 1),
      reverseDuration: const Duration(seconds: 1),
    );
    _animation = CurvedAnimation(
      parent: _animationController,
      curve: Curves.easeIn,
      reverseCurve: Curves.bounceIn,
    );
    _animation = Tween(begin: 200.0, end: 300.0).animate(_animation)
      ..addListener(() {
        setState(() {

        });
      });
  }

  void _scale() {
    if (_animation.status == AnimationStatus.completed ||
        _animation.status == AnimationStatus.forward) {
      _animationController.reverse();
    } else if (_animation.status == AnimationStatus.dismissed ||
        _animation.status == AnimationStatus.reverse) {
      _animationController.forward();
    }
  }

  @override
  void dispose() {
    super.dispose();
    _animationController.dispose();
  }

  @override
  Widget build(BuildContext context) {
    debugPrint('build');
    return Center(
      child: Column(
        mainAxisSize: MainAxisSize.min,
        children: [
          Icon(
            Icons.account_circle,
            size: _animation.value,
          ),
          OutlinedButton(
            onPressed: _scale,
            child: const Text('scale'),
          )
        ],
      ),
    );
  }
}
|
程序运行起来后,UI效果为:
五、分析动画源码
5.1、_animationController.forward()
从动画的启动方法入手,也就是AnimationController的forward方法,看下它的源码。
1
2
3
4
5
6
7
8
9
|
TickerFuture forward({ double? from }) {
  // 指定动画方向为正向
  _direction = _AnimationDirection.forward;
  // 因为没有传入from,所以这里为null,此处不会执行
  if (from != null) {
    value = from;
  }
  return _animateToInternal(upperBound);
}
|
在AnimationController的forward方法中,执行了 _animateToInternal 方法,这里传入了upperBound,它是该动画被视为完成的值。
upperBound是在AnimationController的构造方法中传入,只是本示例中没有传入,所以取的是默认值为 1.0。
 1
 2
 3
 4
 5
 6
 7
 8
 9
10
11
12
13
14
15
16
17
18
19
|
class AnimationController extends Animation<double>
  with AnimationEagerListenerMixin, AnimationLocalListenersMixin, AnimationLocalStatusListenersMixin {

  AnimationController({
    double? value,
    this.duration,
    this.reverseDuration,
    this.debugLabel,
    this.lowerBound = 0.0,
    // 默认值
    this.upperBound = 1.0,
    this.animationBehavior = AnimationBehavior.normal,
    required TickerProvider vsync,
  }) : assert(upperBound >= lowerBound),
       _direction = _AnimationDirection.forward {
    _ticker = vsync.createTicker(_tick);
    _internalSetValue(value ?? lowerBound);
  }
}
|
继续跟踪AnimationController的 _animateToInternal 方法。
 1
 2
 3
 4
 5
 6
 7
 8
 9
10
11
12
13
14
15
16
17
18
19
20
21
22
23
24
25
26
27
28
29
30
31
32
33
34
35
36
37
38
39
40
41
42
43
44
45
46
47
48
49
50
51
52
53
54
55
56
57
58
59
60
61
62
63
64
65
66
67
68
69
70
71
72
73
74
75
76
|
TickerFuture _animateToInternal(double target, { Duration? duration, Curve curve = Curves.linear }) {
  double scale = 1.0;
  /// SemanticsBinding.instance.disableAnimations用来判断该平台是否要求禁用或简化动画。
  /// 可通过设置debugSemanticsDisableAnimations可以覆盖此设置以进行测试或调试
  /// 例如:
  ///
  /// ```dart
  /// import 'package:flutter/rendering.dart';
  ///
  /// void main() {
  ///   // debugSemanticsDisableAnimations = true;
  ///   runApp(const MyApp());
  /// }
  /// ```
  /// 本示例中很明显没有禁用动画,所以此处不执行,scale的值仍然为1.0
  if (SemanticsBinding.instance.disableAnimations) {
    switch (animationBehavior) {
      case AnimationBehavior.normal:
        // 由于该框架无法处理零持续时间动画,因此我们以正常持续时间的 5% 运行它,以将大多数动画限制为单帧。
        // 理想情况下,框架将能够处理零持续时间动画,但是,如果不延迟至少一帧,永久重复动画的常见模式可能会导致无限循环。
        // Since the framework cannot handle zero duration animations, we run it at 5% of the normal
        // duration to limit most animations to a single frame.
        // Ideally, the framework would be able to handle zero duration animations, however, the common
        // pattern of an eternally repeating animation might cause an endless loop if it weren't delayed
        // for at least one frame.
        scale = 0.05;
      case AnimationBehavior.preserve:
        break;
    }
  }
  // simulationDuration是模拟持续时间,但是由于duration参数没有传入,所以simulationDuration为null
  Duration? simulationDuration = duration;
  // 因为simulationDuration为null,所以此处执行
  if (simulationDuration == null) {
    assert(!(this.duration == null && _direction == _AnimationDirection.forward));
    assert(!(this.duration == null && _direction == _AnimationDirection.reverse && reverseDuration == null));
    // 获取动画的范围,因为在AnimationController构造方法中,upperBound与lowerBound参数均没传入,所以都是取默认值,upperBound为1.0,lowerBound为0.0,那么此处range为1.0
    final double range = upperBound - lowerBound;
    // range.isFinite是判断range这个数字是否是有限的。
    // 唯一的非有限数是 NaN 值、正无穷大和负无穷大。所有整数都是有限的。
    // 所有数字都满足isInfinite、isFinite和isNaN之一
    // 因为range为1.0,所以range.isFinite是true
    // 因为target为传入的upperBound,所以它的值为1.0,_value默认值为0.0,所以remainingFraction的最终计算结果为1.0,也就是动画的执行进度剩余百分比
    final double remainingFraction = range.isFinite ? (target - _value).abs() / range : 1.0;
    // 如果动画方向为反向并且反向动画时间reverseDuration(此处reverseDuration也就是AnimationController构造方法传入的reverseDuration)不为null,
    // 那么directionDuration为反向动画时间,否则为正向动画时间duration(此处duration也就是AnimationController构造方法传入的duration)
    // 在前面的forward方法中,_direction已经被赋值为_AnimationDirection.forward,所以这里directionDuration为this.duration,也就是1s
    final Duration directionDuration =
      (_direction == _AnimationDirection.reverse && reverseDuration != null)
      ? reverseDuration!
      : this.duration!;
    // 那么最终计算后的simulationDuration模拟持续时间为1s
    simulationDuration = directionDuration * remainingFraction;
  } else if (target == value) {
    // Already at target, don't animate.
    simulationDuration = Duration.zero;
  }
  // 停止运行该动画。这不会触发任何通知。动画停止在当前状态。
  stop();
  // 因为simulationDuration为1s,所以这里不执行
  if (simulationDuration == Duration.zero) {
    if (value != target) {
      _value = clampDouble(target, lowerBound, upperBound);
      notifyListeners();
    }
    _status = (_direction == _AnimationDirection.forward) ?
      AnimationStatus.completed :
      AnimationStatus.dismissed;
    _checkStatusChanged();
    return TickerFuture.complete();
  }
  assert(simulationDuration > Duration.zero);
  assert(!isAnimating);
  // 执行_startSimulation方法,并且创建_InterpolationSimulation实例并作为参数传入该方法
  return _startSimulation(_InterpolationSimulation(_value, target, simulationDuration, curve, scale));
}
|
在AnimationController的 _animateToInternal 方法中,执行了 _startSimulation 方法,并且创建 _InterpolationSimulation 实例并作为参数传入该方法。
继续跟踪AnimationController的 _startSimulation 方法。
 1
 2
 3
 4
 5
 6
 7
 8
 9
10
11
12
13
14
15
16
17
18
19
20
21
|
TickerFuture _startSimulation(Simulation simulation) {
  assert(!isAnimating);
  // 将前面创建的_InterpolationSimulation实例赋值给成员变量_simulation
  _simulation = simulation;
  // 初始化动画上一帧的时间,动画还没开始,所以为0
  _lastElapsedDuration = Duration.zero;
  // 计算_value,也就是外部使用的_animation.value
  // clampDouble主要对simulation.x(0.0)这个结果做了大小限制(lowerBound <= 结果 <= upperBound)
  // 此处执行的是_InterpolationSimulation的x方法,_value的最终计算结果为0.0
  _value = clampDouble(simulation.x(0.0), lowerBound, upperBound);
  // 启动Ticker,每个动画帧均会调用一次回调,这个等下再分析
  final TickerFuture result = _ticker!.start();
  // 因为_direction为_AnimationDirection.forward,所以此时_status状态为AnimationStatus.forward
  _status = (_direction == _AnimationDirection.forward) ?
      AnimationStatus.forward :
      AnimationStatus.reverse;
      // 调用所有状态监听器
  _checkStatusChanged();
  // 最后将TickerFuture返回,但是本示例中没用到,这里就不讲解了
  return result;
}
|
关于simulation.x(0.0),这里分析下,它执行了 _InterpolationSimulation 的x方法。
 1
 2
 3
 4
 5
 6
 7
 8
 9
10
11
12
13
14
15
16
17
18
19
20
21
22
23
24
25
26
27
28
29
30
31
32
|
// _InterpolationSimulation的作用就是将Engine层返回的每一帧时间转换为[0.0, 1.0]范围的数值
class _InterpolationSimulation extends Simulation {
    // _begin传入的是_value,它的值为0.0
    // _end传入的是target,它的值为1.0
    // duration传入的是simulationDuration,它的值为1s
    // _curve传入的是curve,它的值为Curves.linear
    // scale传入的是scale,它的值为1.0
  _InterpolationSimulation(this._begin, this._end, Duration duration, this._curve, double scale)
    : assert(duration.inMicroseconds > 0),
    // duration.inMicroseconds表示获取微秒数,所以1s的微秒数为1000000,microsecondsPerSecond表示每秒的微秒数
    // 结合传入的参数值,那么_durationInSeconds最终的计算结果为1s
      _durationInSeconds = (duration.inMicroseconds * scale) / Duration.microsecondsPerSecond;

  final double _durationInSeconds;
  final double _begin;
  final double _end;
  final Curve _curve;

  @override
  double x(double timeInSeconds) {
    // 外部调用simulation.x(0.0)时传入0.0,所以此处timeInSeconds为0.0,所以t最终的计算结果为0
    final double t = clampDouble(timeInSeconds / _durationInSeconds, 0.0, 1.0);
    // 因为t为0,所以执行这里,返回_begin,它的值为0.0
    if (t == 0.0) {
      return _begin;
    } else if (t == 1.0) {
      return _end;
    } else {
      return _begin + (_end - _begin) * _curve.transform(t);
    }
  }
}
|
关于 _checkStatusChanged 方法,这里分析下。
 1
 2
 3
 4
 5
 6
 7
 8
 9
10
11
12
|
AnimationStatus _lastReportedStatus = AnimationStatus.dismissed;

void _checkStatusChanged() {
  // 因为在_startSimulation方法中,_status已经被赋值为AnimationStatus.forward,所以这里将成员变量_status赋值给status,那么此时newStatus的值为AnimationStatus.forward
  final AnimationStatus newStatus = status;
  // _lastReportedStatus的默认值为AnimationStatus.dismissed,所以if判断不相等,此处执行
  if (_lastReportedStatus != newStatus) {
    _lastReportedStatus = newStatus;
    // 将newStatus通知给所有已注册的状态监听器
    notifyStatusListeners(newStatus);
  }
}
|
因为AnimationController混入了AnimationLocalStatusListenersMixin,所以这里的notifyStatusListeners方法执行的是AnimationLocalStatusListenersMixin的notifyStatusListeners方法。
 1
 2
 3
 4
 5
 6
 7
 8
 9
10
11
12
13
14
15
16
17
18
19
20
21
22
23
24
25
26
27
28
29
30
|
void notifyStatusListeners(AnimationStatus status) {
  final List<AnimationStatusListener> localListeners = _statusListeners.toList(growable: false);
  for (final AnimationStatusListener listener in localListeners) {
    try {
      // 遍历所有AnimationStatusListener,将status回调出去
      if (_statusListeners.contains(listener)) {
        listener(status);
      }
    } catch (exception, stack) {
      InformationCollector? collector;
      assert(() {
        collector = () => <DiagnosticsNode>[
          DiagnosticsProperty<AnimationLocalStatusListenersMixin>(
            'The $runtimeType notifying status listeners was',
            this,
            style: DiagnosticsTreeStyle.errorProperty,
          ),
        ];
        return true;
      }());
      FlutterError.reportError(FlutterErrorDetails(
        exception: exception,
        stack: stack,
        library: 'animation library',
        context: ErrorDescription('while notifying status listeners for $runtimeType'),
        informationCollector: collector,
      ));
    }
  }
}
|
先回到 _startSimulation 方法上来,其实整个 _startSimulation 方法的重点是_ticker!.start(),因为它启动了动画,那么 _ticker 是什么?又在哪创建的?
5.2、AnimationController的构造方法
 1
 2
 3
 4
 5
 6
 7
 8
 9
10
11
12
13
14
15
16
17
18
19
|
class AnimationController extends Animation<double>
  with AnimationEagerListenerMixin, AnimationLocalListenersMixin, AnimationLocalStatusListenersMixin {

  AnimationController({
    double? value,
    this.duration,
    this.reverseDuration,
    this.debugLabel,
    this.lowerBound = 0.0,
    this.upperBound = 1.0,
    this.animationBehavior = AnimationBehavior.normal,
    required TickerProvider vsync,
  }) : assert(upperBound >= lowerBound),
       _direction = _AnimationDirection.forward {
        // 此处执行了TickerProvider的createTicker方法
    _ticker = vsync.createTicker(_tick);
    _internalSetValue(value ?? lowerBound);
  }
}
|
在AnimationController的构造方法中,执行了vsync.createTicker(_tick)这行代码,也就是执行了TickerProvider的createTicker方法,而createTicker方法需要传入的参数是一个TickerCallback,这里传入的实参为AnimationController的 _tick 方法。
在本示例中,vsync参数传入的是this,即混入的SingleTickerProviderStateMixin,它是专门用来提供和管理单个Ticker。
 1
 2
 3
 4
 5
 6
 7
 8
 9
10
11
12
13
14
15
|
class _MyWidgetState extends State<MyWidget> with SingleTickerProviderStateMixin {
  late AnimationController _animationController;
  late Animation<double> _animation;

  @override
  void initState() {
    super.initState();
    _animationController = AnimationController(
        // 传入this,即混入的SingleTickerProviderStateMixin
      vsync: this,
      duration: const Duration(seconds: 1),
      reverseDuration: const Duration(seconds: 1),
    );
  }
}
|
因此,vsync.createTicker实际上执行了SingleTickerProviderStateMixin的createTicker方法。
 1
 2
 3
 4
 5
 6
 7
 8
 9
10
11
12
13
14
15
16
17
18
19
20
21
22
23
24
25
26
27
28
|
mixin SingleTickerProviderStateMixin<T extends StatefulWidget> on State<T> implements TickerProvider {
 Ticker? _ticker;

 @override
 Ticker createTicker(TickerCallback onTick) {
   assert(() {
     if (_ticker == null) {
       return true;
     }
     throw FlutterError.fromParts(<DiagnosticsNode>[
       ErrorSummary('$runtimeType is a SingleTickerProviderStateMixin but multiple tickers were created.'),
       ErrorDescription('A SingleTickerProviderStateMixin can only be used as a TickerProvider once.'),
       ErrorHint(
         'If a State is used for multiple AnimationController objects, or if it is passed to other '
         'objects and those objects might use it more than one time in total, then instead of '
         'mixing in a SingleTickerProviderStateMixin, use a regular TickerProviderStateMixin.',
       ),
     ]);
   }());
   // 这里创建了Ticker实例并赋值给成员变量_ticker
   // 此处Ticker构造方法传入的参数onTick,它的实例是AnimationController的_tick方法。
   _ticker = Ticker(onTick, debugLabel: kDebugMode ? 'created by ${describeIdentity(this)}' : null);
   _updateTickerModeNotifier();
   _updateTicker(); // Sets _ticker.mute correctly.
   // 把Ticker实例返回
   return _ticker!;
 }
}
|
当 _startSimulation 方法执行了 _ticker!.start() 时,就会执行上面创建的 _ticker 的start方法,跟踪下Ticker的start方法。
 1
 2
 3
 4
 5
 6
 7
 8
 9
10
11
12
13
14
15
16
17
18
19
20
21
22
23
24
25
26
27
28
29
30
31
32
33
34
|
TickerFuture start() {
 assert(() {
   if (isActive) {
     throw FlutterError.fromParts(<DiagnosticsNode>[
       ErrorSummary('A ticker was started twice.'),
       ErrorDescription('A ticker that is already active cannot be started again without first stopping it.'),
       describeForError('The affected ticker was'),
     ]);
   }
   return true;
 }());
 assert(_startTime == null);
 // 此处创建了一个TickerFuture对象,表示正在进行的Ticker序列的对象。
 // Ticker.start方法返回一个TickerFuture。如果使用Ticker.stop停止Ticker ,并将canceled参数设置为 false(默认值),则TickerFuture将成功完成。
 // 如果Ticker在未停止的情况下被处置,或者如果在canceled设置为 true 的情况下停止,则此 Future 将永远不会完成
 _future = TickerFuture._();
 // shouldScheduleTick表示是否应该安排一个tick
 // 不应安排tick的原因包括:
 // 1、已经为下一帧安排了一个tick
 // 2、ticker未激活(尚未调用start)
 // 3、ticker没有在ticking,例如因为它被muted (请参阅isTicking )
 // 通过断点调试来看,此处shouldScheduleTick为true,所以执行了scheduleTick方法。
 if (shouldScheduleTick) {
   scheduleTick();
 }
 // schedulerPhase表示调度程序当前运行的阶段,通过断点调试来看,SchedulerBinding.instance.schedulerPhase.index的值为0,
 // 也就是schedulerPhase所处状态为idle,所以SchedulerBinding.instance.schedulerPhase.index > SchedulerPhase.idle.index不满足,不会执行这里代码
 if (SchedulerBinding.instance.schedulerPhase.index > SchedulerPhase.idle.index &&
     SchedulerBinding.instance.schedulerPhase.index < SchedulerPhase.postFrameCallbacks.index) {
   _startTime = SchedulerBinding.instance.currentFrameTimeStamp;
 }
 // 返回一个TickerFuture对象,此处的返回就是forward方法的返回值
 return _future!;
}
|
在Ticker的start方法中,执行了scheduleTick方法,跟踪看看。
1
2
3
4
5
6
7
|
// scheduleTick方法的作用是为下一帧安排一个tick
void scheduleTick({ bool rescheduling = false }) {
  assert(!scheduled);
  assert(shouldScheduleTick);
  // 执行了SchedulerBinding的scheduleFrameCallback方法,该方法需要传入一个FrameCallback实例,该实例就是Ticker的_tick方法。
  _animationId = SchedulerBinding.instance.scheduleFrameCallback(_tick, rescheduling: rescheduling);
}
|
先看下SchedulerBinding的scheduleFrameCallback方法。
 1
 2
 3
 4
 5
 6
 7
 8
 9
10
|
int scheduleFrameCallback(FrameCallback callback, { bool rescheduling = false }) {
  // 执行了scheduleFrame方法。调用dart:ui.PlatformDispatcher.scheduleFrame来安排新帧
  // 调用此函数后,引擎将(最终)调用handleBeginFrame
  scheduleFrame();
  // 下一帧回调实例的Id,此处+1
  _nextFrameCallbackId += 1;
  // 将callback包装成_FrameCallbackEntry对象,存入瞬态回调Map集合_transientCallbacks中
  _transientCallbacks[_nextFrameCallbackId] = _FrameCallbackEntry(callback, rescheduling: rescheduling);
  return _nextFrameCallbackId;
}
|
看下SchedulerBinding的scheduleFrame方法。
 1
 2
 3
 4
 5
 6
 7
 8
 9
10
11
12
13
14
15
16
|
void scheduleFrame() {
  if (_hasScheduledFrame || !framesEnabled) {
    return;
  }
  assert(() {
    if (debugPrintScheduleFrameStacks) {
      debugPrintStack(label: 'scheduleFrame() called. Current phase is $schedulerPhase.');
    }
    return true;
  }());
  // 执行ensureFrameCallbacksRegistered方法,确保PlatformDispatcher.onBeginFrame和PlatformDispatcher.onDrawFrame的回调已注册
  ensureFrameCallbacksRegistered();
  // 执行platformDispatcher的scheduleFrame,请求在下一个适当的机会调用onBeginFrame和onDrawFrame回调
  platformDispatcher.scheduleFrame();
  _hasScheduledFrame = true;
}
|
看下ensureFrameCallbacksRegistered方法。
1
2
3
4
5
6
7
|
@protected
void ensureFrameCallbacksRegistered() {
  // 为platformDispatcher的onBeginFrame注册回调,这里具体实现是_handleBeginFrame方法
  platformDispatcher.onBeginFrame ??= _handleBeginFrame;
  // 为platformDispatcher的onDrawFrame注册回调,这里具体实现是_handleDrawFrame方法
  platformDispatcher.onDrawFrame ??= _handleDrawFrame;
}
|
再看下platformDispatcher.scheduleFrame(),这里是external修饰,说明调用了Engine层的方法了,它在不同平台有不同实现。
1
2
3
4
5
|
// 请求在下一个适当的机会调用onBeginFrame和onDrawFrame回调。
void scheduleFrame() => _scheduleFrame();

@Native<Void Function()>(symbol: 'PlatformConfigurationNativeApi::ScheduleFrame')
external static void _scheduleFrame();
|
这里就不深入底层实现了,不过可以猜测,在Android中应该是调用了Choreographer注册了Vysnc信号监听,然后再回调给Flutter,具体留给你们去验证了。
等到Engine层处理完成,将会回调给Framework层的 _beginFrame 方法,在 _beginFrame 方法中执行了PlatformDispatcher的 _beginFrame 方法。
1
2
3
4
5
|
@pragma('vm:entry-point')
void _beginFrame(int microseconds, int frameNumber) {
  PlatformDispatcher.instance._beginFrame(microseconds);
  PlatformDispatcher.instance._updateFrameData(frameNumber);
}
|
在PlatformDispatcher的 _beginFrame 方法中,执行了 _invoke1 方法,第一个参数传入的是onBeginFrame回调,这个就是之前讲过的SchedulerBinding的ensureFrameCallbacksRegistered方法中注册的回调。
1
2
3
4
5
6
7
8
|
void _beginFrame(int microseconds) {
  _invoke1<Duration>(
    // 此处传入onBeginFrame
    onBeginFrame,
    _onBeginFrameZone,
    Duration(microseconds: microseconds),
  );
}
|
来看下 _invoke1 方法,执行了callback(),也就是调用了onBeginFrame的回调引用,那么就会触发SchedulerBinding的 _handleBeginFrame 方法。
 1
 2
 3
 4
 5
 6
 7
 8
 9
10
11
|
void _invoke1<A>(void Function(A a)? callback, Zone zone, A arg) {
  if (callback == null) {
    return;
  }
  if (identical(zone, Zone.current)) {
    // 此处调用外部方法引用,传入参数是arg,也就是一个Duration,这个时间是每一帧的时间
    callback(arg);
  } else {
    zone.runUnaryGuarded<A>(callback, arg);
  }
}
|
继续看SchedulerBinding的 _handleBeginFrame 方法,执行了handleBeginFrame方法。
 1
 2
 3
 4
 5
 6
 7
 8
 9
10
11
12
13
14
15
16
17
18
19
20
21
22
23
24
25
26
27
28
29
30
31
32
33
34
35
36
37
38
39
40
41
42
43
44
45
|
void handleBeginFrame(Duration? rawTimeStamp) {
  _frameTimelineTask?.start('Frame');
  _firstRawTimeStampInEpoch ??= rawTimeStamp;
  _currentFrameTimeStamp = _adjustForEpoch(rawTimeStamp ?? _lastRawTimeStamp);
  if (rawTimeStamp != null) {
    _lastRawTimeStamp = rawTimeStamp;
  }

  assert(() {
    _debugFrameNumber += 1;

    if (debugPrintBeginFrameBanner || debugPrintEndFrameBanner) {
      final StringBuffer frameTimeStampDescription = StringBuffer();
      if (rawTimeStamp != null) {
        _debugDescribeTimeStamp(_currentFrameTimeStamp!, frameTimeStampDescription);
      } else {
        frameTimeStampDescription.write('(warm-up frame)');
      }
      _debugBanner = '▄▄▄▄▄▄▄▄ Frame ${_debugFrameNumber.toString().padRight(7)}   ${frameTimeStampDescription.toString().padLeft(18)} ▄▄▄▄▄▄▄▄';
      if (debugPrintBeginFrameBanner) {
        debugPrint(_debugBanner);
      }
    }
    return true;
  }());

  assert(schedulerPhase == SchedulerPhase.idle);
  _hasScheduledFrame = false;
  try {
    // TRANSIENT FRAME CALLBACKS
    _frameTimelineTask?.start('Animate');
    _schedulerPhase = SchedulerPhase.transientCallbacks;
    final Map<int, _FrameCallbackEntry> callbacks = _transientCallbacks;
    _transientCallbacks = <int, _FrameCallbackEntry>{};
    // 此处遍历执行_transientCallbacks,也就是传入的Ticker的_tick方法实例
    callbacks.forEach((int id, _FrameCallbackEntry callbackEntry) {
      if (!_removedIds.contains(id)) {
        _invokeFrameCallback(callbackEntry.callback, _currentFrameTimeStamp!, callbackEntry.debugStack);
      }
    });
    _removedIds.clear();
  } finally {
    _schedulerPhase = SchedulerPhase.midFrameMicrotasks;
  }
}
|
看下Ticker的 _tick 方法。
 1
 2
 3
 4
 5
 6
 7
 8
 9
10
11
12
13
14
15
16
|
void _tick(Duration timeStamp) {
  assert(isTicking);
  assert(scheduled);
  _animationId = null;

  _startTime ??= timeStamp;
  // 执行了SingleTickerProviderStateMixin的createTicker方法中传入的onTick参数
  // 也就是执行了AnimationController构造方法中的vsync.createTicker(_tick)传入的_tick方法实例
  _onTick(timeStamp - _startTime!);

  // The onTick callback may have scheduled another tick already, for
  // example by calling stop then start again.
  if (shouldScheduleTick) {
    scheduleTick(rescheduling: true);
  }
}
|
看下AnimationController的 _tick 方法。
 1
 2
 3
 4
 5
 6
 7
 8
 9
10
11
12
13
14
15
16
17
18
19
20
21
22
|
// elapsed是Engine层返回的每一帧时间Duration,每一帧的时间都不一样
void _tick(Duration elapsed) {
  _lastElapsedDuration = elapsed;
  // 将拿到的每一帧的时间单位改为秒
  final double elapsedInSeconds = elapsed.inMicroseconds.toDouble() / Duration.microsecondsPerSecond;
  assert(elapsedInSeconds >= 0.0);
  // 执行clampDouble方法获取_value,此时的_value依然是_simulation控制,也就是_InterpolationSimulation实例
  _value = clampDouble(_simulation!.x(elapsedInSeconds), lowerBound, upperBound);
  // 等到elapsedInSeconds时间达到我们设定的动画时间Duration,也就是本示例中的1s,表示动画执行完成
  if (_simulation!.isDone(elapsedInSeconds)) {
      // 如果_direction是_AnimationDirection.forward,更改_status为AnimationStatus.completed,否则改为AnimationStatus.dismissed
    _status = (_direction == _AnimationDirection.forward) ?
      AnimationStatus.completed :
      AnimationStatus.dismissed;
      // 停止当前动画,移除当前瞬态帧回调,那么_tick方法就不会被再回调执行
    stop(canceled: false);
  }
  // 执行notifyListeners方法,通知所有listeners回调
  notifyListeners();
  // 执行_checkStatusChanged,通知所有status listeners回调
  _checkStatusChanged();
}
|
至此,forward方法完成了第一帧动画的初始操作,可以说它启动了动画。等到在addListener方法中执行setState方法时,就会触发下一轮 _tick 方法的执行以及build方法的执行,这样一帧一帧执行直到动画完成。
关于setState方法的分析参考解读Flutter源码之setState一文。
5.3、_animation.value
通过 _animation.value 最初拿到的是AnimationController的 _value,也就是上面 _tick 方法中计算出来的 _value,为什么这么说呢?看下面分析就知道了。
在本示例中,CurvedAnimation的构造方法将 _animationController 作为参数传了进去。
1
2
3
4
5
6
|
_animation = CurvedAnimation(
  // 传入_animationController
    parent: _animationController,
    curve: Curves.easeIn,
    reverseCurve: Curves.bounceIn,
);
|
可以发现CurvedAnimation混入了AnimationWithParentMixin。
 1
 2
 3
 4
 5
 6
 7
 8
 9
10
11
12
13
14
15
16
|
class CurvedAnimation extends Animation<double> with AnimationWithParentMixin<double> {

  CurvedAnimation({
    required this.parent,
    required this.curve,
    this.reverseCurve,
  }) {
    // 根据_animationController的初始状态,更新Curved曲线的方向
    _updateCurveDirection(parent.status);
    // 给_animationController注册状态监听,用来更新后续Curved曲线的方向
    parent.addStatusListener(_updateCurveDirection);
  }

  @override
  final Animation<double> parent;
}
|
看下AnimationWithParentMixin,可以发现此时的listeners管理以及status依然是转发给parent处理,也就是还是由AnimationController来管理。
 1
 2
 3
 4
 5
 6
 7
 8
 9
10
11
12
13
14
|
mixin AnimationWithParentMixin<T> {

  Animation<T> get parent;

  void addListener(VoidCallback listener) => parent.addListener(listener);

  void removeListener(VoidCallback listener) => parent.removeListener(listener);

  void addStatusListener(AnimationStatusListener listener) => parent.addStatusListener(listener);

  void removeStatusListener(AnimationStatusListener listener) => parent.removeStatusListener(listener);

  AnimationStatus get status => parent.status;
}
|
但是,CurvedAnimation重写了AnimationController成员变量value,可以看到在value中拿到parent.value后,执行了 activeCurve.transform(t) 进行转换。
 1
 2
 3
 4
 5
 6
 7
 8
 9
10
11
12
13
14
15
16
17
18
19
20
21
22
23
24
25
26
27
28
29
30
|
@override
double get value {
  // 获取Curves曲线的方向
  final Curve? activeCurve = _useForwardCurve ? curve : reverseCurve;

  // 获取AnimationController的value值,这个值之前由simulation计算得来
  final double t = parent.value;
  if (activeCurve == null) {
    return t;
  }
  // 控制动画范围
  if (t == 0.0 || t == 1.0) {
    assert(() {
      final double transformedValue = activeCurve.transform(t);
      final double roundedTransformedValue = transformedValue.round().toDouble();
      if (roundedTransformedValue != t) {
        throw FlutterError(
          'Invalid curve endpoint at $t.\n'
          'Curves must map 0.0 to near zero and 1.0 to near one but '
          '${activeCurve.runtimeType} mapped $t to $transformedValue, which '
          'is near $roundedTransformedValue.',
        );
      }
      return true;
    }());
    return t;
  }
  // 执行Curve转换
  return activeCurve.transform(t);
}
|
这里执行了Curve的父类ParametricCurve的transform方法。
 1
 2
 3
 4
 5
 6
 7
 8
 9
10
11
12
13
14
|
abstract class Curve extends ParametricCurve<double> {

  const Curve();

  @override
  double transform(double t) {
    // 控制动画范围
    if (t == 0.0 || t == 1.0) {
      return t;
    }
    // 执行父类ParametricCurve的transform方法
    return super.transform(t);
  }
}
|
在ParametricCurve的transform方法中,执行了transformInternal方法,该方法由子类实现。
 1
 2
 3
 4
 5
 6
 7
 8
 9
10
11
12
13
14
15
|
abstract class ParametricCurve<T> {

  const ParametricCurve();

  T transform(double t) {
    assert(t >= 0.0 && t <= 1.0, 'parametric value $t is outside of [0, 1] range.');
    // 执行transformInternal方法
    return transformInternal(t);
  }

  @protected
  T transformInternal(double t) {
    throw UnimplementedError();
  }
}
|
在本示例中,对于动画的方向是正向的,CurvedAnimation构造方法中传入的子类是Curves.easeIn;对于动画的方向是反向的,CurvedAnimation构造方法中传入的子类是Curves.bounceIn。因为本示例只讲解forward方法,所以这里只以Curves.easeIn为例讲解,看下源码。
1
|
static const Cubic easeIn = Cubic(0.42, 0.0, 1.0, 1.0);
|
看下Cubic实现的transformInternal方法。它是返回点t处的曲线值。但是给定的参数值t将介于 0.0 和 1.0 之间(包含 0.0 和 1.0),那和我们实际Widget的参数映射还是不一致,比如本示例中Icon的size参数。
 1
 2
 3
 4
 5
 6
 7
 8
 9
10
11
12
13
14
15
16
17
|
@override
double transformInternal(double t) {
  double start = 0.0;
  double end = 1.0;
  while (true) {
    final double midpoint = (start + end) / 2;
    final double estimate = _evaluateCubic(a, c, midpoint);
    if ((t - estimate).abs() < _cubicErrorBound) {
      return _evaluateCubic(b, d, midpoint);
    }
    if (estimate < t) {
      start = midpoint;
    } else {
      end = midpoint;
    }
  }
}
|
想要和我们实际Widget的参数映射一致,就需要讲到Tween了,看下本示例中的实现。
1
|
_animation = Tween(begin: 200.0, end: 300.0).animate(_animation)
|
看下Tween的animate方法,方法参数传入了上一步创建的CurvedAnimation,返回的是 _AnimatedEvaluation 实例。
1
2
3
|
Animation<T> animate(Animation<double> parent) {
  return _AnimatedEvaluation<T>(parent, this);
}
|
看下 _AnimatedEvaluation实现。
 1
 2
 3
 4
 5
 6
 7
 8
 9
10
11
|
class _AnimatedEvaluation<T> extends Animation<T> with AnimationWithParentMixin<double> {
  _AnimatedEvaluation(this.parent, this._evaluatable);

  @override
  final Animation<double> parent;

  final Animatable<T> _evaluatable;

  @override
  T get value => _evaluatable.evaluate(parent);
}
|
可以看到 _AnimatedEvaluation 继承自Animation,和CurvedAnimation一样混入了AnimationWithParentMixin,此时的listeners管理以及status是转发给parent处理,也就是CurvedAnimation。
而且 _AnimatedEvaluation 重写了AnimationController成员变量value,当执行 _animation.value时就会调用该value。可以看到在value中执行了 _evaluatable.evaluate(parent) 进行转换。
_evaluatable 就是 _AnimatedEvaluation 构造方法传入进来的this,指的是Tween实例,又因为Tween继承自Animatable,看下Animatable的evaluate方法。
1
2
3
4
5
6
|
abstract class Animatable<T> {

  T transform(double t);

  T evaluate(Animation<double> animation) => transform(animation.value);
}
|
可以看到啊,在Animatable的evaluate方法中,执行了transform方法,传入的是animation.value,实际上就拿到了CurvedAnimation的value,这个方法由子类实现,现在看下Tween的transform方法。
 1
 2
 3
 4
 5
 6
 7
 8
 9
10
|
@override
T transform(double t) {
  if (t == 0.0) {
    return begin as T;
  }
  if (t == 1.0) {
    return end as T;
  }
  return lerp(t);
}
|
在Tween的transform方法中,执行了lerp方法进行Widget参数映射到[0.0, 1.0]范围。
 1
 2
 3
 4
 5
 6
 7
 8
 9
10
11
12
13
14
15
16
17
18
19
20
21
22
23
24
25
26
27
28
29
30
31
32
33
34
35
36
37
38
39
40
41
42
43
44
45
46
47
48
49
50
51
52
53
|
@protected
T lerp(double t) {
  assert(begin != null);
  assert(end != null);
  assert(() {
    // Assertions that attempt to catch common cases of tweening types
    // that do not conform to the Tween requirements.
    dynamic result;
    try {
      // ignore: avoid_dynamic_calls
      result = (begin as dynamic) + ((end as dynamic) - (begin as dynamic)) * t;
      result as T;
      return true;
    } on NoSuchMethodError {
      throw FlutterError.fromParts(<DiagnosticsNode>[
        ErrorSummary('Cannot lerp between "$begin" and "$end".'),
        ErrorDescription(
          'The type ${begin.runtimeType} might not fully implement `+`, `-`, and/or `*`. '
          'See "Types with special considerations" at https://api.flutter.dev/flutter/animation/Tween-class.html '
          'for more information.',
        ),
        if (begin is Color || end is Color)
          ErrorHint('To lerp colors, consider ColorTween instead.')
        else if (begin is Rect || end is Rect)
          ErrorHint('To lerp rects, consider RectTween instead.')
        else
          ErrorHint(
            'There may be a dedicated "${begin.runtimeType}Tween" for this type, '
            'or you may need to create one.',
          ),
      ]);
    } on TypeError {
      throw FlutterError.fromParts(<DiagnosticsNode>[
        ErrorSummary('Cannot lerp between "$begin" and "$end".'),
        ErrorDescription(
          'The type ${begin.runtimeType} returned a ${result.runtimeType} after '
          'multiplication with a double value. '
          'See "Types with special considerations" at https://api.flutter.dev/flutter/animation/Tween-class.html '
          'for more information.',
        ),
        if (begin is int || end is int)
          ErrorHint('To lerp int values, consider IntTween or StepTween instead.')
        else
          ErrorHint(
            'There may be a dedicated "${begin.runtimeType}Tween" for this type, '
            'or you may need to create one.',
          ),
      ]);
    }
  }());
  // ignore: avoid_dynamic_calls
  return (begin as dynamic) + ((end as dynamic) - (begin as dynamic)) * t as T;
}
|
关于lerp方法,这里插一嘴,因为Tween的子类很多,所以lerp方法可以由Tween的子类去实现,例如Tween的子类SizeTween,看下SizeTween的lerp方法。
1
2
3
4
5
6
7
|
class SizeTween extends Tween<Size?> {

  SizeTween({ super.begin, super.end });

  @override
  Size? lerp(double t) => Size.lerp(begin, end, t);
}
|
可以发现SizeTween的lerp方法,它是调用了Size的lerp方法。除了Size之外,还有很多类也重写了lerp方法,比如Color,BorderRadius,Border等等,它们分别对应的是ColorTween,BorderRadiusTween,BorderTween。
总结一下本示例中 _animation.value 的执行过程:
当外部调用_animation.value时,就会执行Tween中的value,在Tween的value中就会执行CurvedAnimation中的value,在CurvedAnimation的value中就会执行AnimationController的value。
所以说 _animation.value 的执行是一个向上转发,向下执行的过程。
六、动画总结
当执行forward方法时,就会启动动画,此时只是执行了动画的第一帧,然后就会触发addListener的回调,在addListener的回调中,执行了setState方法。
接着又会触发addListener的回调与build方法的执行,这样就形成了递归执行的过程,在这个过程中,通过引用 _animation.value 可以拿到每一帧的值,这个值是经过了simulation模拟计算将每一帧时间转换为[0.0,1.0]范围,在[0.0,1.0]范围内也经过了Curve曲线速度的转换,最后再通过Tween映射为具体的Widget的参数范围。
每次build方法执行时,_animation.value 的值会重新计算,从而改变Widget参数完成整个动画过程。