注:本文代码基于Flutter SDK 3.13.5
一、与绘制相关的对象
Flutter中与绘制相关的对象有三个,分别是Canvas、Layer和Scene。
-
Canvas:封装了Flutter Skia各种绘制指令,比如画线drawLine、画圆drawCircle、画矩形drawRect等指令。
-
Layer:分为容器类Layer和绘制类Layer两种;暂时可以理解为是绘制产物的载体,比如调用Canvas API绘制后,相应的绘制产物Picture被保存在PictureLayer.picture对象中。
-
Scene:屏幕上将要要显示的元素。在上屏前需要将Layer中保存的绘制产物Picture关联到Scene上。
接下来重点分析绘制产物Picture以及Layer。
1.1、绘制产物Picture
PictureLayer的绘制产物是Picture,关于Picture有两点需要阐明:
1、Picture实际上是一系列的图形绘制操作指令,这一点可以参考Picture类源码的注释。
 1
 2
 3
 4
 5
 6
 7
 8
 9
10
11
12
13
|
/// 表示一系列记录的图形操作的对象。
/// An object representing a sequence of recorded graphical operations.
///
/// 要创建Picture ,请使用PictureRecorder
/// To create a [Picture], use a [PictureRecorder].
///
/// 可以使用SceneBuilder通过SceneBuilder.addPicture方法将Picture放置在Scene中。也可以使用Canvas.drawPicture方法将Picture绘制到Canvas中。
/// A [Picture] can be placed in a [Scene] using a [SceneBuilder], via
/// the [SceneBuilder.addPicture] method. A [Picture] can also be
/// drawn into a [Canvas], using the [Canvas.drawPicture] method.
abstract class Picture {

}
|
2、Picture要显示在屏幕上,必然会经过光栅化(光栅化是将图形数据转换为像素的过程,即将顶点数据转换为片元,每个片元对应帧缓冲区中的一像素),随后Flutter会将光栅化后的位图信息缓存起来,也就是说同一个Picture对象,其绘制指令只会执行一次,执行完成后绘制的位图就会被缓存起来。
综合以上两点,可以看到PictureLayer的“绘制产物”一开始是一些“绘图指令”,当第一次绘制完成后,位图信息就会被缓存,绘制指令也就不会再被执行了,所以这时“绘制产物”就是位图了。
1.2、绘制产物的导出
既然Picture中保存的是绘制产物,那么它也应该能提供一个方法能将绘制产物导出,实际上,Picture有一个toImage方法,可以根据指定的大小导出Image。
 1
 2
 3
 4
 5
 6
 7
 8
 9
10
11
|
/// 将绘制产物导出为图片
void pictureToImage(PictureLayer pictureLayer) async {
  final Image image = await pictureLayer.picture!
      .toImage(pictureLayer.canvasBounds.right.toInt(), pictureLayer.canvasBounds.bottom.toInt());
  final ByteData? byteData = await image.toByteData(format: ImageByteFormat.png);
  // 转化为Uint8List
  final Uint8List uint8list = byteData!.buffer.asUint8List();
  // 需要导入库path_provider: ^2.1.1,以Android为例,这里存储到Context.getCacheDir目录
  final String fileDir = (await getTemporaryDirectory()).path;
  await File('$fileDir/pictureToImage.png').writeAsBytes(uint8list);
}
|
1.3、Layer
Layer作为绘制产物Picture的持有者,它的作用如下。
1、如果没有发生变化,可以在不同的frame之间复用绘制产物Picture
2、划分绘制边界,缩小重绘范围
Layer可以分为两类:容器类Layer与绘制类Layer,如图所示。
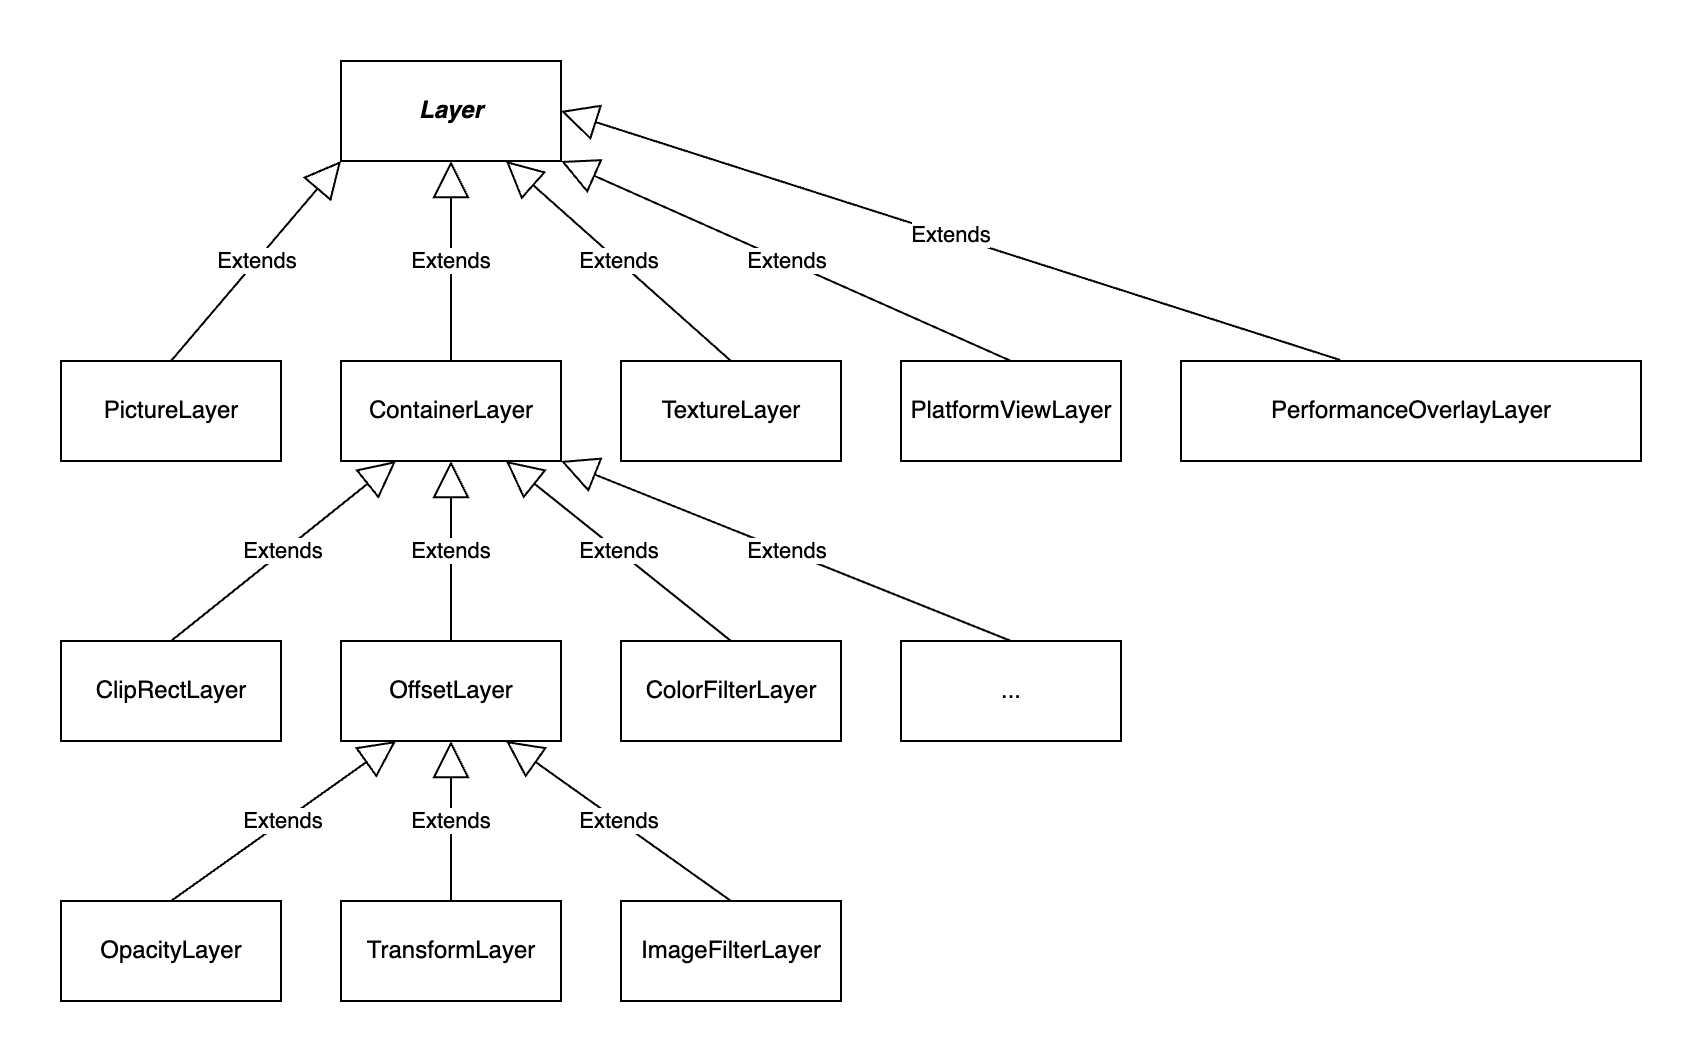
1.3.1、容器类Layer
例如OffsetLayer,它是根Layer,并且继承自ContainerLayer,而ContainerLayer继承自Layer类,可以将直接继承自ContainerLayer类的Layer称为容器类Layer,容器类Layer可以添加任意多个子Layer。
关于容器类Layer,它的作用以及具体的使用场景如下。
1、将组件树的绘制结构组成一棵树
因为Flutter中的Widget是树状结构,那么相应的RenderObject对应的绘制结构也应该是树状结构,Flutter会根据一些“特定的规则”(后面解释)为组件树生成一棵Layer树,而容器类Layer就可以组成树状结构(父Layer可以包含任意多个子Layer,子Layer又可以包含任意多个子Layer)。
2、可以对多个Layer整体应用一些变换效果
容器类Layer可以对其子Layer整体做一些变换效果,比如剪裁效果(ClipRectLayer、ClipRRectLayer、ClipPathLayer)、过滤效果(ColorFilterLayer、ImageFilterLayer)、矩阵变换(TransformLayer)、透明变换(OpacityLayer)等。
注意:虽然ContainerLayer并非抽象类,开发者可以直接创建ContainerLayer类的实例,但实际上很少会这么做。与此相反,在需要使用使用ContainerLayer时直接使用其子类即可。如果您确实不需要任何变换效果,那么就使用OffsetLayer,不用担心会有额外性能开销,它的底层实现(Skia)是非常高效的。
1.3.2、绘制类Layer
下面重点介绍一下PictureLayer类,它是Flutter中最常用的一种绘制类Layer。
一般而言,最终显示在屏幕上的是位图信息,而位图信息正是由Canvas API绘制的。前面讲过,Canvas API的绘制产物是Picture对象,而当前版本的Flutter中只有PictureLayer才拥有Picture对象,换句话说,Flutter中通过Canvas API绘制自身及其子节点的组件的绘制结果最终会落在PictureLayer中。
1.3.3、变换效果的实现方式
上面说过ContainerLayer可以对其子Layer整体进行一些变换,实际上,在大多数UI系统的Canvas API中也都有一些变换相关的方法,那么也就意味着一些变换效果既可以通过 ContainerLayer来实现,也可以通过Canvas API来实现。例如要实现平移变换,既可以使用 OffsetLayer,也可以直接使用Canva.translate API。既然如此,那选择实现方式的原则是什么呢?
容器类Layer的变换在底层是通过Skia来实现的,不需要Canvas来处理。具体的原理是,有变换功能的容器类Layer会对应一个Skia引擎中的Layer(有变换功能的容器类Layer在添加到Scene之前就会构建一个Engine Layer),为了和Flutter Framework中Layer区分,Flutter中将Skia的Layer称为Engine Layer。这里以OffsetLayer为例,看看它的addToScene方法。
 1
 2
 3
 4
 5
 6
 7
 8
 9
10
11
12
13
14
15
16
17
18
19
20
21
22
23
24
|
/// 存储为此层创建的引擎层,以便跨框架重用引擎资源以获得更好的应用程序性能。
/// 该值可以传递给ui.SceneBuilder.addRetained以向引擎传达该层或其任何后代中没有任何变化。例如,本机引擎可以重用前一帧中渲染的纹理。例如,Web引擎可以重用为前一帧创建的HTML DOM节点。
/// 该值可以作为oldLayer参数传递给“push”方法,以向引擎传达图层正在更新先前渲染的图层的信息。例如,Web引擎可以更新先前渲染的HTML DOM节点的属性,而不是创建新节点
@protected
@visibleForTesting
ui.EngineLayer? get engineLayer => _engineLayer;

/// 重写此方法以将此层上传到引擎
@override
void addToScene(ui.SceneBuilder builder) {
  // Skia has a fast path for concatenating scale/translation only matrices.
  // Hence pushing a translation-only transform layer should be fast. For
  // retained rendering, we don't want to push the offset down to each leaf
  // node. Otherwise, changing an offset layer on the very high level could
  // cascade the change to too many leaves.
  // 创建Engine Layer
  engineLayer = builder.pushOffset(
    offset.dx,
    offset.dy,
    oldLayer: _engineLayer as ui.OffsetEngineLayer?,
  );
  addChildrenToScene(builder);
  builder.pop();
}
|
OffsetLayer对其子节点整体做偏移变换的功能是Skia中实现支持的。Skia可以支持多层渲染,但并不是层越多越好,Engine Layer是会占用一定的资源,Flutter自带组件库中涉及到变换效果的都是优先使用Canvas API来实现,如果Canvas API实现起来非常困难或实现不了时才会用 ContainerLayer来实现。
那么有什么场景下变换效果通过Canvas API实现起来会非常困难,需要用ContainerLayer来实现?一个典型的场景是需要对组件树中的某个子树整体做变换,且子树中有多个PictureLayer时。这是因为一个Canvas往往对应一个PictureLayer,不同Canvas之间相互隔离的,只有子树中所有组件都通过同一个Canvas绘制时才能通过该Canvas对所有子节点进行整体变换,否则就只能通过ContainerLayer。
注意:Canvas API中也有名字包含Layer的相关方法,如Canvas.saveLayer,它和上面分析的Layer含义不同。Canvas对象中的Layer相关方法主要是提供一种在绘制过程中缓存中间绘制结果的手段,为了在绘制复杂对象时方便多个绘制元素之间分离绘制而设计的,您可以简单认为不管Canvas中创建多少个Layer,这些Layer都是在同一个PictureLayer上。
二、示例演示
2.1、绘制过程示例
无论是通过CustomPaint还是自定义RenderObject,都是在Flutter的Widget框架模型下进行的绘制,实际上Flutter底层最终都会通过调用文章开头讲的与绘制相关的对象它们的API去完成绘制。既然如此,那么您也可以直接在main方法中调用这些与绘制相关的对象它们的API来完成绘制,下面演示一下直接在main方法中绘制一个椭圆形。
 1
 2
 3
 4
 5
 6
 7
 8
 9
10
11
12
13
14
15
16
17
18
19
20
21
22
23
24
25
26
27
28
29
30
31
32
33
34
35
36
37
38
|
void main() {
// pictureToImage方法中使用了跨平台交互,所以需要先初始化ServicesBinding
WidgetsFlutterBinding.ensureInitialized();
// 创建绘制记录器与Canvas
PictureRecorder recorder = PictureRecorder();
Canvas canvas = Canvas(recorder);
// 绘制背景
canvas.drawColor(Colors.white, BlendMode.lighten);
// 绘制椭圆
canvas.drawOval(
// 设置椭圆的左上角原点以及宽高
const Rect.fromLTWH(100, 100, 300, 400),
Paint()
..color = Colors.blueAccent
..isAntiAlias = true
..style = PaintingStyle.stroke
..strokeWidth = 8,
);
// 在指定位置区域绘制
// 创建layer,将绘制的产物保存在layer中
var pictureLayer = PictureLayer(const Rect.fromLTWH(0, 0, 500, 600));
// recorder.endRecording()获取绘制产物
pictureLayer.picture = recorder.endRecording();
// 将给定Layer添加到该Layer的子列表的末尾,也就是将pictureLayer添加到OffsetLayer中
var rootLayer = OffsetLayer();
rootLayer.append(pictureLayer);
// 上屏,将绘制的内容显示在屏幕上
final SceneBuilder builder = SceneBuilder();
final Scene scene = rootLayer.buildScene(builder);
// PlatformDispatcher.instance.implicitView相当于window
PlatformDispatcher.instance.implicitView!.render(scene);
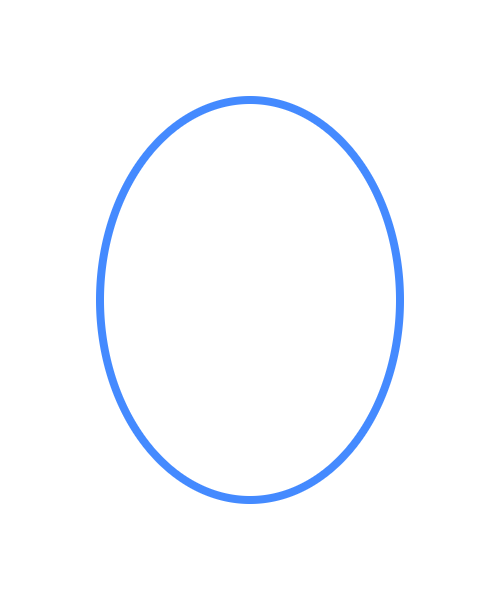
// 将绘制产物导出为图片,与最前面例子对应
pictureToImage(pictureLayer);
}
|
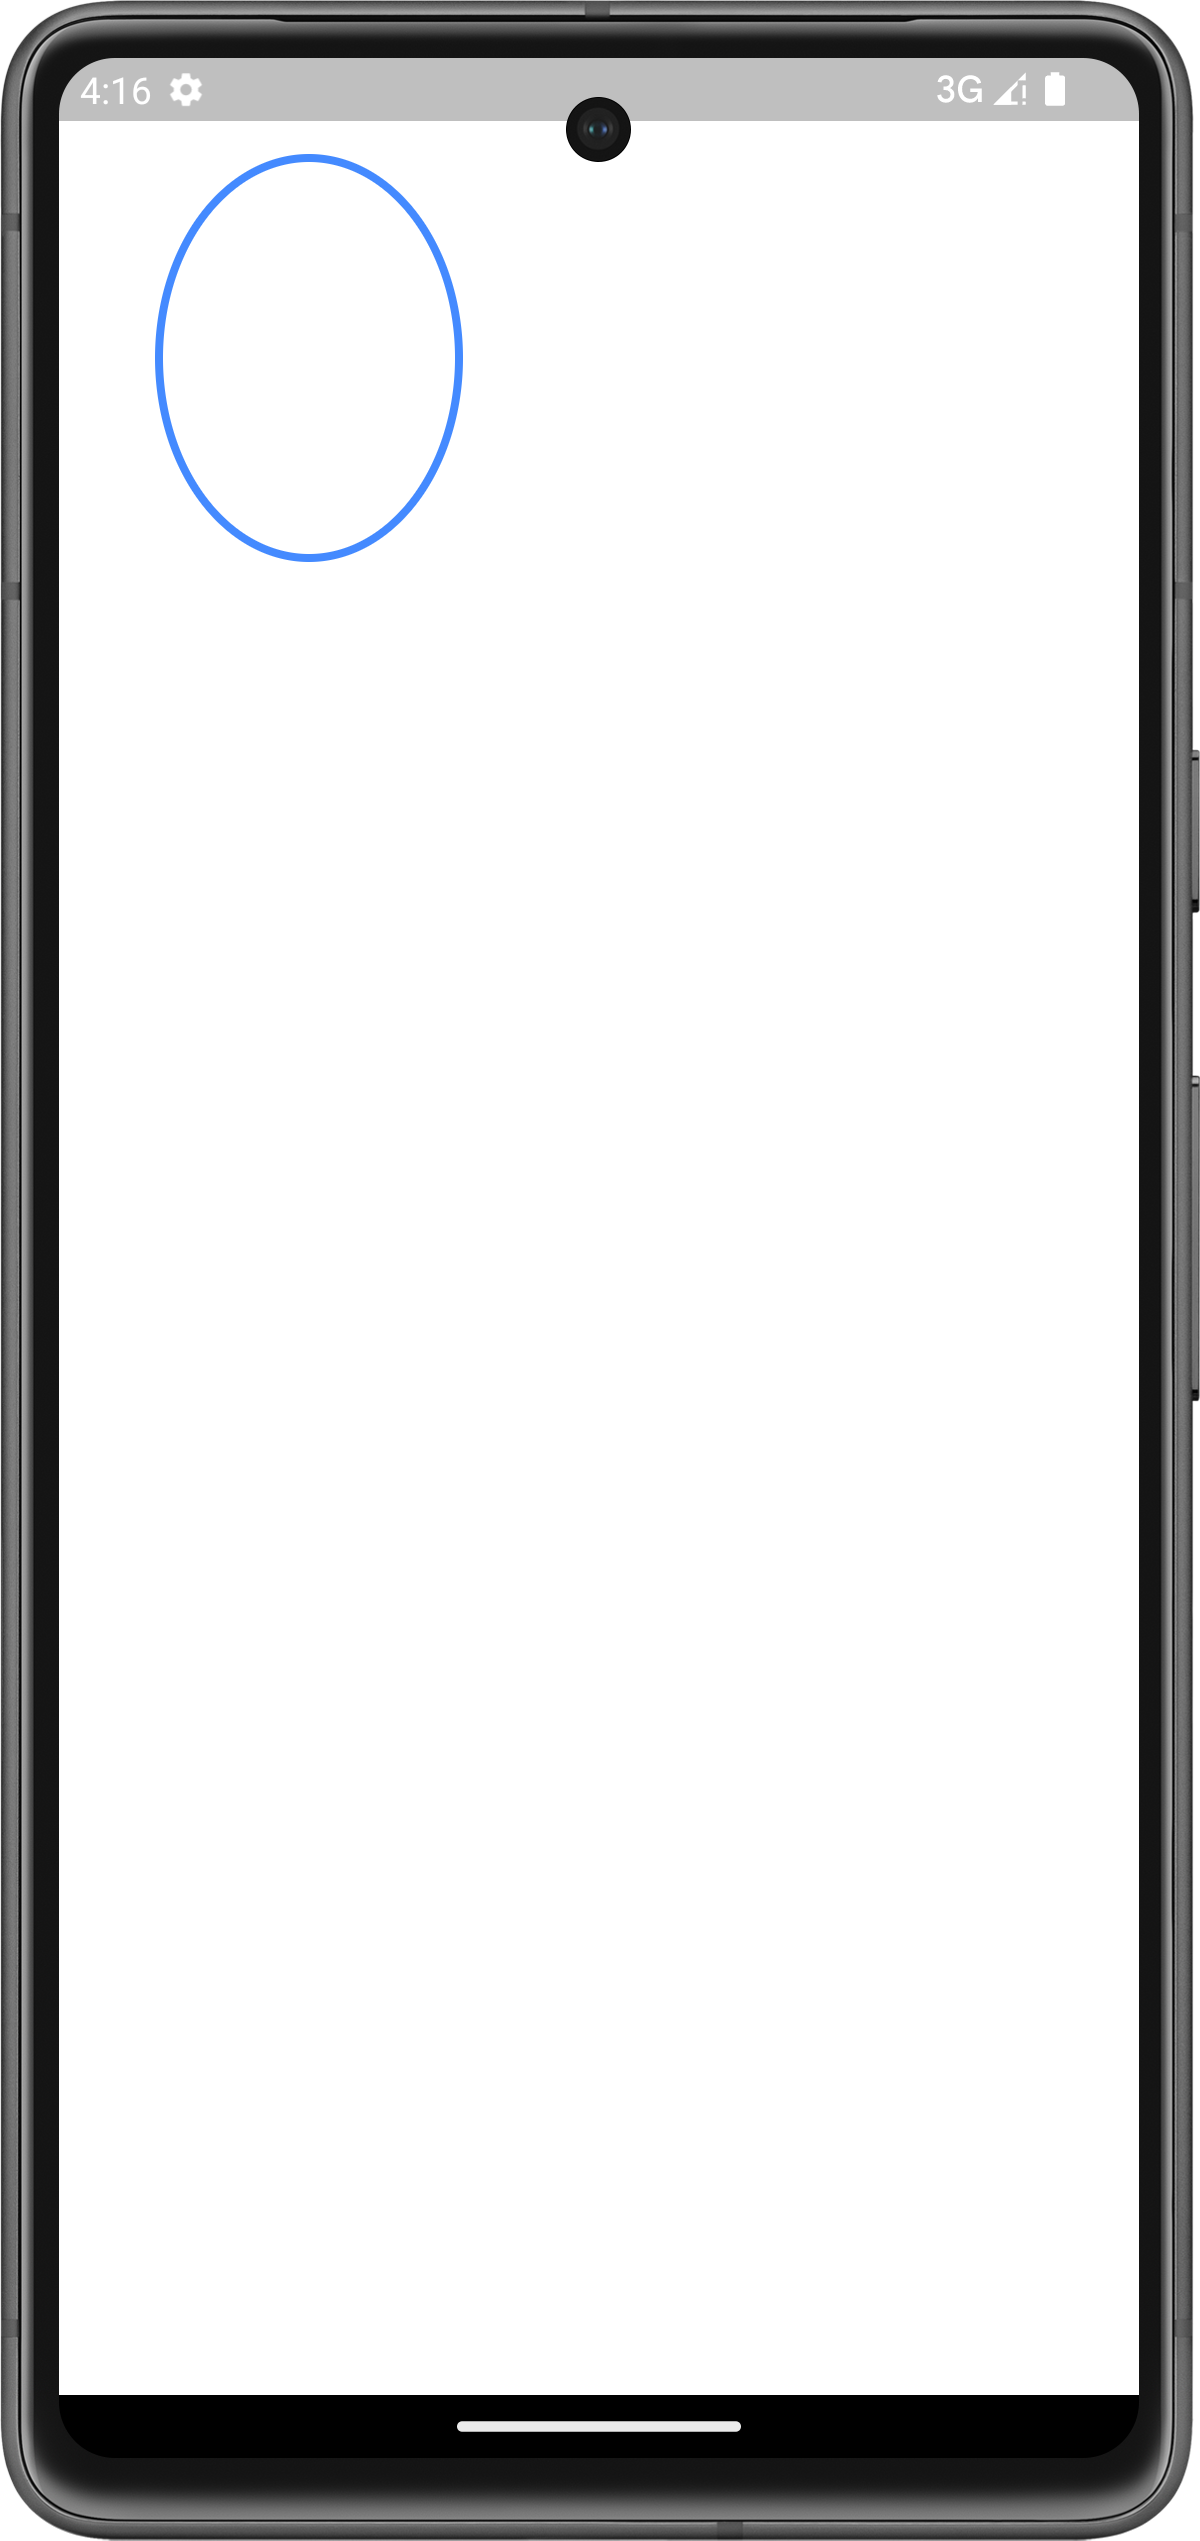
将绘制产物导出为图片,与最前面例子对应,如下图所示。
2.2、总结绘制Paint过程
1、构建一个Canvas用于绘制;同时还要创建一个绘制指令记录器PictureRecorder,因为绘制指令最终是要传递给Skia的,而Canvas可能会连续发起多条绘制指令,指令记录器用于收集Canvas在一段时间内所有的绘制指令,因此Canvas构造函数第一个参数必须传递一个PictureRecorder实例。
2、Canvas绘制完成后,通过PictureRecorder获取绘制产物,然后将其保存在PictureLayer.picture中。
3、构建Scene对象,将Layer的绘制产物和Scene关联起来。
4、最后上屏。调用implicitView的render方法将Scene上的绘制产物发送给GPU。
三、源码分析
为了便于描述,这里先定义一下“绘制边界节点”的概念:将isRepaintBoundary属性值为true的RenderObject节点称为绘制边界节点。
Flutter中自带了一个RepaintBoundary组件,它的功能其实就是向组件树中插入一个绘制边界节点。
3.1、组件树绘制流程
Flutter绘制组件树的大致流程如下(不包括子树中需要层合成Compositing的情况):
Flutter第一次绘制时,会从上到下开始递归地绘制子节点,每当遇到一个边界节点,就会判断该边界节点的Layer属性(类型为ContainerLayer),如果Layer为空就会创建一个新的OffsetLayer并赋值给它;如果不为空就会直接使用它。然后再将该边界节点的Layer传递给子节点,接下来有两种情况:
如果是第一次绘制,就会创建一个Canvas对象和一个PictureLayer,然后将它们绑定,后续调用Canvas绘制都会落到和其绑定的PictureLayer上,然后将这个PictureLayer加入到边界节点的Layer中。
如果不是第一次绘制,就会复用已有的PictureLayer和Canvas对象。
如果子节点是边界节点,则对子节点递归上述过程。当子树的递归完成后,就要将子节点的Layer添加到父级Layer中。
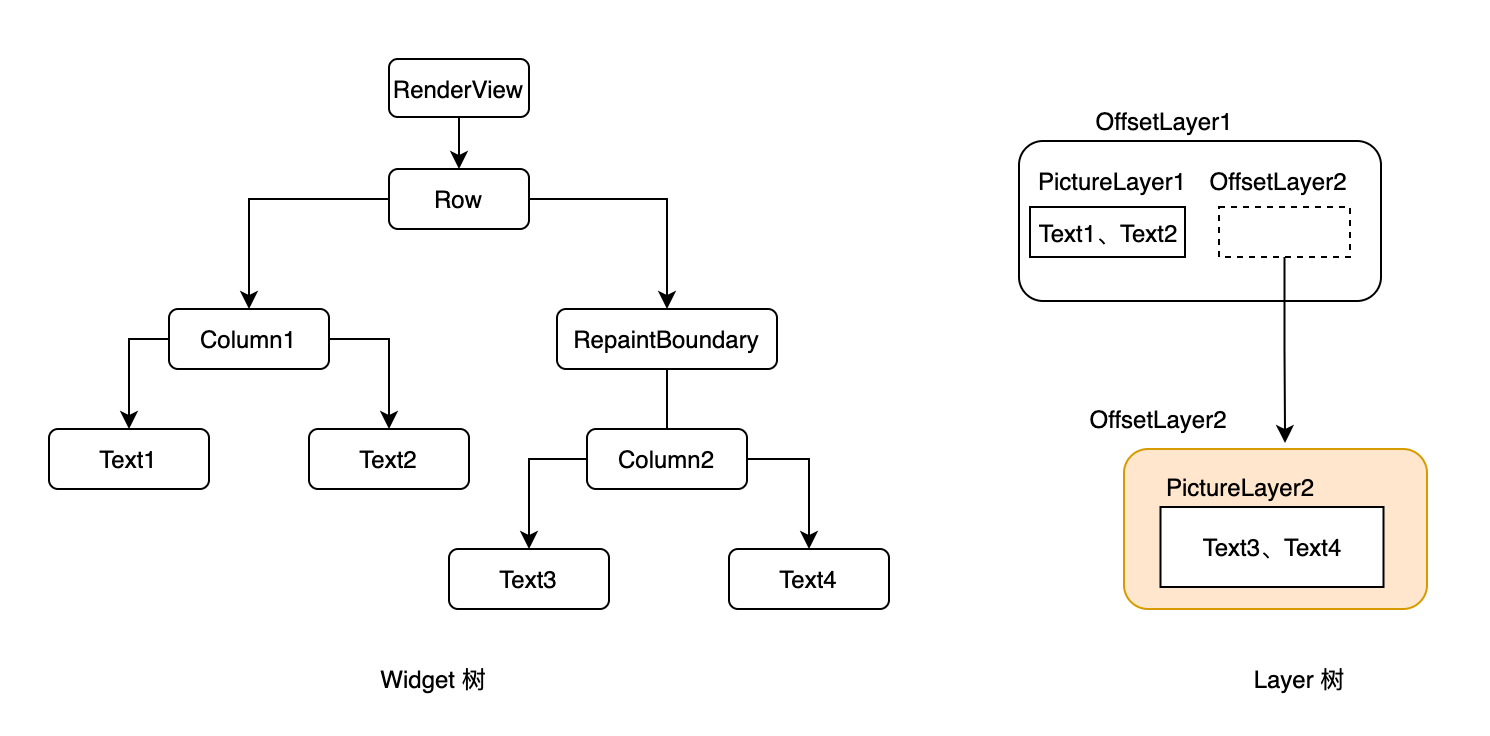
最终整个流程执行完后就生成了一棵Layer树,下面通过一个例子来理解整个过程。下图左边是Widget树,右边是最终生成的Layer树,一起看一下生成过程。
上图对应的代码为:
 1
 2
 3
 4
 5
 6
 7
 8
 9
10
11
12
13
14
15
16
17
18
19
20
21
22
23
24
25
26
27
28
29
30
31
32
33
34
35
36
37
38
39
40
41
42
43
44
45
46
47
48
49
50
|
void main() {
  _runApp(
    const Row(
      crossAxisAlignment: CrossAxisAlignment.start,
      textDirection: TextDirection.ltr,
      children: [
        Column(
          mainAxisSize: MainAxisSize.min,
          children: [
            Text(
              'Text1',
              textDirection: TextDirection.ltr,
              style: TextStyle(fontSize: 38, color: Colors.blueAccent),
            ),
            Text(
              'Text2',
              textDirection: TextDirection.ltr,
              style: TextStyle(fontSize: 38, color: Colors.redAccent),
            ),
          ],
        ),
        RepaintBoundary(
          child: Column(
            mainAxisSize: MainAxisSize.min,
            children: [
              Text(
                'Text3',
                textDirection: TextDirection.ltr,
                style: TextStyle(fontSize: 38, color: Colors.greenAccent),
              ),
              Text(
                'Text4',
                textDirection: TextDirection.ltr,
                style: TextStyle(fontSize: 38, color: Colors.yellowAccent),
              ),
            ],
          ),
        ),
      ],
    ),
  );
}

void _runApp(Widget app) {
  final WidgetsBinding binding = WidgetsFlutterBinding.ensureInitialized();
  Timer.run(() {
    binding.attachRootWidget(app);
  });
  binding.scheduleWarmUpFrame();
}
|
1、RenderView是Flutter应用的根节点,绘制会从它开始,因为它是一个绘制边界节点,在第一次绘制时,会为它创建一个OffsetLayer,这里记为OffsetLayer1,接下OffsetLayer1会传递给Row。
2、由于Row是一个容器类组件且不需要绘制自身,那么接下来它会绘制自己的孩子,它有两个孩子,先绘制第一个孩子Column1,将OffsetLayer1传给Column1,而Column1也不需要绘制自身,那么它又会将OffsetLayer1传递给第一个子节点Text1。
3、Text1需要绘制文本,它会使用OffsetLayer1进行绘制,由于OffsetLayer1是第一次绘制,所以会新建一个PictureLayer1和一个Canvas1,然后将Canvas1和PictureLayer1绑定,接下来文本内容通过Canvas1对象绘制,Text1绘制完成后,Column1又会将 OffsetLayer1传给Text2。
4、Text2也需要使用OffsetLayer1绘制文本,但是此时OffsetLayer1已经不是第一次绘制,所以会复用之前的Canvas1和PictureLayer1,调用Canvas1来绘制文本。
5、Column1的子节点绘制完成后,PictureLayer1上承载的是Text1和Text2的绘制产物。
6、接下来Row完成了Column1的绘制后,开始绘制第二个子节点RepaintBoundary,Row会将OffsetLayer1传递给RepaintBoundary,由于它是一个绘制边界节点并且是第一次绘制,则会为它创建一个OffsetLayer2。接下来RepaintBoundary会将OffsetLayer2传递给Column2,和Column1不同的是,Column2会使用OffsetLayer2去绘制Text3和Text4,绘制过程同Column1,在此不再赘述。
7、当RepaintBoundary的子节点绘制完时,要将RepaintBoundary的Layer( OffsetLayer2)添加到父级Layer(OffsetLayer1)中。
至此,整棵组件树绘制完成,生成了一棵右图所示的Layer树。需要说明的是PictureLayer1和 OffsetLayer2是兄弟关系,它们都是OffsetLayer1的孩子。
通过上面的例子至少可以发现一点:同一个Layer是可以多个组件共享的,比如Text1和Text2共享PictureLayer1。
但是Layer共享也会带来一个潜在的问题:比如Text1文本发生变化需要重绘时,也会连带着Text2重绘。也许您会有疑惑:不能每一个组件都绘制在一个单独的Layer上吗?这样还能避免相互干扰。
不可否认,您的疑惑是对的,但是究其原因还是为了节省资源,Layer太多时Skia会比较耗资源,所以这是一个权衡问题。
OK,上面只是绘制的一般流程。一般情况下Layer树中的ContainerLayer和PictureLayer的数量与结构是和Widget树中的边界节点一一对应的。但是,如果Widget树中有子组件在绘制过程中添加了新的Layer,那么Layer会比边界节点数量多一些,这时就不是一一对应了。
另外,Flutter中很多拥有变换、剪裁、透明等效果的组件,它们的实现都会往Layer树中添加新的Layer,这个有机会再讲。
3.2、创建新的PictureLayer
现在接着上面例子,给Row添加第三个子节点Text5,如下图所示。

上图对应的代码为:
 1
 2
 3
 4
 5
 6
 7
 8
 9
10
11
12
13
14
15
16
17
18
19
20
21
22
23
24
25
26
27
28
29
30
31
32
33
34
35
36
37
38
39
40
41
42
43
44
45
46
47
48
49
50
51
52
53
54
55
|
void main() {
  _runApp(
    const Row(
      crossAxisAlignment: CrossAxisAlignment.start,
      textDirection: TextDirection.ltr,
      children: [
        Column(
          mainAxisSize: MainAxisSize.min,
          children: [
            Text(
              'Text1',
              textDirection: TextDirection.ltr,
              style: TextStyle(fontSize: 38, color: Colors.blueAccent),
            ),
            Text(
              'Text2',
              textDirection: TextDirection.ltr,
              style: TextStyle(fontSize: 38, color: Colors.redAccent),
            ),
          ],
        ),
        RepaintBoundary(
          child: Column(
            mainAxisSize: MainAxisSize.min,
            children: [
              Text(
                'Text3',
                textDirection: TextDirection.ltr,
                style: TextStyle(fontSize: 38, color: Colors.greenAccent),
              ),
              Text(
                'Text4',
                textDirection: TextDirection.ltr,
                style: TextStyle(fontSize: 38, color: Colors.yellowAccent),
              ),
            ],
          ),
        ),
        Text(
          'Text5',
          textDirection: TextDirection.ltr,
          style: TextStyle(fontSize: 38, color: Colors.purpleAccent),
        ),
      ],
    ),
  );
}

void _runApp(Widget app) {
  final WidgetsBinding binding = WidgetsFlutterBinding.ensureInitialized();
  Timer.run(() {
    binding.attachRootWidget(app);
  });
  binding.scheduleWarmUpFrame();
}
|
那么它的Layer树会变成什么样呢?首先Row会遍历子组件,执行PaintingContext的paintChild方法绘制子组件,下面看绘制RepaintBoundary的情况。
 1
 2
 3
 4
 5
 6
 7
 8
 9
10
11
12
13
14
15
16
17
18
|
void paintChild(RenderObject child, Offset offset) {
  ...
  // 因为RepaintBoundary是绘制边界节点,所以isRepaintBoundary为true,执行这里
  if (child.isRepaintBoundary) {
    // 将Canvas1绘制产物保存在PictureLayer1中,置空Layer以及Canvas
    stopRecordingIfNeeded();
    // 递归绘制RepaintBoundary的所有子组件
    _compositeChild(child, offset);
  // If a render object was a repaint boundary but no longer is one, this
  // is where the framework managed layer is automatically disposed.
  } else if (child._wasRepaintBoundary) {
    assert(child._layerHandle.layer is OffsetLayer);
    child._layerHandle.layer = null;
    child._paintWithContext(this, offset);
  } else {
    child._paintWithContext(this, offset);
  }
}
|
看下PaintingContext的 _compositeChild 方法。
 1
 2
 3
 4
 5
 6
 7
 8
 9
10
11
12
13
14
15
16
17
18
|
void _compositeChild(RenderObject child, Offset offset) {
  ...
  // Create a layer for our child, and paint the child into it.
  if (child._needsPaint || !child._wasRepaintBoundary) {
    // 递归绘制RepaintBoundary的所有子组件
    repaintCompositedChild(child, debugAlsoPaintedParent: true);
  } else {
    if (child._needsCompositedLayerUpdate) {
      updateLayerProperties(child);
    }
    ...
  }
  assert(child._layerHandle.layer is OffsetLayer);
  // 将RepaintBoundary的Layer(OffsetLayer2)添加到父级Layer(OffsetLayer1)中
  final OffsetLayer childOffsetLayer = child._layerHandle.layer! as OffsetLayer;
  childOffsetLayer.offset = offset;
  appendLayer(childOffsetLayer);
}
|
继续看PaintingContext的repaintCompositedChild方法。
 1
 2
 3
 4
 5
 6
 7
 8
 9
10
11
12
13
14
15
16
17
18
19
20
21
22
23
24
25
26
27
28
29
30
31
32
33
34
35
36
37
38
39
40
41
42
43
44
45
46
|
static void repaintCompositedChild(RenderObject child, { bool debugAlsoPaintedParent = false }) {
  assert(child._needsPaint);
  _repaintCompositedChild(
    child,
    debugAlsoPaintedParent: debugAlsoPaintedParent,
  );
}

static void _repaintCompositedChild(
  RenderObject child, {
  bool debugAlsoPaintedParent = false,
  PaintingContext? childContext,
}) {
  ...
  OffsetLayer? childLayer = child._layerHandle.layer as OffsetLayer?;
  // 此处childLayer为null,由于RepaintBoundary是一个绘制边界节点,且是第一次绘制,则会为它创建一个OffsetLayer2
  if (childLayer == null) {
    assert(debugAlsoPaintedParent);
    assert(child._layerHandle.layer == null);

    // Not using the `layer` setter because the setter asserts that we not
    // replace the layer for repaint boundaries. That assertion does not
    // apply here because this is exactly the place designed to create a
    // layer for repaint boundaries.
    final OffsetLayer layer = child.updateCompositedLayer(oldLayer: null);
    child._layerHandle.layer = childLayer = layer;
  } else {
    ...
    childLayer.removeAllChildren();
    final OffsetLayer updatedLayer = child.updateCompositedLayer(oldLayer: childLayer);
    ...
  }
  child._needsCompositedLayerUpdate = false;

  ...

  childContext ??= PaintingContext(childLayer, child.paintBounds);
  // 递归绘制RepaintBoundary的所有子组件
  child._paintWithContext(childContext, Offset.zero);

  // Double-check that the paint method did not replace the layer (the first
  // check is done in the [layer] setter itself).
  assert(identical(childLayer, child._layerHandle.layer));
  // 将Canvas2的绘制产物保存在PictureLayer2中,置空Layer以及Canvas
  childContext.stopRecordingIfNeeded();
}
|
Text5是在RepaintBoundary绘制完成后才会绘制,因为Row循环第三次时才会遍历到它。
接下来在绘制Text5时,要先通过context.canvas来绘制,看下它的源码。
 1
 2
 3
 4
 5
 6
 7
 8
 9
10
11
12
13
14
15
16
17
18
19
|
@override
Canvas get canvas {
  // 前面_canvas已经被置空,所以执行_startRecording方法,
  if (_canvas == null) {
    _startRecording();
  }
  assert(_currentLayer != null);
  return _canvas!;
}

void _startRecording() {
  assert(!_isRecording);
  // 新创建一个PictureLayer3与Canvas3
  _currentLayer = PictureLayer(estimatedBounds);
  _recorder = ui.PictureRecorder();
  _canvas = Canvas(_recorder!);
  // 添加到OffsetLayer1中
  _containerLayer.append(_currentLayer!);
}
|
因此,Text5的绘制会落在PictureLayer3上,所以最终的 Layer树如下图所示。
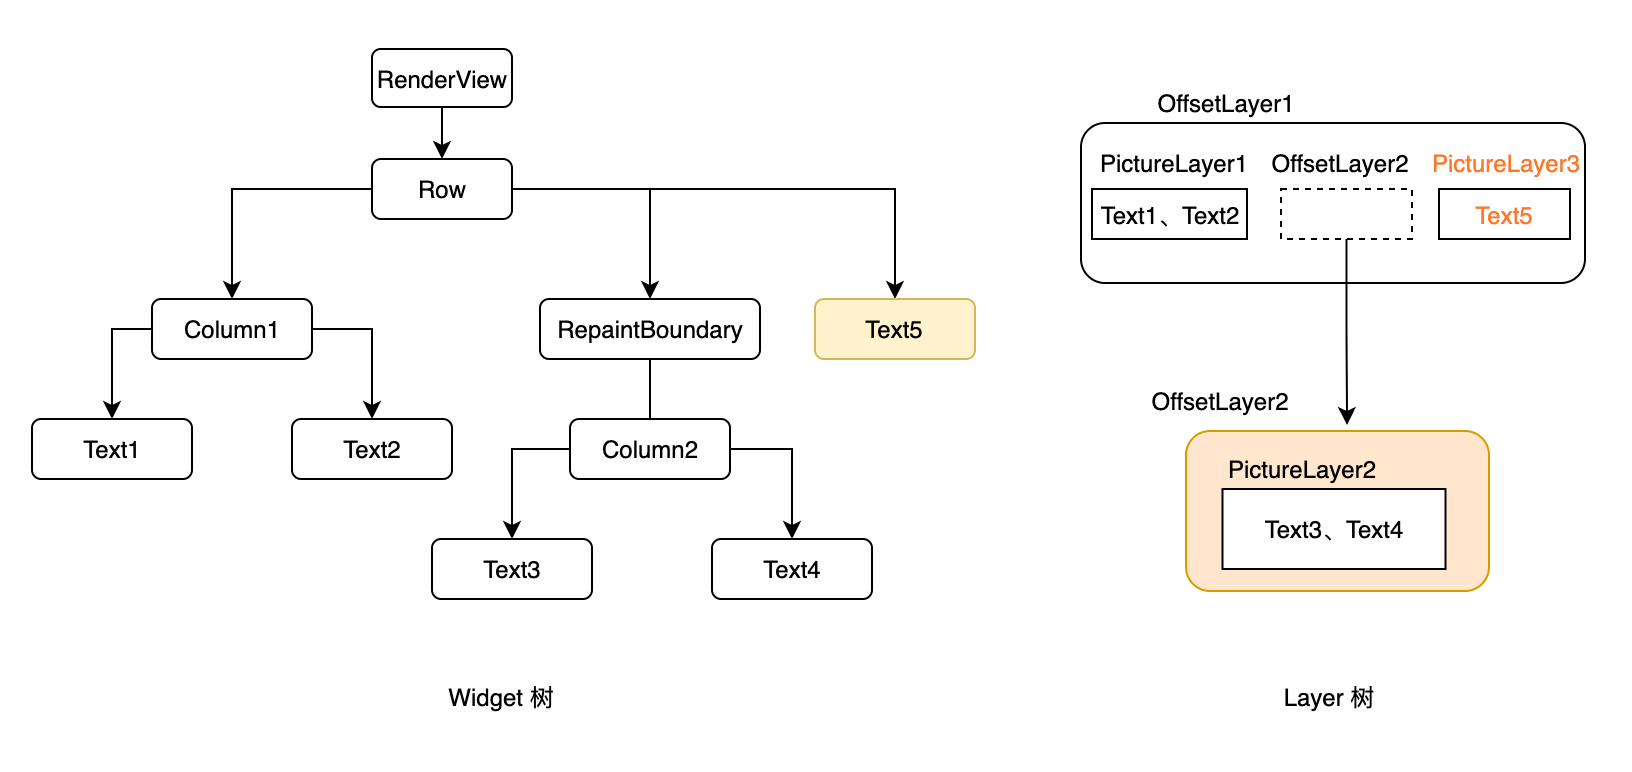
总结:父节点在绘制子节点时,如果子节点是绘制边界节点,则在绘制完该子节点后会生成一个新的PictureLayer,后续其它子节点会在新的PictureLayer上绘制。
对于上面的例子,为什么不能复用之前的PictureLayer1?如果这样做,在层叠布局(例如Stack)的场景中就会有问题。下面看一个例子,如下图所示。
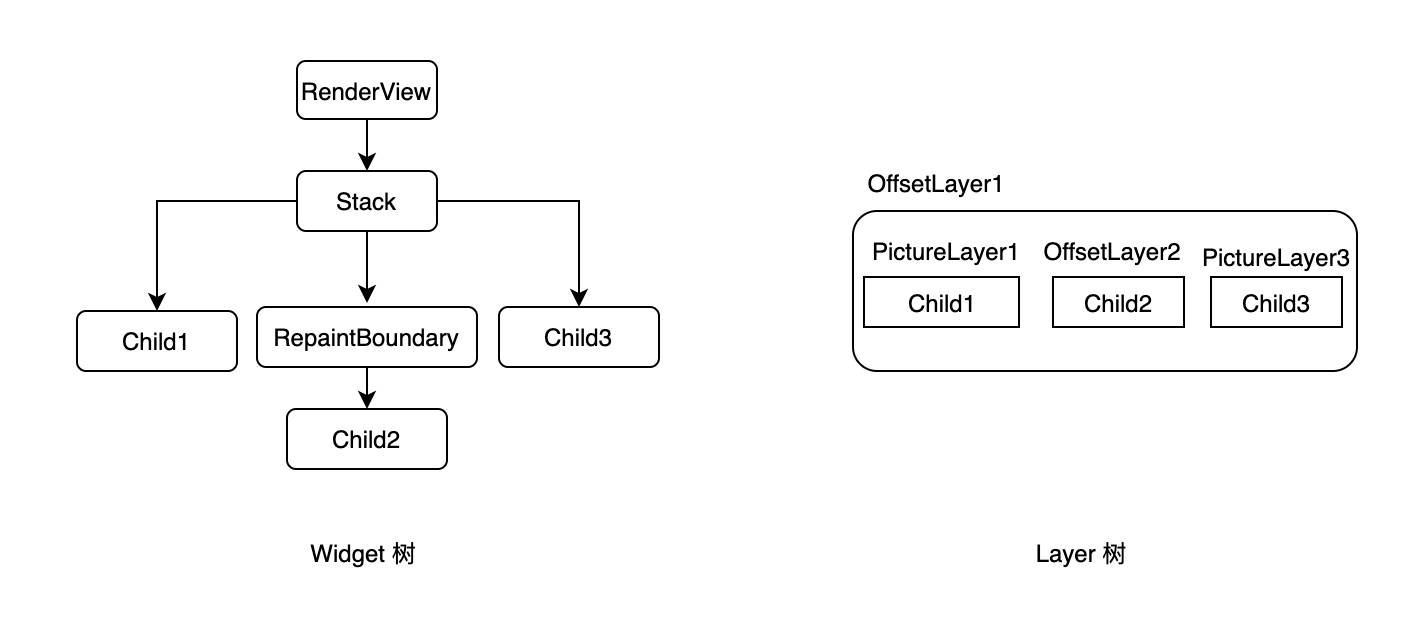
左边是一个Stack布局,右边是对应的Layer树结构;大家都知道Stack布局中会根据其子组件的加入顺序进行层叠绘制,最先加入的孩子在最底层,最后加入的孩子在最上层。可以设想一下如果绘制 Child3时复用了PictureLayer1,则会导致Child3被Child2遮住,这显然不符合预期,但如果新建一个PictureLayer在添加到OffsetLayer最后面,则可以获得正确的结果。
还有一种可能,如果Child2的父节点不是RepaintBoundary,那么Child3和Child1还是不可以共享同一个PictureLayer,原因如下:
如果Child2的父组件改为一个自定义的组件,在这个自定义的组件中您希望对子节点在渲染时进行一些矩阵变化,为了实现这个功能,您创建一个新的TransformLayer并指定变换规则,然后把它传递给 Child2,Child2会绘制完成后需要将TransformLayer添加到Layer树中(不添加到Layer树中是不会显示的),则组件树和最终的Layer树结构如下图所示。
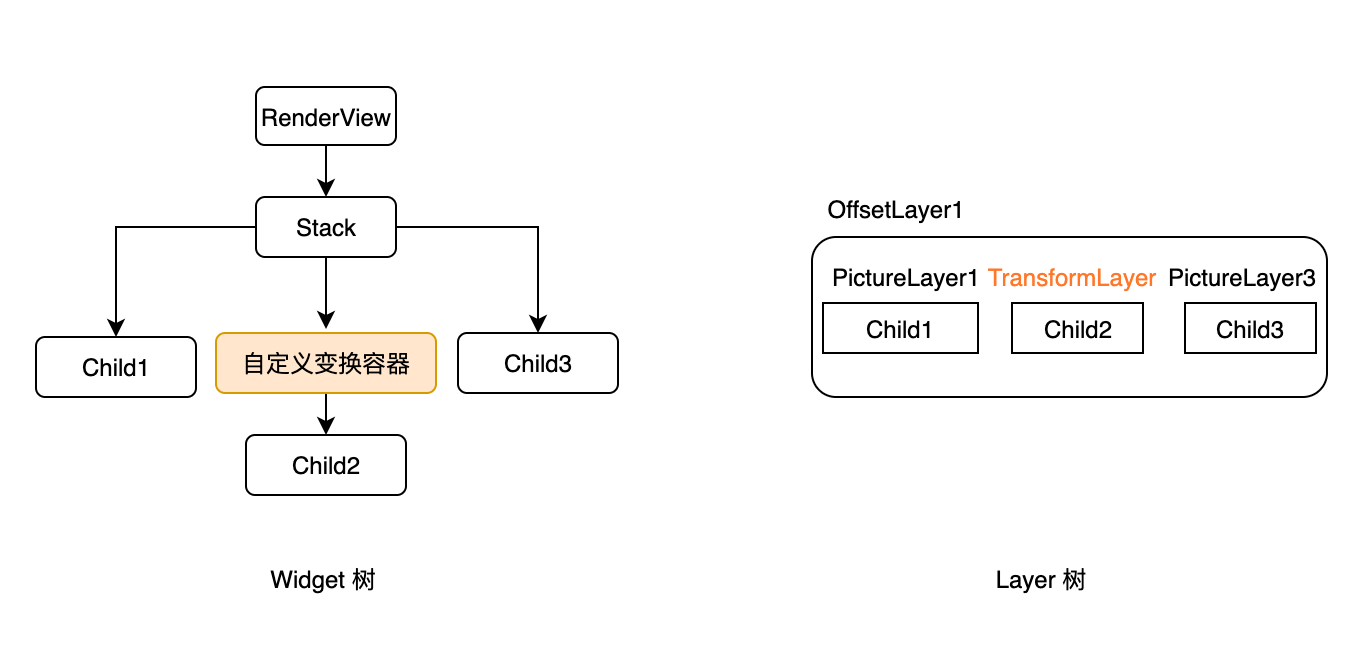
可以发现这种情况本质上和上面使用RepaintBoudary的情况是一样的,Child3仍然不应该复用 PictureLayer1,那么现在可以总结一个一般规律了:只要一个组件需要往Layer树中添加新的 Layer,那么就必须也要结束掉当前PictureLayer的绘制。
3.3、PipelineOwner的flushPaint方法
不管是runApp方法或者setState方法,都会执行RendererBinding的drawFrame方法。
 1
 2
 3
 4
 5
 6
 7
 8
 9
10
11
12
13
|
@protected
void drawFrame() {
  pipelineOwner.flushLayout();
  pipelineOwner.flushCompositingBits();
  // 触发绘制流程
  pipelineOwner.flushPaint();
  if (sendFramesToEngine) {
    // 发送二进制数据给GPU
    renderView.compositeFrame(); // this sends the bits to the GPU
    pipelineOwner.flushSemantics(); // this also sends the semantics to the OS.
    _firstFrameSent = true;
  }
}
|
看下PipelineOwner的flushPaint方法。
 1
 2
 3
 4
 5
 6
 7
 8
 9
10
11
12
13
14
15
16
17
18
19
20
21
22
23
24
25
26
27
28
29
30
31
32
33
34
35
36
37
38
|
// nodesNeedingPaint中的节点的isRepaintBoundary必然为true
List<RenderObject> _nodesNeedingPaint = <RenderObject>[];

void flushPaint() {
  ...
  try {
    ...
    final List<RenderObject> dirtyNodes = _nodesNeedingPaint;
    _nodesNeedingPaint = <RenderObject>[];

    // 对脏节点进行深度优先排序
    // Sort the dirty nodes in reverse order (deepest first).
    for (final RenderObject node in dirtyNodes..sort((RenderObject a, RenderObject b) => b.depth - a.depth)) {
      assert(node._layerHandle.layer != null);
      if ((node._needsPaint || node._needsCompositedLayerUpdate) && node.owner == this) {
        if (node._layerHandle.layer!.attached) {
          assert(node.isRepaintBoundary);
          if (node._needsPaint) {
            // 重新绘制给定的渲染对象。
            // 渲染对象必须附加到PipelineOwner,必须具有合成层,并且必须需要绘制。渲染对象的图层(如果有)以及子树中不需要重新绘制的任何图层都会被重新使用
            PaintingContext.repaintCompositedChild(node);
          } else {
            // 更新child的合成层而不重新绘制其子级。
            // 渲染对象必须附加到PipelineOwner,必须具有合成层,并且必须需要合成层更新但不需要绘制。渲染对象的图层被重新使用,并且其子对象的图层都不会被重新绘制或更新
            PaintingContext.updateLayerProperties(node);
          }
        } else {
          // 当flushPaint()试图让我们绘制但我们的图层被分离时调用。
          // 为了确保我们的子树在最终重新连接时被重新绘制,即使在某些祖先层本身从未被标记为脏的情况下,我们也必须将整个分离的子树标记为脏并需要重新绘制。这样,我们最终将被重新绘制。
          node._skippedPaintingOnLayer();
        }
      }
    }
    ...
  } finally {
    ...
  }
}
|
看下PaintingContext的repaintCompositedChild方法。
1
2
3
4
5
6
7
|
static void repaintCompositedChild(RenderObject child, { bool debugAlsoPaintedParent = false }) {
  assert(child._needsPaint);
  _repaintCompositedChild(
    child,
    debugAlsoPaintedParent: debugAlsoPaintedParent,
  );
}
|
看下PaintingContext的 _repaintCompositedChild 方法。
 1
 2
 3
 4
 5
 6
 7
 8
 9
10
11
12
13
14
15
16
17
18
19
20
21
22
23
24
25
26
27
28
29
30
31
32
33
34
35
36
37
38
39
|
static void _repaintCompositedChild(
  RenderObject child, {
  bool debugAlsoPaintedParent = false,
  // 此处childContext参数没有传入,所以为null
  PaintingContext? childContext,
}) {
  ...
  OffsetLayer? childLayer = child._layerHandle.layer as OffsetLayer?;
  // 如果边界节点没有Layer,则为其创建一个OffsetLayer
  if (childLayer == null) {
    ...

    // Not using the `layer` setter because the setter asserts that we not
    // replace the layer for repaint boundaries. That assertion does not
    // apply here because this is exactly the place designed to create a
    // layer for repaint boundaries.
    final OffsetLayer layer = child.updateCompositedLayer(oldLayer: null);
    child._layerHandle.layer = childLayer = layer;
  } else {
    ...
    // 如果边界节点已经有Layer了(之前绘制时已经为其创建过Layer了),则清空其子节点。
    childLayer.removeAllChildren();
    final OffsetLayer updatedLayer = child.updateCompositedLayer(oldLayer: childLayer);
    ...
  }
  child._needsCompositedLayerUpdate = false;

  ...
  // 通过其Layer构建一个paintingContext,之后Layer便和childContext绑定,这意味着通过同一个paintingContext的canvas绘制的产物属于同一个Layer。
  childContext ??= PaintingContext(childLayer, child.paintBounds);
  // 调用节点的paint方法,绘制子节点树
  child._paintWithContext(childContext, Offset.zero);

  // Double-check that the paint method did not replace the layer (the first
  // check is done in the [layer] setter itself).
  assert(identical(childLayer, child._layerHandle.layer));
  // 将Canvas的绘制产物保存在PictureLayer中,置空Layer以及Canvas
  childContext.stopRecordingIfNeeded();
}
|
看下RenderObject的 _paintWithContext 方法。
 1
 2
 3
 4
 5
 6
 7
 8
 9
10
11
12
13
14
15
16
17
18
19
20
21
22
23
24
25
26
27
28
|
void _paintWithContext(PaintingContext context, Offset offset) {
  ...
  // 如果我们仍然需要布局,那么这意味着我们在布局阶段被跳过,因此不需要绘制。
  // 我们可能还不知道(也就是说,我们的层可能还没有分离),因为在布局中跳过我们的同一个节点在树中位于我们之上(显然),因此可能还没有机会绘制(因为树以相反的顺序绘制)。
  // 特别是如果它们具有不同的层,就会发生这种情况,因为我们之间存在重绘边界。
  // If we still need layout, then that means that we were skipped in the
  // layout phase and therefore don't need painting. We might not know that
  // yet (that is, our layer might not have been detached yet), because the
  // same node that skipped us in layout is above us in the tree (obviously)
  // and therefore may not have had a chance to paint yet (since the tree
  // paints in reverse order). In particular this will happen if they have
  // a different layer, because there's a repaint boundary between us.
  if (_needsLayout) {
    return;
  }
  ...
  _needsPaint = false;
  _needsCompositedLayerUpdate = false;
  _wasRepaintBoundary = isRepaintBoundary;
  try {
    paint(context, offset);
    assert(!_needsLayout); // check that the paint() method didn't mark us dirty again
    assert(!_needsPaint); // check that the paint() method didn't mark us dirty again
  } catch (e, stack) {
    _reportException('paint', e, stack);
  }
  ...
}
|
看下RenderObject的paint方法,这个方法由子类实现。如果是容器组件,要绘制孩子和自身(当然,容器自身也可能没有绘制逻辑,这种情况只绘制孩子即可,比如Center组件),如果不是容器类组件,则绘制自身,比如Image组件。下面以Center组件为例,看下它RenderShiftedBox的paint方法。
1
2
3
4
5
6
7
8
9
|
@override
void paint(PaintingContext context, Offset offset) {
  final RenderBox? child = this.child;
  if (child != null) {
    final BoxParentData childParentData = child.parentData! as BoxParentData;
    // 绘制子节点
    context.paintChild(child, childParentData.offset + offset);
  }
}
|
看下PaintingContext的paintChild方法。
 1
 2
 3
 4
 5
 6
 7
 8
 9
10
11
12
13
14
15
16
17
18
|
void paintChild(RenderObject child, Offset offset) {
  ...
  // 如果该节点是边界节点,则执行_compositeChild方法,内部会递归绘制子节点
  if (child.isRepaintBoundary) {
    stopRecordingIfNeeded();
    _compositeChild(child, offset);
  // 如果渲染对象是重绘边界但不再是重绘边界,则框架管理层会自动处理该边界。
  // If a render object was a repaint boundary but no longer is one, this
  // is where the framework managed layer is automatically disposed.
  } else if (child._wasRepaintBoundary) {
    assert(child._layerHandle.layer is OffsetLayer);
    child._layerHandle.layer = null;
    child._paintWithContext(this, offset);
  } else {
    // 如果不是边界节点直接绘制自己
    child._paintWithContext(this, offset);
  }
}
|
按照上面的流程执行完毕后,最终所有边界节点的Layer就会相连起来组成一棵Layer树。
3.4、RenderView的markNeedsRepaint方法
 1
 2
 3
 4
 5
 6
 7
 8
 9
10
11
12
13
14
15
16
17
18
19
20
21
22
23
24
25
26
27
28
29
30
31
32
33
34
35
36
37
38
39
40
41
42
43
|
void markNeedsPaint() {
  assert(!_debugDisposed);
  assert(owner == null || !owner!.debugDoingPaint);
  if (_needsPaint) {
    return;
  }
  _needsPaint = true;
  // 如果这之前不是重绘边界,那么它将没有我们可以从中绘制的图层。
  // If this was not previously a repaint boundary it will not have
  // a layer we can paint from.
  if (isRepaintBoundary && _wasRepaintBoundary) {
    ...
    // 如果我们总是有自己的Layer,那么我们可以重新绘制自己,而不涉及任何其它节点。
    // If we always have our own layer, then we can just repaint
    // ourselves without involving any other nodes.
    assert(_layerHandle.layer is OffsetLayer);
    if (owner != null) {
      // 将当前节点添加到需要重新绘制的列表中
      owner!._nodesNeedingPaint.add(this);
      // 请求新的frame,该方法最终会调用scheduleFrame()
      owner!.requestVisualUpdate();
    }
  } else if (parent is RenderObject) {
    // 若不是边界节点且存在父节点,递归调用父节点的markNeedsPaint
    parent!.markNeedsPaint();
  } else {
    ...
    // 如果我们是渲染树的根而不是重绘边界,那么我们必须绘制自己,因为没有其它人可以绘制我们。在这种情况下,我们不会将自己添加到 _nodesNeedingPaint 中,因为无论如何,根总是被告知要绘制。
    // 以RenderView为根的树不会经过此代码路径,因为RenderView是重绘边界。
    // If we are the root of the render tree and not a repaint boundary
    // then we have to paint ourselves, since nobody else can paint us.
    // We don't add ourselves to _nodesNeedingPaint in this case,
    // because the root is always told to paint regardless.
    //
    // Trees rooted at a RenderView do not go through this
    // code path because RenderViews are repaint boundaries.

    // 如果是根节点,直接请求新的frame即可
    if (owner != null) {
      owner!.requestVisualUpdate();
    }
  }
}
|
markNeedsRepaint方法的执行过程如下:
1、会从当前节点一直往父级查找,直到找到一个绘制边界节点时终止查找,然后会将该绘制边界节点添加到其PiplineOwner的 _nodesNeedingPaint列表中(保存需要重绘的绘制边界节点)。
2、在查找的过程中,会将自己到绘制边界节点路径上所有节点的 _needsPaint 属性置为true,表示需要重新绘制。
3、请求新的frame,执行重绘重绘流程。
3.5、RenderView的compositeFrame方法
 1
 2
 3
 4
 5
 6
 7
 8
 9
10
11
12
13
14
15
16
17
18
19
|
ui.FlutterView get flutterView => _view;
final ui.FlutterView _view;

void compositeFrame() {
  ...
  try {
    final ui.SceneBuilder builder = ui.SceneBuilder();
    // 通过Layer构建Scene
    final ui.Scene scene = layer!.buildScene(builder);
    if (automaticSystemUiAdjustment) {
      _updateSystemChrome();
    }
    _view.render(scene);
    scene.dispose();
    ...
  } finally {
    ...
  }
}
|
看下ContainerLayer的buildScene方法。
 1
 2
 3
 4
 5
 6
 7
 8
 9
10
11
12
13
14
|
ui.Scene buildScene(ui.SceneBuilder builder) {
  updateSubtreeNeedsAddToScene();
  // 将Layer树中每一个Layer传给Skia,最终会调用Native API
  addToScene(builder);
  if (subtreeHasCompositionCallbacks) {
    _fireCompositionCallbacks(includeChildren: true);
  }
  // Clearing the flag _after_ calling `addToScene`, not _before_. This is
  // because `addToScene` calls children's `addToScene` methods, which may
  // mark this layer as dirty.
  _needsAddToScene = false;
  final ui.Scene scene = builder.build();
  return scene;
}
|
四、参考文献