注:本文代码基于Flutter SDK 3.13.5
一、理解布局约束
在学习Flutter的过程中可能会遇到这样一个问题:为什么给Widget设置了width: 100,但是不起作用?
这时候最应该做的不是怎样去解决这个问题,而是要先去熟悉这条规则:首先,上层Widget向下层Widget传递约束条件;然后,下层Widget向上层Widget传递大小信息。最后,上层Widget决定下层Widget的位置。如果您在开发时无法熟练运用这条规则,在布局时就不能完全理解其原理,所以越早掌握这条规则越好!
例如,如果一个Widget中包含了一个具有padding的Column,并且要对Column的子 Widget进行如下的布局:
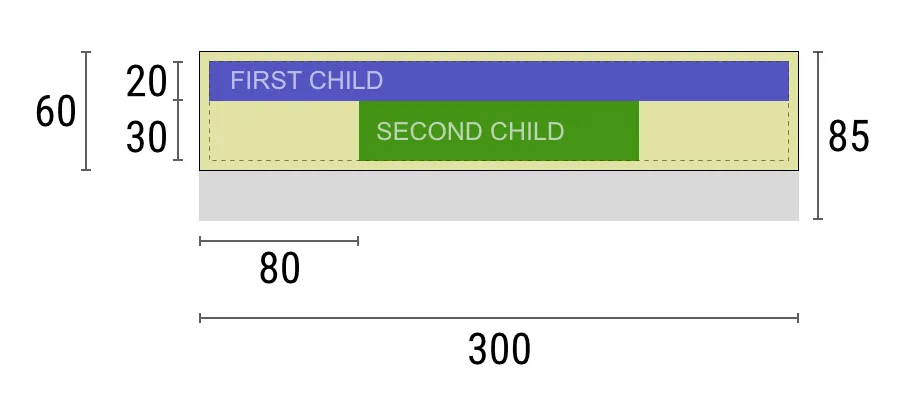
那么Parent与Child之间就像一场谈判,将会像下面这样:
1、Widget:“嘿!我的父级。我的约束是多少?”
2、Parent:“你的宽度必须在80到300像素之间,高度必须在30到85之间。”
3、Widget:“嗯…我想要5个像素的内边距,这样我的子级能最多拥有290个像素宽度和75个像素高度。”
4、Widget:“嘿,我的第一个子级,你的宽度必须要在0到290,长度在0到75之间。”
5、First Child:“OK,那我想要290像素的宽度,20个像素的长度。”
6、Widget:“嗯…由于我想要将我的第二个子级放在第一个子级下面,所以我们仅剩55个像素的高度给第二个子级了。”
7、Widget:“嘿,我的第二个子级,你的宽度必须要在0到290,长度在0到55之间。”
8、Second Child:“OK,那我想要140像素的宽度,30个像素的长度。”
9、Widget:“很好。我的第一个子级将被放在x: 5 & y: 5的位置,而我的第二个子级将在x: 80 & y: 25的位置。”
10、Widget:“嘿,我的父级,我决定我的大小为300像素宽度,60像素高度。”
OK,现在再回想最初的问题:为什么给Widget设置了固定宽高,但是不起作用?看下关于这个问题的几个例子就知道了。
整个屏幕作为Container的父级,并且强制Container变成和屏幕一样的大小。所以这个Container充满了整个屏幕,并绘制成红色。

1
|
Container(width: 100, height: 100, color: red)
|
红色的Container想要变成100 x 100的大小,但是它无法变成,因为屏幕强制它变成和屏幕一样的大小。所以Container充满了整个屏幕。
1
2
3
|
Center(
  child: Container(width: 100, height: 100, color: red),
)
|
屏幕强制Center变得和屏幕一样大,所以Center充满了屏幕。然后Center告诉Container可以变成任意大小,但是不能超出屏幕。现在,Container可以真正变成100 × 100大小了。

分析一下上面例子的现象,这涉及一个名词Constraints(约束),它主要描述了最小和最大宽高的限制,这里需要介绍一下两种常用的约束:
- 宽松约束:宽松约束的最小宽度/高度为0。它不限制最小宽高,只限制最大宽高,可以通过 BoxConstraints.loose(Size size) 来快速创建。
1
2
3
4
5
6
7
|
BoxConstraints loosen() {
  assert(debugAssertIsValid());
  return BoxConstraints(
    maxWidth: maxWidth,
    maxHeight: maxHeight,
  );
}
|
- 严格约束:严格约束给你了一种获得确切大小的选择。换句话来说就是,它的最大/最小宽度是一致的,高度也一样。可以通过 BoxConstraints.tight(Size size) 来快速创建。
1
2
3
4
5
|
BoxConstraints.tight(Size size)
  : minWidth = size.width,
    maxWidth = size.width,
    minHeight = size.height,
    maxHeight = size.height;
|
对于前面三个示例来说,为什么示例一与示例二的Container充满了整个屏幕?因为Container的Render父组件为RenderView,所以看下RenderView的performLayout方法就知晓了。
 1
 2
 3
 4
 5
 6
 7
 8
 9
10
11
12
|
@override
void performLayout() {
  assert(_rootTransform != null);
  // configuration为根渲染对象的布局约束,size为当前屏幕大小
  _size = configuration.size;
  assert(_size.isFinite);

  if (child != null) {
    // 这里使用了严格约束,要求子组件Container和当前屏幕一样大小
    child!.layout(BoxConstraints.tight(_size));
  }
}
|
对于示例三来说,为什么Container不再是充满了整个屏幕?因为Container的Render父组件为RenderPositionedBox,所以看下RenderPositionedBox的performLayout方法就知晓了。
 1
 2
 3
 4
 5
 6
 7
 8
 9
10
11
12
13
14
15
16
17
18
19
20
21
|
@override
void performLayout() {
  final BoxConstraints constraints = this.constraints;
  final bool shrinkWrapWidth = _widthFactor != null || constraints.maxWidth == double.infinity;
  final bool shrinkWrapHeight = _heightFactor != null || constraints.maxHeight == double.infinity;

  if (child != null) {
    // 这里使用了宽松约束,只要求子组件Container最大宽高和Center组件一样大小,也就是当前屏幕大小
    child!.layout(constraints.loosen(), parentUsesSize: true);
    size = constraints.constrain(Size(
      shrinkWrapWidth ? child!.size.width * (_widthFactor ?? 1.0) : double.infinity,
      shrinkWrapHeight ? child!.size.height * (_heightFactor ?? 1.0) : double.infinity,
    ));
    alignChild();
  } else {
    size = constraints.constrain(Size(
      shrinkWrapWidth ? 0.0 : double.infinity,
      shrinkWrapHeight ? 0.0 : double.infinity,
    ));
  }
}
|
可以发现,RenderView中给子组件传递的是一个严格约束,即强制子组件大小等于屏幕大小,所以Container便撑满了屏幕。那怎么才能让指定的大小生效呢?标准答案就是引入一个中间组件,让这个中间组件遵守父组件的约束,然后对子组件传递新的约束。
对于示例二来讲,最简单的方式是用一个Center(Align)组件来包裹Container,Center会遵守RenderView的约束,让自身撑满屏幕,然后会给子组件传递一个宽松约束。
当然还可以使用其它组件来代替Align,比如UnconstrainedBox,原理也是相同的,具体可以查看源码验证,这里就不带大家分析了。
二、示例演示
在深入分析Flutter布局Layout过程之前,先分别自定义一个单子组件和多子组件来直观看一下Flutter布局的主要过程。
2.1、单子组件布局示例
实现一个单子组件CustomCenter,功能基本和Center组件对齐。这里不采用组合的方式来实现组件,而是直接通过定制RenderObject的方式来实现,因为居中组件需要包含一个子组件,所以可以直接继承SingleChildRenderObjectWidget。
 1
 2
 3
 4
 5
 6
 7
 8
 9
10
|
// 此处实现与RenderAligningShiftedBox相似
class CustomCenter extends SingleChildRenderObjectWidget {
  const CustomCenter({super.key, required super.child});

  @override
  RenderObject createRenderObject(BuildContext context) {
    // 此处虽然没有传入child,但是在RenderObject树构建过程中,insertRenderObjectChild方法已经插入child,完成child的赋值
    return CustomRenderPositionedBox();
  }
}
|
接着实现CustomRenderPositionedBox。这里直接继承RenderObject会更接近底层一点,但这需要自己手动实现一些和布局无关的东西,例如事件分发等逻辑。
为了更聚焦布局本身,可以选择继承自RenderShiftedBox,它会帮我们实现布局之外的一些功能,这样就只需要重写performLayout方法,在该方法中实现子组件居中算法即可。
 1
 2
 3
 4
 5
 6
 7
 8
 9
10
11
12
13
14
15
16
17
18
19
20
21
22
23
24
25
26
27
28
29
30
31
32
33
34
35
36
37
38
39
40
41
42
43
44
45
46
47
48
|
// 此处实现与RenderPositionedBox相似
class CustomRenderPositionedBox extends RenderShiftedBox {
  CustomRenderPositionedBox({RenderBox? child}) : super(child);

  @override
  void performLayout() {
    // CustomCenter存在子组件
    if (child != null) {
      // 对子组件进行layout,随后获取它的size
      child!.layout(
        constraints.loosen(), // 对子组件实行宽松约束
        parentUsesSize: true, // 如果接下来想要使用child的size,parentUsesSize就需要设置为true
      );

      debugPrint('${constraints.maxWidth == double.infinity}'); // 这里一般情况都打印false

      // 根据子组件的大小确定CustomCenter自身的大小
      // constrain方法的作用:返回既满足约束又尽可能接近给定大小的大小
      size = constraints.constrain(Size(
        // 如果CustomCenter父组件传递给它最大宽高约束是无限大时,CustomCenter的宽高会设置为它子组件的宽高
        // 否则CustomCenter的宽高会设置为它父组件的最大宽高
        constraints.maxWidth == double.infinity ? child!.size.width : double.infinity,
        constraints.maxHeight == double.infinity ? child!.size.height : double.infinity,
      ));
    } else {
      // CustomCenter不存在子组件
      size = constraints.constrain(Size(
        // 如果CustomCenter父组件传递给它最大宽高约束是无限大时,CustomCenter的宽高会设置为0
        // 否则CustomCenter的宽高会设置为它父组件的最大宽高
        constraints.maxWidth == double.infinity ? 0.0 : double.infinity,
        constraints.maxHeight == double.infinity ? 0.0 : double.infinity,
      ));
    }

    // 根据父组件(CustomCenter)与子组件的大小,算出子组件在父组件中居中之后的偏移,然后将这个偏移保存在子组件的parentData中,以便后续的绘制阶段使用
    BoxParentData parentData = child!.parentData as BoxParentData;
    parentData.offset = (size - child!.size as Offset) / 2;
  }

  @override
  void paint(PaintingContext context, Offset offset) {
    // 打印CustomCenter的背景,看下它的大小
    if (kDebugMode) {
      context.canvas.drawRect(offset & size, Paint()..color = Colors.white);
    }
    super.paint(context, offset);
  }
}
|
下面去使用CustomCenter,与前面示例三相似。
 1
 2
 3
 4
 5
 6
 7
 8
 9
10
11
|
void main() {
  runApp(
    CustomCenter(
      child: Container(
        width: 100,
        height: 100,
        color: Colors.blueAccent,
      ),
    ),
  );
}
|

2.2、多子组件布局示例
在实际开发中可能会遇到贴边左-右布局,现在就来自定义一个CustomLeftRightBox组件来实现左-右布局,因为CustomLeftRightBox有两个孩子,用一个Widget数组来保存子组件。
在定义组件时,与单子组件不同的是多子组件需要继承自MultiChildRenderObjectWidget。
1
2
3
4
5
6
7
8
9
|
class CustomLeftRightBox extends MultiChildRenderObjectWidget {
  const CustomLeftRightBox({
    super.key,
    required super.children,
  }) : assert(children.length == 2, 'children只能有2个孩子');

  @override
  RenderObject createRenderObject(BuildContext context) => CustomRenderLeftRightBox();
}
|
接下来需要实现CustomRenderLeftRightBox,在其performLayout方法中实现左-右布局算法。
 1
 2
 3
 4
 5
 6
 7
 8
 9
10
11
12
13
14
15
16
17
18
19
20
21
22
23
24
25
26
27
28
29
30
31
32
33
34
35
36
37
38
39
40
41
42
43
44
45
46
47
48
49
50
51
52
53
54
55
56
57
58
59
60
61
62
63
64
65
66
67
68
69
|
class LeftRightBoxParentData extends ContainerBoxParentData<RenderBox> {}

class CustomRenderLeftRightBox extends RenderBox
    with
        // 这两个组合mixin实现了通用的绘制和事件处理相关逻辑
        ContainerRenderObjectMixin<RenderBox, LeftRightBoxParentData>,
        RenderBoxContainerDefaultsMixin<RenderBox, LeftRightBoxParentData> {
  /// 初始化每一个child的parentData
  @override
  void setupParentData(covariant RenderObject child) {
    if (child.parentData is! LeftRightBoxParentData) {
      child.parentData = LeftRightBoxParentData();
    }
  }

  @override
  void performLayout() {
    // 获取CustomLeftRightBox父组件的约束
    final BoxConstraints constraints = this.constraints;

    // 获取CustomLeftRightBox第一个孩子,也就是左子组件
    RenderBox leftChild = firstChild!;
    LeftRightBoxParentData childParentData = leftChild.parentData! as LeftRightBoxParentData;

    // 获取CustomLeftRightBox下一个孩子,也就是右子组件
    RenderBox rightChild = childParentData.nextSibling!;
    // 布局右子组件
    rightChild.layout(
      // 这里rightChild最小宽高为0,最大宽度为CustomRenderLeftRightBox父组件的最大宽度/2,最大高度为CustomRenderLeftRightBox父组件的最大高度
      BoxConstraints(maxWidth: constraints.maxWidth / 2, maxHeight: constraints.maxHeight),
      parentUsesSize: true,
    );
    // 只调整右子组件的Offset,对齐到CustomRenderLeftRightBox父组件的顶部
    childParentData = rightChild.parentData! as LeftRightBoxParentData;
    childParentData.offset = Offset(constraints.maxWidth - rightChild.size.width, 0);

    // 布局左子组件
    // 左子组件的Offset默认为(0,0),为了确保左子组件始终能显示,这里不修改它的Offset
    leftChild.layout(
      // 这里leftChild最小宽高为0,最大宽度为左侧剩余宽度,最大高度为CustomRenderLeftRightBox父组件的最大高度
      BoxConstraints(
          maxWidth: constraints.maxWidth - rightChild.size.width, maxHeight: constraints.maxHeight),
      parentUsesSize: true,
    );

    // 设置CustomLeftRightBox自身的size
    size = constraints.constrain(
      Size(
        constraints.maxWidth,
        // CustomLeftRightBox的高度会设置为它子组件中的最大高度
        max(leftChild.size.height, rightChild.size.height),
      ),
    );
  }

  @override
  void paint(PaintingContext context, Offset offset) {
    // 打印CustomLeftRightBox的背景,看下它的大小
    if (kDebugMode) {
      context.canvas.drawRect(offset & size, Paint()..color = Colors.white);
    }
    defaultPaint(context, offset);
  }

  @override
  bool hitTestChildren(BoxHitTestResult result, {required Offset position}) {
    return defaultHitTestChildren(result, position: position);
  }
}
|
下面去使用CustomLeftRightBox。
 1
 2
 3
 4
 5
 6
 7
 8
 9
10
11
12
13
14
15
16
17
18
19
20
|
void main() {
  runApp(
    Center(
      child: CustomLeftRightBox(
        children: [
          Container(
            width: 80,
            height: 80,
            color: Colors.redAccent,
          ),
          Container(
            width: 160,
            height: 160,
            color: Colors.blueAccent,
          ),
        ],
      ),
    ),
  );
}
|
可以看到,实际布局流程和单子组件并没有太大区别,只不过多子组件需要同时对多个子组件进行布局。
另外和CustomRenderPositionedBox不同的是,CustomRenderLeftRightBox是直接继承自RenderBox,同时混入了ContainerRenderObjectMixin和 RenderBoxContainerDefaultsMixin两个mixin,这两个mixin组合实现了通用的绘制和事件处理相关逻辑。
除此之外,您可能还会注意到自定义的LeftRightBoxParentData,它的最终父类是ParentData。在上面两个例子中,在实现相应的RenderObject时都用到了子组件的parentData对象(将子组件的Offset信息保存其中),可以看到parentData虽然属于child的属性,但它从设置(包括初始化)到使用都在父组件中,这也是为什么起名叫“parentData”。实际上Flutter框架中,parentData这个属性主要就是为了在布局layout阶段保存组件布局信息而设计的。
需要注意:“parentData用于保存组件的布局信息”只是一个约定,您在定义组件时完全可以将子组件的布局信息保存在任意地方,也可以保存非布局信息。但是,还是强烈建议大家遵循Flutter的规范,这样的代码会更容易被他人看懂,也会更容易维护。
2.3、总结Flutter布局Layout过程
Flutter布局Layout过程主要是确定每一个组件的布局信息(大小和位置),Flutter的布局过程如下:
1、父组件向子组件传递约束(constraints)信息,限制子组件的最大和最小宽高。
2、子组件根据约束信息确定自己的大小(size)。
3、父组件根据特定布局规则(不同布局组件会有不同的布局算法)确定每一个子组件在父组件布局空间中的位置,用偏移Offset表示。
4、递归整个过程,确定出每一个组件的大小和位置。
至此,相信你已经对Flutter的布局流程熟悉了,现在看一张Flutter官网的图。
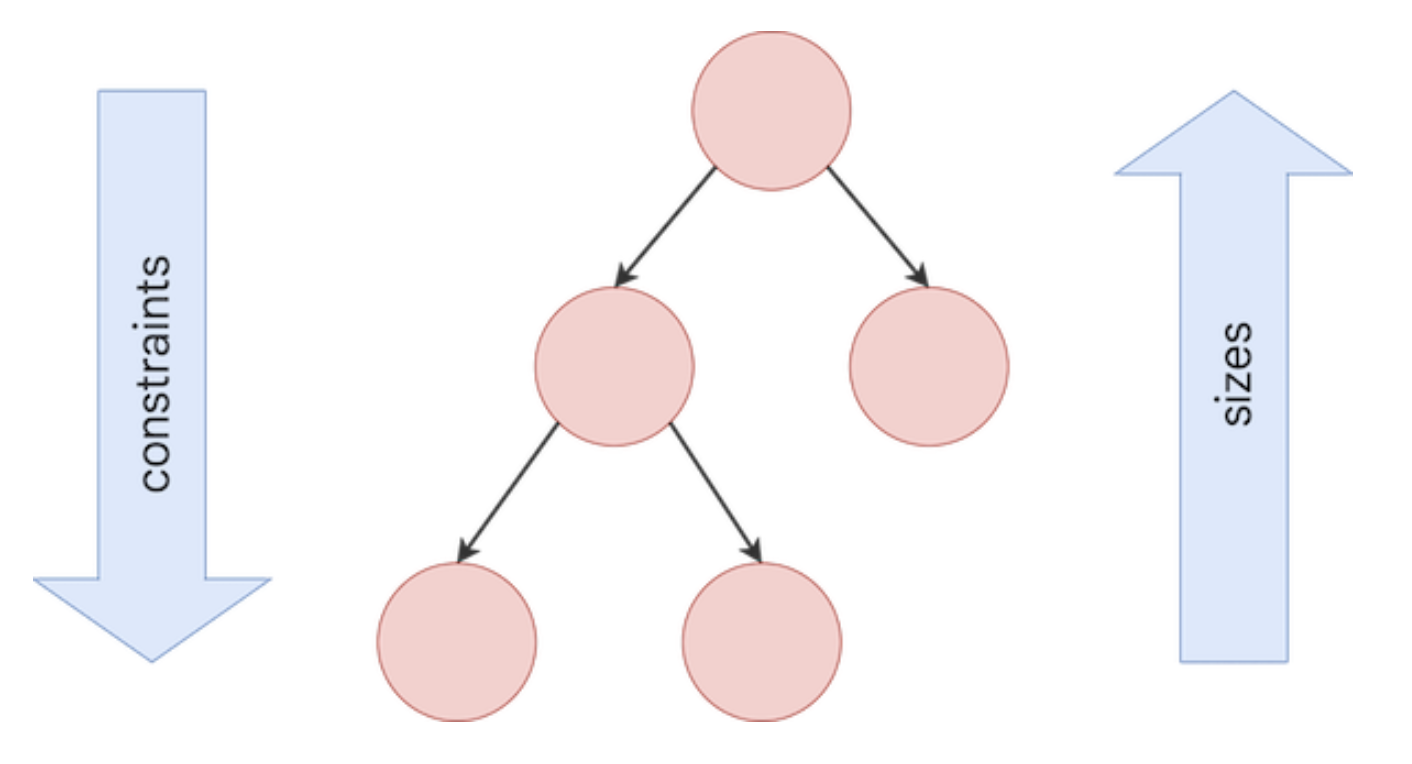
官方对于Flutter布局过程是这么描述的:
在进行布局的时候,Flutter会以DFS(深度优先遍历)方式遍历渲染树,并将限制以自上而下的方式从父组件传递给子组件。子组件若要确定自己的大小,则必须遵循父组件传递的限制。子组件的响应方式是在父组件建立的约束内将大小以自下而上的方式传递给父组件。
看完官方的描述是不是理解的更透彻了一些!
三、源码分析
以上面单子组件布局示例为例,进行源码分析。
3.1、RenderView初始化
在runApp方法中,会执行WidgetsFlutterBinding.ensureInitialized(),此处会执行RendererBinding的initInstances方法。
 1
 2
 3
 4
 5
 6
 7
 8
 9
10
11
12
13
14
15
16
17
18
19
20
21
|
@override
void initInstances() {
  super.initInstances();
  ...
  // 创建PipelineOwner实例
  // 管道所有者提供用于驱动渲染管道的接口,并存储有关在管道的每个阶段中请求访问哪些渲染对象的状态。
  _pipelineOwner = PipelineOwner(
    onSemanticsOwnerCreated: _handleSemanticsOwnerCreated,
    onSemanticsUpdate: _handleSemanticsUpdate,
    onSemanticsOwnerDisposed: _handleSemanticsOwnerDisposed,
  );
  ...
  // 创建根组件RenderView
  initRenderView();
  // 注册持久帧回调
  addPersistentFrameCallback(_handlePersistentFrameCallback);
  ...
}

PipelineOwner get pipelineOwner => _pipelineOwner;
late PipelineOwner _pipelineOwner;
|
在initInstances方法中执行了initRenderView方法。
1
2
3
4
5
6
7
8
9
|
void initRenderView() {
  ...
  // 创建RenderView实例,传入configuration,此处为屏幕大小
  renderView = RenderView(configuration: createViewConfiguration(), view: platformDispatcher.implicitView!);
  // 通过准备第一帧来引导渲染管道。
  // 这应该只调用一次,并且必须在更改configuration之前调用。它通常在调用构造函数后立即调用。
  // 这实际上并没有安排第一帧。对owner调用PipelineOwner.requestVisualUpdate来执行此操作
  renderView.prepareInitialFrame();
}
|
先看下RenderView构造方法传入的configuration,它是一个createViewConfiguration方法。
1
2
3
4
5
6
7
8
9
|
ViewConfiguration createViewConfiguration() {
  final FlutterView view = platformDispatcher.implicitView!;
  final double devicePixelRatio = view.devicePixelRatio;
  // 创建ViewConfiguration实例,这是子组件的约束条件
  return ViewConfiguration(
    size: view.physicalSize / devicePixelRatio,
    devicePixelRatio: devicePixelRatio,
  );
}
|
看下RenderView的构造方法。
 1
 2
 3
 4
 5
 6
 7
 8
 9
10
11
12
13
14
15
|
class RenderView extends RenderObject with RenderObjectWithChildMixin<RenderBox> {

  RenderView({
    RenderBox? child,
    required ViewConfiguration configuration,
    required ui.FlutterView view,
  }) : _configuration = configuration,
       _view = view {
    this.child = child;
  }

  // RenderView持有了ViewConfiguration
  ViewConfiguration get configuration => _configuration;
  ViewConfiguration _configuration;
}
|
创建RenderView实例赋值给renderView,会执行setter方法。
1
2
3
4
5
6
|
RenderView get renderView => _pipelineOwner.rootNode! as RenderView;

set renderView(RenderView value) {
  // 将RenderView赋值给rootNode
  _pipelineOwner.rootNode = value;
}
|
看下PipelineOwner的rootNode。
 1
 2
 3
 4
 5
 6
 7
 8
 9
10
11
12
|
// 此管道管理的唯一对象,没有父对象。
RenderObject? get rootNode => _rootNode;
RenderObject? _rootNode;
set rootNode(RenderObject? value) {
  if (_rootNode == value) {
    return;
  }
  _rootNode?.detach();
  _rootNode = value;
  // 执行这里
  _rootNode?.attach(this);
}
|
看下RenderObject的attach方法。
 1
 2
 3
 4
 5
 6
 7
 8
 9
10
11
|
PipelineOwner? get owner => _owner;
PipelineOwner? _owner;

@mustCallSuper
void attach(PipelineOwner owner) {
  assert(!_debugDisposed);
  assert(_owner == null);
  // 此处赋值后,RenderObject持有了PipelineOwner对象
  _owner = owner;
  ...
}
|
再回过头来看下RenderView的prepareInitialFrame方法。
1
2
3
4
5
6
7
8
|
void prepareInitialFrame() {
  assert(owner != null);
  assert(_rootTransform == null);
  // 执行这里
  scheduleInitialLayout();
  scheduleInitialPaint(_updateMatricesAndCreateNewRootLayer());
  assert(_rootTransform != null);
}
|
看下RenderObject的scheduleInitialLayout方法。
 1
 2
 3
 4
 5
 6
 7
 8
 9
10
11
12
13
14
15
16
17
|
RenderObject? _relayoutBoundary;

void scheduleInitialLayout() {
  assert(!_debugDisposed);
  assert(attached);
  assert(parent is! RenderObject);
  assert(!owner!._debugDoingLayout);
  assert(_relayoutBoundary == null);
  // 设置布局边界为RenderView自己
  _relayoutBoundary = this;
  assert(() {
    _debugCanParentUseSize = false;
    return true;
  }());
  // 将RenderView添加到PipelineOwner中List保存,表示自己是需要布局的组件
  owner!._nodesNeedingLayout.add(this);
}
|
3.2、SchedulerBinding的scheduleWarmUpFrame方法
在runApp方法中,执行完WidgetsBinding的scheduleAttachRootWidget方法后,三颗树也会创建完成,随后继续执行SchedulerBinding的scheduleWarmUpFrame方法。
 1
 2
 3
 4
 5
 6
 7
 8
 9
10
11
12
13
14
15
16
17
18
19
20
21
22
23
24
25
26
27
28
29
30
31
32
33
34
35
36
37
38
39
40
41
42
|
void scheduleWarmUpFrame() {
  if (_warmUpFrame || schedulerPhase != SchedulerPhase.idle) {
    return;
  }

  _warmUpFrame = true;
  final TimelineTask timelineTask = TimelineTask()..start('Warm-up frame');
  final bool hadScheduledFrame = _hasScheduledFrame;
  // We use timers here to ensure that microtasks flush in between.
  Timer.run(() {
    assert(_warmUpFrame);
    // 由引擎调用去准备框架以生成新帧。该函数调用由scheduleFrameCallback注册的所有瞬态帧回调
    handleBeginFrame(null);
  });
  Timer.run(() {
    assert(_warmUpFrame);
    // 由引擎调用以产生新的帧。
    // 该方法在handleBeginFrame之后立即调用。它调用addPersistentFrameCallback注册的所有回调(通常驱动渲染管道),然后调用addPostFrameCallback注册的回调。
    handleDrawFrame();
    // We call resetEpoch after this frame so that, in the hot reload case,
    // the very next frame pretends to have occurred immediately after this
    // warm-up frame. The warm-up frame's timestamp will typically be far in
    // the past (the time of the last real frame), so if we didn't reset the
    // epoch we would see a sudden jump from the old time in the warm-up frame
    // to the new time in the "real" frame. The biggest problem with this is
    // that implicit animations end up being triggered at the old time and
    // then skipping every frame and finishing in the new time.
    resetEpoch();
    _warmUpFrame = false;
    if (hadScheduledFrame) {
      // 通过调用dart:ui.PlatformDispatcher.scheduleFrame来安排新帧
      scheduleFrame();
    }
  });

  // Lock events so touch events etc don't insert themselves until the
  // scheduled frame has finished.
  lockEvents(() async {
    await endOfFrame;
    timelineTask.finish();
  });
}
|
看下SchedulerBinding的handleDrawFrame方法。
 1
 2
 3
 4
 5
 6
 7
 8
 9
10
11
12
13
14
15
16
17
18
19
20
21
22
23
24
25
26
27
28
29
30
31
32
|
void handleDrawFrame() {
  assert(_schedulerPhase == SchedulerPhase.midFrameMicrotasks);
  _frameTimelineTask?.finish(); // end the "Animate" phase
  try {
    // PERSISTENT FRAME CALLBACKS
    _schedulerPhase = SchedulerPhase.persistentCallbacks;
    // 遍历_persistentCallbacks执行FrameCallback
    for (final FrameCallback callback in _persistentCallbacks) {
      _invokeFrameCallback(callback, _currentFrameTimeStamp!);
    }

    // POST-FRAME CALLBACKS
    _schedulerPhase = SchedulerPhase.postFrameCallbacks;
    final List<FrameCallback> localPostFrameCallbacks =
        List<FrameCallback>.of(_postFrameCallbacks);
    _postFrameCallbacks.clear();
    for (final FrameCallback callback in localPostFrameCallbacks) {
      _invokeFrameCallback(callback, _currentFrameTimeStamp!);
    }
  } finally {
    _schedulerPhase = SchedulerPhase.idle;
    _frameTimelineTask?.finish(); // end the Frame
    assert(() {
      if (debugPrintEndFrameBanner) {
        debugPrint('▀' * _debugBanner!.length);
      }
      _debugBanner = null;
      return true;
    }());
    _currentFrameTimeStamp = null;
  }
}
|
_persistentCallbacks 是在RendererBinding的initInstances方法中调用addPersistentFrameCallback方法注册,之前讲过,这里直接看 _handlePersistentFrameCallback 方法。
1
2
3
4
5
|
void _handlePersistentFrameCallback(Duration timeStamp) {
  // 泵送渲染管道以生成帧
  drawFrame();
  _scheduleMouseTrackerUpdate();
}
|
看下RendererBinding的drawFrame方法。
 1
 2
 3
 4
 5
 6
 7
 8
 9
10
11
12
13
|
@protected
void drawFrame() {
  // 系统中所有脏的RenderObject都被布局
  // 该函数是渲染管线的核心阶段之一。在绘制之前会清理布局信息,以便渲染对象将出现在屏幕上的最新位置
  pipelineOwner.flushLayout();
  pipelineOwner.flushCompositingBits();
  pipelineOwner.flushPaint();
  if (sendFramesToEngine) {
    renderView.compositeFrame(); // this sends the bits to the GPU
    pipelineOwner.flushSemantics(); // this also sends the semantics to the OS.
    _firstFrameSent = true;
  }
}
|
看下PipelineOwner的flushLayout方法。
 1
 2
 3
 4
 5
 6
 7
 8
 9
10
11
12
13
14
15
16
17
18
19
20
21
22
23
24
25
26
27
28
29
30
31
32
33
34
35
36
37
38
39
40
41
42
43
|
void flushLayout() {
  ...
  try {
    while (_nodesNeedingLayout.isNotEmpty) {
      assert(!_shouldMergeDirtyNodes);
      // 此时_nodesNeedingLayout中只有一个RenderView,然后赋值给dirtyNodes
      final List<RenderObject> dirtyNodes = _nodesNeedingLayout;
      // 创建新的_nodesNeedingLayout,相当于清空了_nodesNeedingLayout
      _nodesNeedingLayout = <RenderObject>[];
      // 对dirtyNodes进行渲染树按深度从小到大排序
      dirtyNodes.sort((RenderObject a, RenderObject b) => a.depth - b.depth);
      // 遍历dirtyNodes
      for (int i = 0; i < dirtyNodes.length; i++) {
        // _shouldMergeDirtyNodes默认为false,这里不执行
        if (_shouldMergeDirtyNodes) {
          _shouldMergeDirtyNodes = false;
          if (_nodesNeedingLayout.isNotEmpty) {
            _nodesNeedingLayout.addAll(dirtyNodes.getRange(i, dirtyNodes.length));
            break;
          }
        }
        // 从dirtyNodes中取出RenderView,执行_layoutWithoutResize方法
        final RenderObject node = dirtyNodes[i];
        if (node._needsLayout && node.owner == this) {
          node._layoutWithoutResize();
        }
      }
      // No need to merge dirty nodes generated from processing the last
      // relayout boundary back.
      _shouldMergeDirtyNodes = false;
    }

    ...
    // 这里_children为空,不执行
    for (final PipelineOwner child in _children) {
      child.flushLayout();
    }
    assert(_nodesNeedingLayout.isEmpty, 'Child PipelineOwners must not dirty nodes in their parent.');
  } finally {
    _shouldMergeDirtyNodes = false;
    ...
  }
}
|
看下RenderObject的 _layoutWithoutResize 方法。
 1
 2
 3
 4
 5
 6
 7
 8
 9
10
11
12
13
14
15
16
17
|
@pragma('vm:notify-debugger-on-exception')
void _layoutWithoutResize() {
  assert(_relayoutBoundary == this);
  ...
  try {
    // 执行这里
    performLayout();
    markNeedsSemanticsUpdate();
  } catch (e, stack) {
    _reportException('performLayout', e, stack);
  }
  ...
  // RenderView已经布局完成,不需要再布局
  _needsLayout = false;
  // 将渲染对象RenderView标记为需要绘制,从而安排视觉更新
  markNeedsPaint();
}
|
此处执行RenderObject的performLayout方法,该方法由子类RenderView实现。
 1
 2
 3
 4
 5
 6
 7
 8
 9
10
11
12
|
@override
void performLayout() {
  assert(_rootTransform != null);
  // 获取屏幕大小约束
  _size = configuration.size;
  assert(_size.isFinite);

  // 对子组件CustomRenderPositionedBox执行严格约束,也就是要求子组件和屏幕一样大小
  if (child != null) {
    child!.layout(BoxConstraints.tight(_size));
  }
}
|
3.3、RenderObject的layout方法
这里执行了CustomRenderPositionedBox父类RenderObject的layout方法。
 1
 2
 3
 4
 5
 6
 7
 8
 9
10
11
12
13
14
15
16
17
18
19
20
21
22
23
24
25
26
27
28
29
30
31
32
33
34
35
36
37
38
39
40
41
42
43
44
45
46
47
48
49
50
51
52
53
54
55
56
57
58
59
60
61
62
63
64
65
66
67
68
69
70
|
Constraints? _constraints;  // 上次布局时父组件传递给当前组件的约束

bool _needsLayout = true;   // 当前组件是否被标记为需要布局

RenderObject? _relayoutBoundary;  // 上次布局时当前组件的布局边界

@pragma('vm:notify-debugger-on-exception')
void layout(Constraints constraints, { bool parentUsesSize = false }) {
  ...
  // 因为parentUsesSize没有传入,取默认值为false,所以isRelayoutBoundary为true
  // isRelayoutBoundary表示该child(也就是CustomRenderPositionedBox)是否是布局边界
  final bool isRelayoutBoundary = !parentUsesSize || sizedByParent || constraints.isTight || parent is! RenderObject;
  // 因为parentUsesSize为false,表示当前组件父组件的大小不依赖当前组件大小,所以CustomRenderPositionedBox自身就是布局边界
  // 分析一
  final RenderObject relayoutBoundary = isRelayoutBoundary ? this : parent!._relayoutBoundary!;
  ...

  // _needsLayout为true,这里不执行
  // 这里的判断意思:当当前组件没有被标记为需要重新布局,且父组件传递的约束没有发生变化时,就看布局边界有无发生变化
  if (!_needsLayout && constraints == _constraints) {
    ...
    // 如果当前组件的布局边界与上一次不同,那么更新当前组件的布局边界,并且向上递归查询对应的布局边界,整个操作相当于把父组件的布局边界传递给子组件
    if (relayoutBoundary != _relayoutBoundary) {
      _relayoutBoundary = relayoutBoundary;
      // 分析二
      visitChildren(_propagateRelayoutBoundaryToChild);
    }
    ...
    return;
  }
  // 缓存来自父组件的约束,后面当前组件需要时可以使用该约束
  _constraints = constraints;
  // _relayoutBoundary为null,这里不执行
  if (_relayoutBoundary != null && relayoutBoundary != _relayoutBoundary) {
    // 本地重新布局边界已更改,必须通知子级,以防它们也需要更新。否则,它们稍后会对实际的重新布局边界感到困惑。
    // The local relayout boundary has changed, must notify children in case
    // they also need updating. Otherwise, they will be confused about what
    // their actual relayout boundary is later.
    visitChildren(_cleanChildRelayoutBoundary);
  }
  // 更新当前组件的布局边界
  _relayoutBoundary = relayoutBoundary;
  ...
  // 后面解释
  if (sizedByParent) {
    ...
    try {
      performResize();
      ...
    } catch (e, stack) {
      _reportException('performResize', e, stack);
    }
    ...
  }
  ...
  try {
    // 执行当前组件的performLayout方法,也就是CustomRenderPositionedBox的performLayout方法
    performLayout();
    markNeedsSemanticsUpdate();
    ...
  } catch (e, stack) {
    _reportException('performLayout', e, stack);
  }
  ...
  // 布局结束后将_needsLayout置为false
  _needsLayout = false;
  // 将当前组件标记为需要重绘,因为布局发生变化后,需要重新绘制
  markNeedsPaint();
  ...
}
|
分析一:关于relayoutBoundary
理论上,某个组件的布局变化后,就可能会影响其它组件的布局,所以当有组件布局发生变化后,最笨的办法是对整棵组件树relayout(重新布局)!但是对所有组件进行relayout的成本还是太大,所以需要探索一下降低relayout成本的方案。实际上,在一些特定场景下,组件发生变化后只需要对部分组件进行重新布局即可(而无需对整棵树relayout)。
假如有一个页面的组件树结构如下图所示:
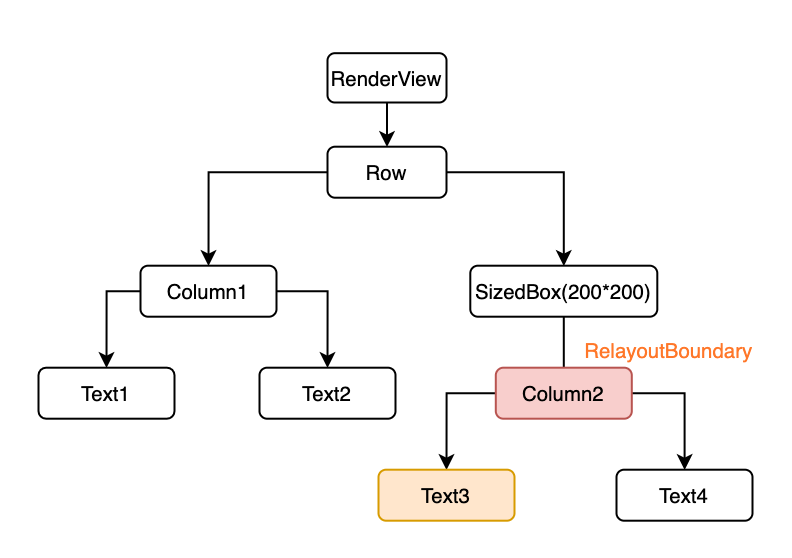
假如Text3的文本长度发生变化,则会导致Text4的位置和Column2的大小也会变化;又因为Column2的父组件SizedBox已经限定了大小,所以SizedBox的大小和位置都不会变化。所以最终需要进行relayout的组件是:Text3、Column2,这里需要注意:
1、Text4是不需要重新布局的,因为Text4的大小没有发生变化,只是位置发生变化,而它的位置是在父组件Column2布局时确定的。
2、很容易发现:假如Text3和Column2之间还有其它组件,则这些组件也都是需要relayout的。
在本例中,Column2就是Text3的relayoutBoundary(重新布局的边界节点)。每个组件的renderObject中都有一个 _relayoutBoundary 属性指向自身的布局边界节点,如果当前节点布局发生变化后,自身到其布局边界节点路径上的所有的节点都需要relayout。
那么,一个组件是否是relayoutBoundary的条件是什么呢?这里有一个原则和四个场景,原则是“组件自身的大小变化不会影响父组件”,如果一个组件满足以下四种情况之一,则它便是relayoutBoundary:
1、当前组件父组件的大小不依赖当前组件大小时;这种情况下父组件在布局时会调用子组件布局函数时并会给子组件传递一个parentUsesSize参数,该参数为false时表示父组件的布局算法不会依赖子组件的大小。
2、组件的大小只取决于父组件传递的约束,而不会依赖后代组件的大小。这样的话后代组件的大小变化就不会影响自身的大小了,这种情况组件的sizedByParent属性必须为true(后面再讲)。
3、父组件传递给自身的约束是一个严格约束(固定宽高,下面会讲);这种情况下即使自身的大小依赖后代元素,但也不会影响父组件。
4、组件为根组件;Flutter应用的根组件是RenderView,它的默认大小是当前设备屏幕大小。
对应的代码实现为:
1
2
|
final bool isRelayoutBoundary = !parentUsesSize || sizedByParent || constraints.isTight || parent is! RenderObject;
final RenderObject relayoutBoundary = isRelayoutBoundary ? this : parent!._relayoutBoundary!;
|
分析二:
这里visitChildren方法会递归执行RenderObject的 _propagateRelayoutBoundaryToChild 方法。
 1
 2
 3
 4
 5
 6
 7
 8
 9
10
11
12
13
14
15
16
17
|
static void _propagateRelayoutBoundaryToChild(RenderObject child) {
  child._propagateRelayoutBoundary();
}

void _propagateRelayoutBoundary() {
  // 当向上找到对应的布局边界时,终止递归
  if (_relayoutBoundary == this) {
    return;
  }
  // 递归向上查询父组件的布局边界,直到父组件的布局边界与当前组件的布局边界相等
  final RenderObject? parentRelayoutBoundary = parent?._relayoutBoundary;
  assert(parentRelayoutBoundary != null);
  if (parentRelayoutBoundary != _relayoutBoundary) {
    _relayoutBoundary = parentRelayoutBoundary;
    visitChildren(_propagateRelayoutBoundaryToChild);
  }
}
|
OK,继续看CustomRenderPositionedBox的performLayout方法,可以看到继续执行RenderObject的layout方法,很明显这是一个递归的过程,递归结束后整个组件树的布局也就完成了。
1
2
3
4
|
child!.layout(
  constraints.loosen(), // 对子组件实行宽松约束
  parentUsesSize: true, // 如果接下来想要使用child的size,parentUsesSize就需要设置为true
);
|
四、扩展
4.1、sizedByParent属性
在RenderObject的layout方法中,有如下逻辑:
1
2
3
4
5
6
7
|
if (sizedByParent) {
  try {
    performResize();
  } catch (e, stack) {
    _reportException('performResize', e, stack);
  }
}
|
上面说过sizedByParent为true时表示:当前组件的大小只取决于父组件传递的约束,而不会依赖后代组件的大小。
前面也说过,performLayout中确定当前组件的大小时通常会依赖子组件的大小,如果sizedByParent为true,则当前组件的大小就不依赖子组件大小了,为了逻辑清晰,Flutter框架中约定,当sizedByParent为true时,确定当前组件大小的逻辑应抽离到 performResize中,这种情况下performLayout主要的任务便只有两个:对子组件进行布局和确定子组件在当前组件中的布局起始位置偏移。
下面通过一个CustomSizeBox示例来演示一下sizedByParent为true时应该如何布局。在此之前,先讲下关于SizeBox的一个小问题:Flutter中的SizedBox组件会将其父组件的约束传递给其子组件,这也就意味着,如果父组件限制了最小宽度为100,即使我们通过SizedBox指定宽度为50,那也是没用的,因为SizedBox的实现中会让SizedBox的子组件先满足SizedBox父组件的约束。例如在AppBar中限制Loading组件大小。
 1
 2
 3
 4
 5
 6
 7
 8
 9
10
11
12
13
14
15
16
17
18
19
20
|
void main() {
  runApp(
    MaterialApp(
      home: Scaffold(
        appBar: AppBar(
          actions: const [
            SizedBox(
              width: 20,
              height: 20,
              child: CircularProgressIndicator(
                strokeWidth: 3,
                valueColor: AlwaysStoppedAnimation(Colors.white),
              ),
            ),
          ],
        ),
      ),
    ),
  );
}
|
之所以不生效,是因为父组件限制了最小高度,当然这里还是可以使用UnconstrainedBox + SizedBox来实现想要的效果。
 1
 2
 3
 4
 5
 6
 7
 8
 9
10
11
12
13
14
15
16
17
18
19
20
21
22
23
24
25
26
27
28
29
30
|
void main() {
  runApp(
    MaterialApp(
      home: Scaffold(
        appBar: AppBar(
          actions: const [
            SizedBox(
              width: 20,
              height: 20,
              child: CircularProgressIndicator(
                strokeWidth: 3,
                valueColor: AlwaysStoppedAnimation(Colors.white),
              ),
            ),
            UnconstrainedBox(
              child: SizedBox(
                width: 20,
                height: 20,
                child: CircularProgressIndicator(
                  strokeWidth: 3,
                  valueColor: AlwaysStoppedAnimation(Colors.white),
                ),
              ),
            ),
          ],
        ),
      ),
    ),
  );
}
|
但是这里希望通过一个组件就能搞定,为此可以自定义一个CustomSizedBox组件,它和SizedBox的主要区别是CustomSizedBox自身会遵守其父组件传递的约束而不是让其子组件去满足CustomSizedBox父组件的约束,具体如下:
1、CustomSizedBox自身大小只取决于父组件的约束和用户指定的宽高。
2、CustomSizedBox确定自身大小后,限制其子组件大小。
 1
 2
 3
 4
 5
 6
 7
 8
 9
10
11
12
13
14
15
16
17
18
19
20
21
22
23
24
25
26
27
28
29
30
31
32
33
34
35
36
37
38
39
40
41
42
43
44
45
46
47
48
49
50
51
52
53
54
55
56
57
58
59
60
61
62
63
64
65
66
67
68
69
70
71
72
73
74
75
76
77
78
79
80
81
82
|
class CustomSizeBox extends SingleChildRenderObjectWidget {
  final double width;
  final double height;

  const CustomSizeBox({
    super.key,
    required super.child,
    this.width = 0,
    this.height = 0,
  });

  @override
  RenderObject createRenderObject(BuildContext context) {
    return CustomRenderSizeBox(width: width, height: height);
  }

  @override
  void updateRenderObject(BuildContext context, covariant CustomRenderSizeBox renderObject) {
    renderObject
      ..width = width
      ..height = height;
  }
}

class CustomRenderSizeBox extends RenderProxyBoxWithHitTestBehavior {
  CustomRenderSizeBox({
    double width = 0,
    double height = 0,
  })  : _width = width,
        _height = height;

  double get width => _width;
  double _width;

  set width(double value) {
    if (_width == value) {
      return;
    }
    _width = value;
    markNeedsLayout();
  }

  double get height => _height;
  double _height;

  set height(double value) {
    if (_height == value) {
      return;
    }
    _height = value;
    markNeedsLayout();
  }

  // CustomRenderSizeBox的大小只取决于父组件传递的约束
  @override
  bool get sizedByParent => true;

  @override
  Size computeDryLayout(BoxConstraints constraints) {
    // 设置CustomRenderSizeBox自身的size,遵守父组件的约束
    return constraints.constrain(Size(_width, _height));
  }

  @override
  void performLayout() {
    child!.layout(
      // 约束子组件的宽高为CustomRenderSizeBox与子组件之间宽高的最小值
      BoxConstraints.tight(Size(min(size.width, _width), min(size.height, _height))),
      // parentUseSize为false时,子组件的布局边界会是它自身,子组件布局发生变化后不会影响CustomSizedBox组件
      parentUsesSize: false,
    );
  }

  @override
  void paint(PaintingContext context, Offset offset) {
    // 打印CustomRenderSizeBox的背景,看下它的大小
    if (kDebugMode) {
      context.canvas.drawRect(offset & size, Paint()..color = Colors.redAccent);
    }
    super.paint(context, offset);
  }
}
|
上面代码有三点需要注意:
1、CustomRenderSizeBox不再直接继承自RenderBox,而是继承自 RenderProxyBoxWithHitTestBehavior,RenderProxyBoxWithHitTestBehavior是间接继承自RenderBox的,它里面包含了默认的命中测试和绘制相关逻辑,继承自它后就不用我们再手动实现了。
2、这里将确定当前组件大小的逻辑挪到了computeDryLayout方法中,因为RenderBox的performResize方法会调用computeDryLayout,并将返回结果作为当前组件的大小。
按照Flutter框架约定,开发者应该重写computeDryLayout方法而不是performResize方法,就像在布局时应该重写performLayout方法而不是layout方法;不过这只是一个约定并非强制,但应该尽可能遵守这个约定,除非你清楚的知道自己在干什么并且能确保之后维护你代码的人也清楚。
3、CustomRenderSizeBox在调用子组件layout时,将parentUsesSize置为false,这样的话子组件就会变成一个布局边界。
 1
 2
 3
 4
 5
 6
 7
 8
 9
10
11
12
13
14
15
16
17
18
19
20
21
22
23
24
25
26
27
28
29
30
31
32
33
34
35
36
37
38
|
void main() {
  runApp(
    MaterialApp(
      home: Scaffold(
        appBar: AppBar(
          actions: const [
            SizedBox(
              width: 20,
              height: 20,
              child: CircularProgressIndicator(
                strokeWidth: 3,
                valueColor: AlwaysStoppedAnimation(Colors.white),
              ),
            ),
            UnconstrainedBox(
              child: SizedBox(
                width: 20,
                height: 20,
                child: CircularProgressIndicator(
                  strokeWidth: 3,
                  valueColor: AlwaysStoppedAnimation(Colors.white),
                ),
              ),
            ),
            CustomSizeBox(
              width: 20,
              height: 20,
              child: CircularProgressIndicator(
                strokeWidth: 3,
                valueColor: AlwaysStoppedAnimation(Colors.white),
              ),
            ),
          ],
        ),
      ),
    ),
  );
}
|
可以发现,当父组件AppBar约束子组件大小宽高是56时,我们通过SizedBox指定CircularProgressIndicator大小是为20 × 20是不能成功的,而通过CustomSizeBox时成功了。
这里需要提醒一下,如果一个组件的sizedByParent为true,那它在布局子组件时也是能将 parentUsesSize置为true的,sizedByParent为true表示自己是布局边界,而将 parentUsesSize置为true或false决定的是子组件是否是布局边界,两者并不矛盾,这个不要混淆了。
顺便提一点Flutter自带的OverflowBox组件的实现中,它的sizedByParent为 true,在调用子组件layout方法时,parentUsesSize传的是true,具体详情可以查看 OverflowBox的实现源码。
4.2、markNeedsLayout方法
当组件布局发生变化时,它需要调用markNeedsLayout方法来更新布局,它的功能主要有两个:
1、将自身到其relayoutBoundary路径上的所有节点标记为“需要布局”。
2、请求新的frame,在新的frame中会对标记为“需要布局”的节点重新布局。
 1
 2
 3
 4
 5
 6
 7
 8
 9
10
11
12
13
14
15
16
17
18
19
20
21
22
23
24
25
26
27
28
29
30
31
32
33
34
35
|
void markNeedsLayout() {
  assert(_debugCanPerformMutations);
  // 如果_needsLayout为true,说明上一次还没布局完成,直接返回
  if (_needsLayout) {
    assert(_debugSubtreeRelayoutRootAlreadyMarkedNeedsLayout());
    return;
  }
  // 如果布局边界为null,说明已经在layout方法中被清理过了
  if (_relayoutBoundary == null) {
    _needsLayout = true;
    if (parent != null) {
      // _relayoutBoundary由RenderObject.layout中的祖先清理。保守地将所有内容标记为脏,直到它到达最近的已知重新布局边界。
      // _relayoutBoundary is cleaned by an ancestor in RenderObject.layout.
      // Conservatively mark everything dirty until it reaches the closest
      // known relayout boundary.
      // 递归调用当前组件到其布局边界节点路径上所有组件的方法markNeedsLayout
      markParentNeedsLayout();
    }
    return;
  }
  // 如果不是布局边界节点
  if (_relayoutBoundary != this) {
    // 递归调用当前组件到其布局边界节点路径上所有组件的方法markNeedsLayout
    markParentNeedsLayout();
  } else {
    _needsLayout = true;
    if (owner != null) {
      ...
      // 将布局边界组件加入到pipelineOwner._nodesNeedingLayout列表中
      owner!._nodesNeedingLayout.add(this);
      // 该方法最终会请求新的frame
      owner!.requestVisualUpdate();
    }
  }
}
|
看下markParentNeedsLayout方法。
 1
 2
 3
 4
 5
 6
 7
 8
 9
10
11
12
13
14
15
|
@protected
void markParentNeedsLayout() {
  assert(_debugCanPerformMutations);
  _needsLayout = true;
  assert(this.parent != null);
  final RenderObject parent = this.parent!;
  // 此渲染对象的invokeLayoutCallback当前是否正在运行
  if (!_doingThisLayoutWithCallback) {
    // 执行父组件的markNeedsLayout
    parent.markNeedsLayout();
  } else {
    assert(parent._debugDoingThisLayout);
  }
  assert(parent == this.parent);
}
|
再看下requestVisualUpdate方法。
1
2
3
4
5
6
7
8
|
void requestVisualUpdate() {
  if (onNeedVisualUpdate != null) {
    onNeedVisualUpdate!();
  } else {
    // 此处执行RendererBinding的ensureVisualUpdate方法,内部会使用scheduleFrame调度一个新帧
    _manifold?.requestVisualUpdate();
  }
}
|
五、参考文献